An Introduction to JavaServer Faces (JSF) 8
What do we have in this session 8?
-
Creating Template Client Files
-
The greeting.xhtml File
Creating Template Client Files
Create template client files for the welcome and response pages. Name the template client file for the welcome page greeting.xhtml. For the response page, the file will be response.xhtml.
|
|
The greeting.xhtml File
|

- Type in greeting for the file name.
- Click the Browse button next to the Template field, and then use the dialog that displays to navigate to the template.xhtml file you created in the previous section.
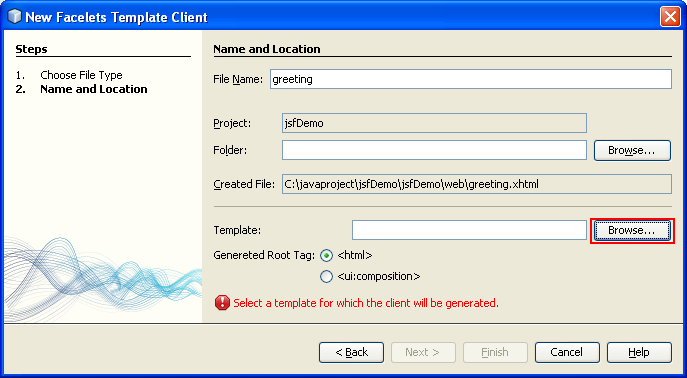


- Click Finish. The new greeting.xhtml template client file is generated and displays in the editor.
- Examine the markup. Note the content highlighted in bold.
<html xmlns="http://www.w3.org/1999/xhtml"xmlns:ui="http://java.sun.com/jsf/facelets"><body><ui:composition template="./template.xhtml"><ui:define name="title">title</ui:define><ui:define name="box">box</ui:define></ui:composition></body></html>
The following is the screenshot.
----------------------------------------------------------------------

The template client file references a template using the <ui:composition> tag's template attribute. Because the template contains <ui:insert> tags for title and box, this template client contains <ui:define> tags for these two names. The content that you specify between the <ui:define> tags is what will be inserted into the template between the <ui:insert> tags of the corresponding name.
- Specify greeting as the title for the file. Make the following change in bold.
<ui:define name="title">
Greeting
</ui:define>
- Switch to the index.xhtml file (press Ctrl-Tab) and copy the content that would normally appear in the grey square that displays in the rendered page. Then switch back to greeting.xhtml and paste it into the template client file.

- Declare the JSF HTML tag library for the file. Place your cursor on any of the tags that are flagged with an error (any tag using the 'h' prefix), and press Ctrl-Space.
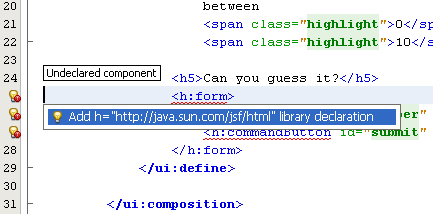
Then select the tag from the list of code completion suggestions. The tag library namespace is added to the file's <html> tag (shown in bold below), and the error indicators disappear.
<html xmlns="http://www.w3.org/1999/xhtml"
xmlns:ui="http://java.sun.com/jsf/facelets"
xmlns:h="http://java.sun.com/jsf/html">
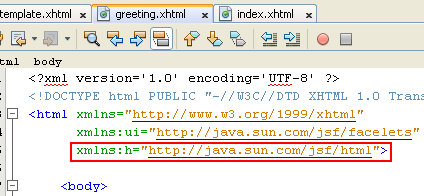
If you place your cursor after the 'm' in <h:form> and press Ctrl-Space, the namespace is automatically added to the file. If only one logical option is available when pressing Ctrl-Space, it is immediately applied to the file. JSF tag libraries are automatically declared when invoking code completion on tags.
< JavaServer Faces (JSF) 7 | Java and Friends | JavaServer Faces (JSF) 9 >