An Introduction to JavaServer Faces (JSF) 4
What do we have in this session 4?
-
Wiring Managed Beans to Pages
-
The index.xhtml File
|
|
Wiring Managed Beans to Pages
One of the primary purposes of JSF is to remove the need to write boilerplate code to manage POJOs and their interaction with the application's views. You saw an example of this in the previous section, where JSF instantiated a UserNumberBean object when you ran the application. This notion is referred to as Inversion of Control (IoC), which enables the container to take responsibility for managing portions of the application that would otherwise require the developer to write repetitious code. In the previous section you created a managed bean that generates a random number between 0 and 10. You also created two properties, userNumber, and response, which represent the number input by the user, and the response to a user guess, respectively. In this section, you explore how you can use the UserNumberBean and its properties in web pages. JSF enables you to do this using its expression language (EL). You use the expression language to bind property values to JSF's UI components contained in your application's web pages. This section also demonstrates how you can take advantage of JSF 2.0's implicit navigation feature to navigate between the index and response pages. The IDE provides support for this work through its code completion and documentation facilities, which you can invoke by pressing Ctrl-Space on items in the editor. Start by making changes to index.xhtml, and then make changes to response.xhtml. In both pages, replace HTML form elements with their JSF counterparts, as they are defined in the JSF HTML tag library. Then, use the JSF expression language to bind property values with selected UI components.
The index.xhtml File
1. Open the index.xhtml page in the editor. Either double-click the index.xhtml node from the Projects window, or press Alt-Shift-O to use the Go to File dialog. Both index and response pages already contain the JSF UI components you require for this exercise. Simply uncomment them and comment out the HTML elements currently being used. 2. Comment out the HTML form element. To do so, highlight the HTML form element as in the image below, then press Ctrl-/ (⌘-/ on Mac).
Note: To highlight, either click and drag in the editor with your mouse, or, using the keyboard, hold Shift and press the arrow keys. Use Ctrl-/ (⌘-/ on Mac) to toggle comments in the editor. You can also apply this keyboard shortcut to other file types, such as Java and CSS.
|

Uncomment the JSF HTML form component. Highlight the component as in the image below, then press Ctrl-/ (⌘-/ on Mac).
--------------------------------------------------------------------------------------------------------------------------------------

After uncommenting the JSF HTML form component, the editor indicates that the <h:form>, <h:inputText>, and <h:commandButton> tags haven't been declared.
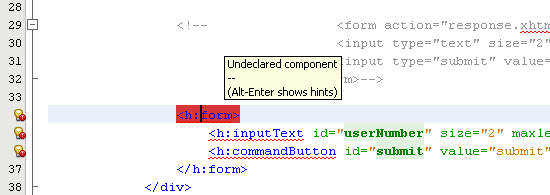
To declare these components, use the IDE's code completion to add the tag library namespace to the page's <html> tag. Place your cursor on any of the undeclared tags and press Ctrl-Space. Code completion suggestions and documentation support displays.

Click Enter. (If there are multiple options, make sure to select the tag that is displayed in the editor before clicking Enter.) The JSF HTML tag library namespace is added to the <html> tag (shown below), and the error indicators disappear.

Use the JSF expression language to bind UserNumberBean's userNumber property to the inputText component. The value attribute can be used to specify the current value of the rendered component. Type in the code displayed in bold below.
<h:form>
<h:inputText id="userNumber" size="2" maxlength="2" value="#{UserNumberBean.userNumber}"/>
<h:commandButton id="submit" value="submit" />
</h:form>

JSF expression language uses the
#{}
syntax. Within these delimiters, you specify the name of the managed bean and
the bean property you want to apply, separated by a dot (.).
Now, when the form data is sent to the server, the value is automatically saved
in the userNumber
property using the property's setter (setUserNumber()).
Also, when the page is requested and a value for
userNumber
has already been set, the value will automatically display in the rendered
inputText
component.
Specify the destination for the request that is invoked when clicking the form button. In the HTML version of the form, you were able to do this using the <form> tag's action attribute. With JSF, you can use the commandButton's action attribute. Furthermore, due to JSF 2.0's implicit navigation feature, you only need to specify the name of the destination file, without the file extension. Type in the code displayed in bold below.
<h:form><h:inputText size="2" maxlength="2" value="#{UserNumberBean.userNumber}" /><h:commandButton id="submit" value="submit" action="response" /></h:form>

The JSF runtime searches for a file named response.xhtml. It assumes the file extension is the same as the extension used by file from which the request originated (index.xhtml) and looks for the response.xhtml file in the same directory as the originating file (i.e., the webroot).
Note: JSF 2.0 aims to make developers' tasks much easier. If you were using JSF 1.2 for this project, you would need to declare a navigation rule in a Faces configuration file that would look similar to the following:
<navigation-rule><from-view-id>/index.xhtml</from-view-id><navigation-case><from-outcome>response</from-outcome><to-view-id>/response.xhtml</to-view-id></navigation-case></navigation-rule>
< JavaServer Faces (JSF) 3 | Java and Friends | JavaServer Faces (JSF) 5 >