An Introduction to JavaServer Faces (JSF) 2
What do we have in this session 2?
-
Creating a Managed Bean
-
Using the Managed Bean Wizard
-
Creating a Constructor
Creating a Managed Bean
You can use JSF's managed beans to process user data and retain it between requests. A managed bean is a POJO (Plain Old Java Object) that can be used to store data, and is managed by the container (e.g., the GlassFish server) using the JSF framework.
A POJO is essentially a Java class that contains a public, no argument constructor and conforms to the JavaBeans naming conventions for its properties.
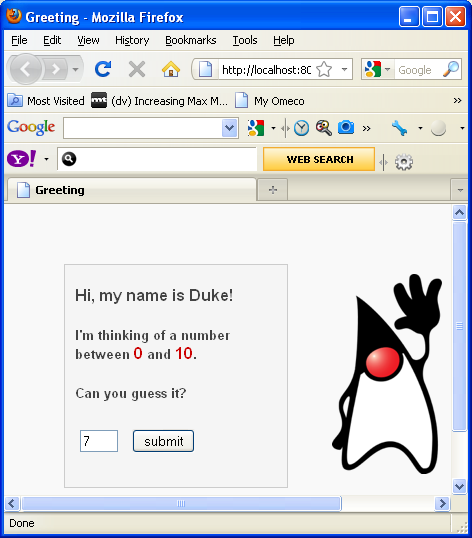
Looking at the static page (index.xhtml) produced from running the project, you need a mechanism that determines whether a user-entered number matches the one currently selected, and returns a view that is appropriate for this outcome. Use the IDE's Managed Bean wizard to create a managed bean for this purpose. The Facelets pages that you create in the next section will need to access the number that the user types in, and the generated response. To enable this, add userNumber and response properties to the managed bean.
|
|
Using the Managed Bean Wizard
1. In the Projects window, right-click the jsfDemo project node and choose New > JSF Managed Bean. (If Managed Bean is not listed, choose Other. Then select the JSF Managed Bean option from the JavaServer Faces category. Click Next.)
|
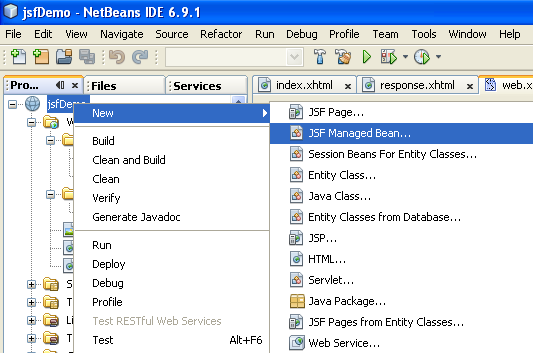
2. In the wizard, enter the following:
a) Class Name: UserNumberBean
b) Package: guessNumber
c) Name: UserNumberBean (be careful with the default given name, change the 'u' to capital letter)
d) Scope: Session

Click Finish. The UserNumberBean class is generated and opens in the editor. Note the following annotations (shown in bold):
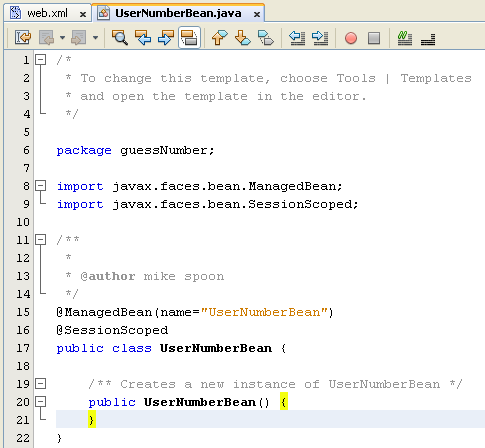
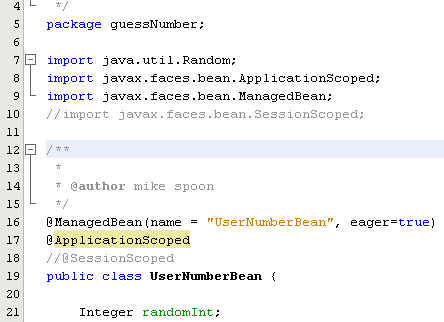
package guessNumber;
import javax.faces.bean.ManagedBean;
import javax.faces.bean.SessionScoped;
/**
*
* @author mike spoon
*/
@ManagedBean(name="UserNumberBean")
@SessionScoped
public class UserNumberBean {
/** Creates a new instance of UserNumberBean */
public UserNumberBean() {
}
}
The following is the JSF managed bean file content screenshot.
Because you are using JSF 2.0, you can declare all JSF-specific components using annotations. In previous versions, you would need to declare them in the Faces configuration file (faces-config.xml).
Creating a Constructor
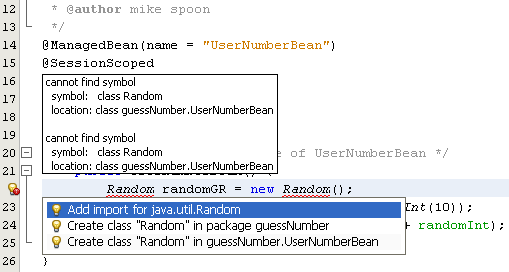
The UserNumberBean constructor must generate a random number between 0 and 10 and store it in an instance variable. This partially forms the business logic for the application.
Define a constructor for the UserNumberBean class (UserNumberBean.java). Enter the following code (changes displayed in bold).
public class UserNumberBean {Integer randomInt;/** Creates a new instance of UserNumberBean */public UserNumberBean() {Random randomGR = new Random();randomInt = new Integer(randomGR.nextInt(10));System.out.println("Duke's number: " + randomInt);}}
The following is the UserNumberBean.java initial file content screenshot.

The above code generates a random number between 0 and 10, and outputs the number in the server log.
Fix imports. To do so, click the hint badge (
![]() )
that displays in the editor's left margin, then choose the option to import
java.util.Random
into the class.
)
that displays in the editor's left margin, then choose the option to import
java.util.Random
into the class.

Run the project again (click the
Run Project (
![]() )
button, or press F6; fn-F6 on Mac). When you run your project, the server's
log file automatically opens in the Output
window.
)
button, or press F6; fn-F6 on Mac). When you run your project, the server's
log file automatically opens in the Output
window.

Notice that you do not see "Duke's number: " listed in the output (as would be indicated from the constructor). A UserNumberBean object was not created because JSF uses lazy instantiation by default. That is, beans in particular scopes are only created and initialized when they are needed by the application.
The Javadoc for the @ManagedBean annotation states:
If the value of the eager() attribute is true, and the managed-bean-scope value is "application", the runtime must instantiate this class when the application starts. This instantiation and storing of the instance must happen before any requests are serviced. If eager is unspecified or false, or the managed-bean-scope is something other than "application", the default "lazy" instantiation and scoped storage of the managed bean happens.
To test this, temporarily modify the UserNumberBean class as follows. (Changes are in bold.)
@ManagedBean(name="UserNumberBean", eager=true)
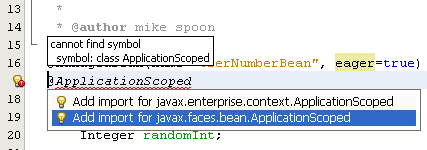
@ApplicationScoped
public class UserNumberBean {
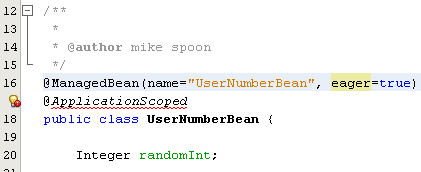
Right-click in the editor and choose Fix Imports (Alt-Shift-I; ⌘-Shift-I on Mac). Use the IDE's fix all imports dialog to add an import for javax.faces.bean.ApplicationScoped and remove the existing import for SessionScoped.
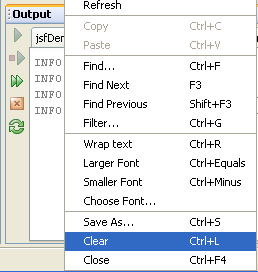
Before running the project, clear the server log. You can do this by right-clicking in the server log in the Output window and choosing Clear (Ctrl-L; ⌘-L on Mac).
-------------------------------------------------------
Run the project again. To do so, you can use the buttons in the left margin of the
Output window. First click the
jsfDemo (run) tab, then click the
Re-run (
![]() )
button to run the project again.
)
button to run the project again.
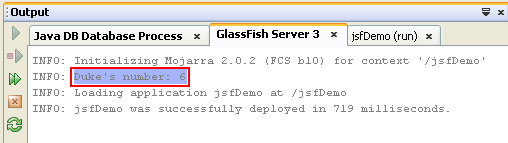
Examine the server's log file. This time you can see the "Duke's number: " string, indicating that a UserNumberBean object was created.

Change the UserNumberBean class back to the way it was. (Revert the changes to original.)
...
...
*/
@ManagedBean(name = "UserNumberBean")
@SessionScoped
public class UserNumberBean {
...
...
The following is the screenshot for the annotation part.

Make sure to add the import statement for javax.faces.bean.SessionScoped and remove the import statement for ApplicationScoped.
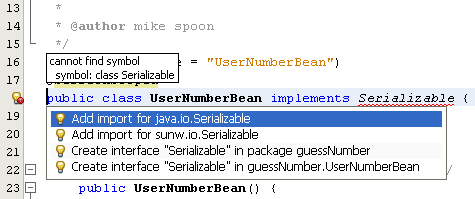
Because UserNumberBean is session-scoped, have it implement the Serializable interface. Edit the source code as shown below.
*/
@ManagedBean(name = "UserNumberBean")
@SessionScoped
public class UserNumberBean implements Serializable {
The following is the screenshot.

Use the hint badge (
![]() )
to import java.io.Serializable into the class.
)
to import java.io.Serializable into the class.
< JavaServer Faces (JSF) 1 | Java and Friends | JavaServer Faces (JSF) 3 >