An Introduction to JavaServer Faces (JSF) 1
What do we have in this session 1?
-
An Introduction
-
Contents
-
Adding JSF 2.0 Support to a Web Application
--------------------------------------------------------------
-
Creating a Managed Bean
-
Using the Managed Bean Wizard
-
Creating a Constructor
-
Adding Properties
-
Wiring Managed Beans to Pages
-
The index.xhtml File
-
Optional Steps: Using NetBeans IDE’s Java Debugger
-
The response.xhtml File
-
Applying a Facelets Template
-
Creating the Facelets Template File
-
Creating Template Client Files
-
The greeting.xhtml File
-
The response.xhtml File
|
|
The original tutorial can be found at netbeans.org and this is a refined version with details step-by-step screenshots and any incorrect information found was rectified. To complete this tutorial, you need the following software and resources.
To compare your project with a working solution, download the completed sample project.
An Introduction
JavaServer Faces (JSF) is a user interface (UI) framework for Java web applications. It is designed to significantly ease the burden of writing and maintaining applications that run on a Java application server and render their UIs back to a target client. JSF provides ease-of-use in the following ways:
This tutorial demonstrates how you can apply JSF 2.0 support to a web application using the NetBeans IDE. You begin by adding JSF 2.0 framework support to a basic web application, and proceed by:
|
Contents
- Adding JSF 2.0 Support to a Web Application
- Creating a Managed Bean
a. Using the Managed Bean Wizard
b. Creating a Constructor
c. Adding Properties
- Wiring the Managed Bean to Pages
a. index.xhtml
b. response.xhtml
- Applying a Facelets Template
a. Creating the Facelets Template File
b. Creating Template Client Files
Adding JSF 2.0 Support to a Web Application
Begin by opening the jsfDemo web application project (please download and unzip the file) in the IDE. Once you have the project opened in the IDE, you can add framework support to it using the project's Properties window.
1.
Click the
Open Project (
![]() )
button in the IDE's main toolbar, or press
Ctrl-Shift-O (⌘-Shift-O
on Mac).
)
button in the IDE's main toolbar, or press
Ctrl-Shift-O (⌘-Shift-O
on Mac).
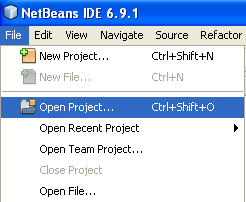
2. In the Open Project dialog, navigate to the location on your computer where you stored the unzipped tutorial project. Select it, and then click Open Project to open it in the IDE.
-----------------------------------------------------------------------------------------------------------

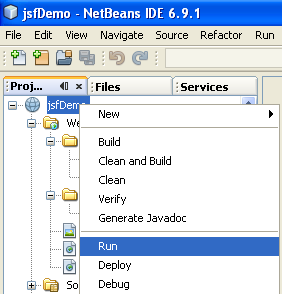
3.
Run the project to see what it looks like in a browser. Either right-click the
jsfDemo project node in the
Projects window and choose
Run, or click the
Run Project (
![]() )
button in the main toolbar. The project is packaged and deployed to the GlassFish
server, and your browser opens to display the welcome page (index.xhtml).
)
button in the main toolbar. The project is packaged and deployed to the GlassFish
server, and your browser opens to display the welcome page (index.xhtml).
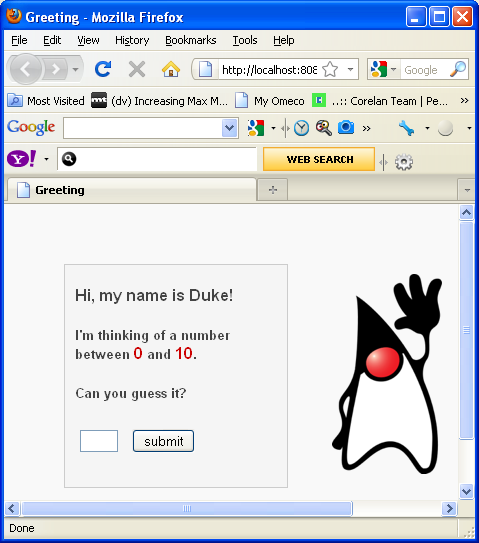
Click the submit button. The response page (response.xhtml) displays as follows.

Currently the welcome and response pages are static and, together with the stylesheet.css file and duke.png image, are the only application files accessible from a browser.
In the Projects window (Ctrl-1; ⌘-1 on Mac), right-click your project node and choose Properties. The Project Properties window displays.
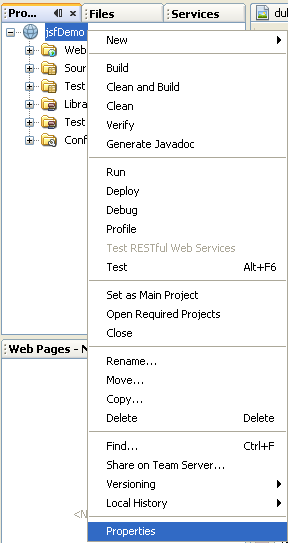
Select the Frameworks category, and then click the Add button. In the dialog that displays, select JavaServer Faces then click OK.


After selecting JavaServer Faces, various configuration options become available. Under the Libraries tab, you can specify how the project accesses JSF 2.0 libraries. The default option is to use the libraries included with the server (the GlassFish server). However, the IDE also bundles the JSF 2.0 libraries. NetBeans 8.9.1 selected the JSF 2.0 by default and the options were grayed.
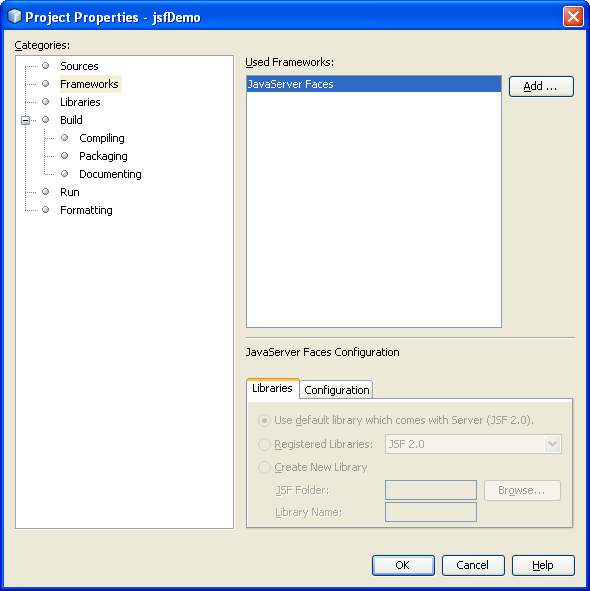
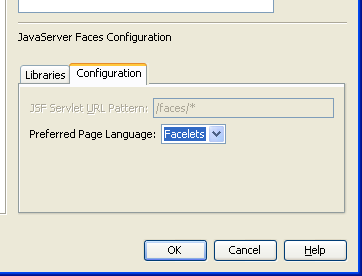
Click the Configuration tab. You can specify how the Faces servlet is registered in the project's deployment descriptor. You can also indicate whether you want Facelets or JSP pages to be the used with the project.
Click OK to finalize changes and exit the Project Properties window.
After adding JSF support to your project, the project's
web.xml
deployment descriptor is modified to look as follows. To open web.xml in the
editor, double click the file in the left pane and edit as shown below. (Changes
are in
bold.)
<web-app version="3.0" xmlns="http://java.sun.com/xml/ns/javaee" xmlns:xsi="http://www.w3.org/2001/XMLSchema-instance" xsi:schemaLocation="http://java.sun.com/xml/ns/javaee http://java.sun.com/xml/ns/javaee/web-app_3_0.xsd">
<context-param>
<param-name>javax.faces.PROJECT_STAGE</param-name>
<param-value>Development</param-value>
</context-param>
<servlet>
<servlet-name>Faces Servlet</servlet-name>
<servlet-class>javax.faces.webapp.FacesServlet</servlet-class>
<load-on-startup>1</load-on-startup>
</servlet>
<servlet-mapping>
<servlet-name>Faces Servlet</servlet-name>
<url-pattern>/faces/*</url-pattern>
</servlet-mapping>
<session-config>
<session-timeout>
30
</session-timeout>
</session-config>
<welcome-file-list>
<welcome-file>faces/index.xhtml</welcome-file>
</welcome-file-list>
</web-app>
The following is the screenshot for web.xml content.

Important: If your <welcome-file> entry does not contain 'faces/', you should add it manually. This ensures that your project's welcome page (index.xhtml) passes through the Faces servlet before being displayed in a browser. This is necessary in order to render the Facelets tag library components properly. See Issue 182277 for more information.
The Faces servlet is registered with the project, and the index.xhtml welcome page is now passed through the Faces servlet when it is requested. Also, note that an entry for the PROJECT_STAGE context parameter has been added. Setting this parameter to 'Development' provides you with useful information when debugging your application.
You can locate the JSF libraries by expanding the project's Libraries node in the Projects window. If you are using the GlassFish server's default libraries, these are the jsf-api.jar and jsf-impl.jar files listed under the GlassFish Server node.
The IDE's JSF 2.0 support primarily includes numerous JSF-specific wizards, and special functionality provided by the Facelets editor. You explore these functional capabilities in the following steps.
< Java and Friends | JavaServer Faces (JSF) 2 >