<NetBeans & Visual Web JSF |Main |Java Web Application 2 >
NetBeans IDE 6.x Tutorial for Java Web Applications part 1
Contents:
-
Machine specification used in this task
-
Terminology
-
Obtaining the required source files
-
Developing the Application
Creating a web project from the provided source files
Creating a front controller using a servlet
Adding the methods to process requests and to create a cookie
Creating the JSP page that receives all the requests
Creating the parameter files used to handle user input
Using JSTL to handle internationalization
Wrapping up
-
Running and Monitoring the Application
Enabling the HTTP Monitor
Verifying the Context Path
Running the application
Monitoring requests and sessions
Monitoring cookies
Monitoring requests for non-existent pages
Enabling internationalization
-
Applying What You Have Learned
-
Exploring Further
-
Glossary
-
Next Steps
In this tutorial, you build a fairly complex web application while being introduced to a number of tools and technologies in NetBeans IDE, as well as a typical web development cycle, from creation to deployment. Beginning with the creating of servlets and JSP pages, the advanced sections of this tutorial show you how to use the JavaServer Pages Standard Tag Library (JSTL) to fetch dynamic data and to internationalize the JSP pages used in this application. You end the tutorial with an introduction to the IDE's HTTP Monitor, which helps you analyze a web application while it is deployed. The original tutorial can be found atnetbeans.org. All credits must go to the original authors. In this tutorial we try to refine all the steps to more details using screen shots.
Machine specification used in this task are:
Terminologies
Below are explanations of some of the terms used in this tutorial.
|
Obtaining the required source files
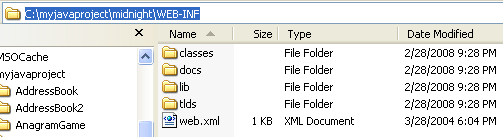
To create the Midnight Cookie Company application, you need themidnight.zip file, which contains the source files on which you build the application. The source files include the WEB-INF folder, which contains the classes, docs, tlds and lib folders that you will use in this tutorial.
1. In your file system, create a folder named midnight. This is where you will unzip the application's files. From now on, we will refer to this folder as $UNZIPHOME.

2. Click here to download the file (in zip).
3. Use an application that unzips files to unzip the midnight.zip file to $UNZIPHOME.$UNZIPHOME now has a WEB-INF folder, which contains the following files and folders:
File or Folder | Description |
web.xml | Deployment descriptor for the web application. |
classes | Contains the resource bundle property files that are used to internationalize the pages and contains the com/midnightcookies/taghandlers folder. The taghandlers folder contains the class files for the ContentHandler tag handler, the ButtonHandler tag handler, and the LinksHandler tag handler. The ContentHandler includes the contents of the specified JSP file. The ButtonHandler prints a submit button with a localized message. The LinksHandler displays a set of links, including a separator, from the tag attribute. |
docs | Contains the header.jsp file, the index.jsp file, and the nonesuch.jsp file. During the tutorial, you will create the main.jsp page and place it in this folder. Also contains the cookies folder, which includes the CookieCutter.jsp file and the CookieMake.jsp file. During the tutorial, you will create the Tray.jsp page and place it in this folder. The about folder contains the about.jsp file, which outlines this web application's architecture. |
lib | Contains the standard.jar file and the jstl.jar file. These two files contain the implementation for the JSTL. The standard.jar contains the TLDs and the tag handlers. The jstl.jar file contains other application program interfaces (APIs) that are needed. |
tlds | Contains the proprietary midnight.tld. |
Developing the Application
Creating a web project from the provided source files:
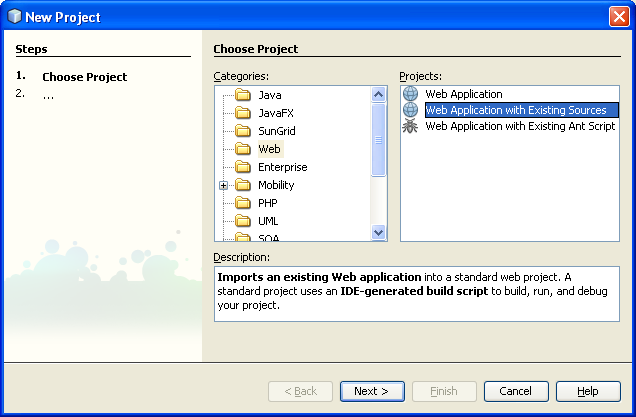
Choose File > New Project (Ctrl-Shift-N). Under Categories, select Web. Under Projects, select Web Project with Existing Sources. Click Next.

In Location, click Browse to select the web application's document root. The document root is $UNZIPHOME, which is called midnight, if you followed the instructions above. This is the folder to which you unzipped the midnight.zip file. You should see the following:
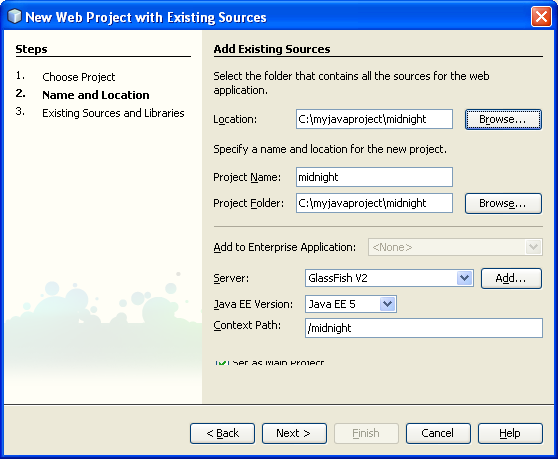
In Project Name, notice that midnight has been set. Capitalize the name to "Midnight", just for display purposes, because project name's initial letter is typically capitalized. Change the Project Location to any folder on your computer. From now on, we will refer to this folder as$PROJECTHOME.
In Server, select the server.
In Java EE Version, make sure that Java EE 5 is selected. Notice that the Context Path is /Midnight. Click Next.

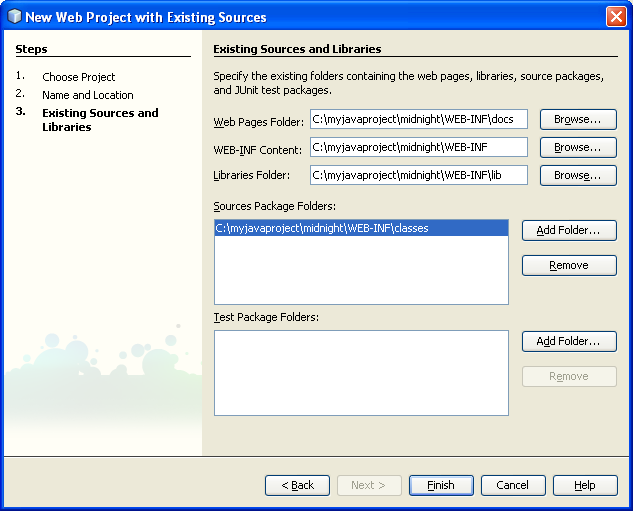
In Web Pages Folder, select the document root ($UNZIPHOME). Notice that the $PROJECTHOME/Midnight/WEB-INF/lib and the $PROJECTHOME/Midnight/WEB-INF/classes folders are automatically selected as your lib and sources folders, respectively, as shown here:
Click Finish.
You are prompted to let the IDE delete your class files, because they will automatically be compiled to your project's build folder when you build the project.
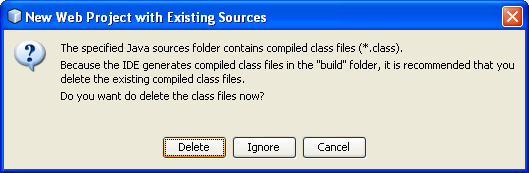
Click Delete to let the IDE do this.
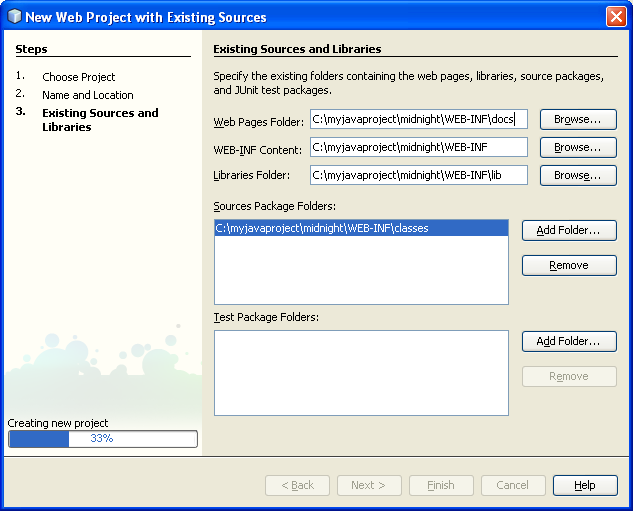
The IDE imports your sources, deletes the class files, and creates the Midnight project in the IDE. You can view its logical structure in the Projects window and its file structure in the Files window.

Creating a front controller using a servlet
A front controller is responsible for routing incoming user requests and can enforce navigation in web applications. A front controller provides a single entry point through which requests for several resources in a web application pass. A front controller can reduce duplication of code in JSP pages, especially in cases where several resources require the same processing. For more information on front controllers, see theJ2EE Patterns catalog.
Expand the Midnight project node and the Source Packages node.
Right-click the com.midnightcookies package node and choose New > Servlet.

Enter FrontController in the Class Name text box and make sure that the com.midnightcookies package is selected in the Package drop-down. Click Next.

Change the value of the URL Pattern(s) text box to the following:
/docs/*, /
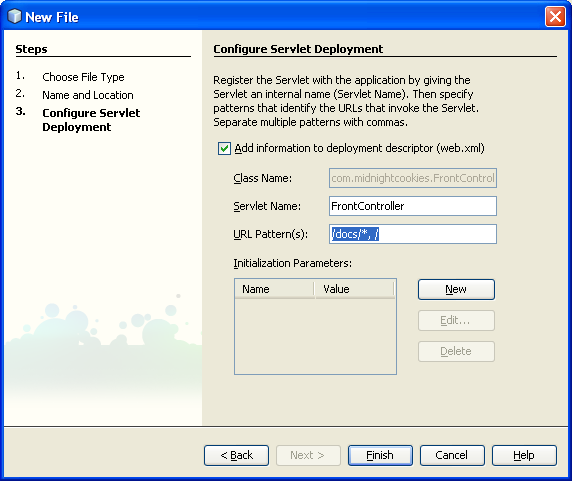
Note that the "," in the line above is a delimiter between URL mappings. It enables you to create multiple URL mappings for each servlet.
Click Finish. FrontController.java opens in the Source Editor.
Expand the Web Pages node and the WEB-INF node. Double-click the web.xml node. The content of the deployment descriptor file, web.xml, is displayed in the graphical editor. Click Servlets at the top of the editor. Expand the node for the FrontController servlet's entry. Notice the servlet's URL Patterns, which you defined in step 4 above:

The servlet mapping "/docs/*" prevents the FrontController servlet from forwarding pages to itself, while the servlet mapping "/" gives the FrontController servlet a servlet mapping to handle a request such as http://hostname:portnumber/midnight/.
Click XML at the top of the editor. The content of the deployment descriptor file is shown in XML format. The servlet mappings are as follows:

Adding the methods to process requests and to create a cookie
Now you will edit the FrontController.java file to include the logic needed to process the requests received by the web application. You will modify the processRequest method and create a new method called createCookie, which demonstrates how to create a cookie used in a web application.
1. Open the Navigator (Ctrl-7) and select the FrontController.java node in the Projects window. You now see the class's methods in the Navigator:
|

2. Double click the processRequest method's node in the Navigator. The Source Editor displays the processRequest method.
3. Replace the default processRequest method with the following code:
protected void processRequest(HttpServletRequest request, HttpServletResponse response)
throws ServletException, IOException {
String id = request.getRequestURI();
id = id.substring(request.getContextPath().length());
getServletContext().log("Midnight Cookies FrontController received a request for " + id);
// The page variable holds the path to the page that will be included
// in the content area of the template page /WEB-INF/docs/main.jsp.
// It is passed to the template in a request attribute.
String page;
// If no request is received or if the request received is
// for the root, serve /WEB-INF/docs/index.jsp
if (id == null || id.trim().equals("") || id.equals("/")){
page = "/WEB-INF/docs/index.jsp";
}
// If a request received is for a file that does not end in
// .jsp or .html, there was an error. Include the
// error page (nonesuch.jsp) and set the nonesuch attribute with
// the path requested.
else if (!id.endsWith(".jsp") && !id.endsWith(".html")) {
page = "/WEB-INF/docs/nonesuch.jsp";
request.setAttribute("nonesuch", id);
}
else {
page = "/WEB-INF".concat(id);
if (id.equals("/docs/cookies/CookieMake.jsp")) {
Cookie cookie = createCookie(request);
if (cookie == null) {
page = "/WEB-INF/docs/cookies/CookieCutter.jsp";
}
else {
response.addCookie(cookie);
request.setAttribute("cookie", cookie);
}
}
}
request.setAttribute("page", page);
try {
request.getRequestDispatcher("/WEB-INF/docs/main.jsp").forward(request, response);
}
catch(Throwable t) {
getServletContext().log(t.getMessage());
}
}

Note: After you enter code (either by typing or copying and pasting) into the Source Editor, place the cursor in the Source Editor and press Alt-Shift-F to automatically format the code. To show line numbers, right-click the left margin and choose Show Line Numbers from the contextual menu.
The line with the call to the createCookie method is underlined and marked as an error, similar to the following illustration. This is because the method does not exist yet.
Click Alt-Enter in the line with the error and notice that the IDE presents a suggestion of how to solve the error:

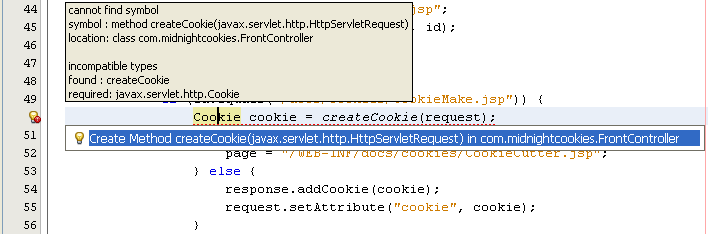
4. Select the suggestion (or press Enter). The IDE creates the skeleton createCookie method at the end of the file.

5. Fill out the new createCookie method by copying the following code and pasting it in the Source Editor:
private Cookie createCookie(HttpServletRequest request) {
String name = (String)request.getParameter("name");
if (name == null || name.trim().equals("")) {
request.setAttribute("noname", "noname");
request.setAttribute("error", "true");
return null;
}
String value = (String)request.getParameter("value");
if (value == null || value.trim().equals("")) {
request.setAttribute("novalue", "novalue");
request.setAttribute("error", "true");
return null;
}
System.out.println(name);
System.out.println(value);
Cookie cookie = null;
try {
cookie = new Cookie(name, value);
}
catch(IllegalArgumentException ex) {
// Probably an illegal name
ex.printStackTrace();
request.setAttribute("error", "true");
request.setAttribute("noname", "badname");
return null;
}
String maxage = request.getParameter("maxage");
if (maxage != null && !maxage.trim().equals("")) {
try {
cookie.setMaxAge(Integer.parseInt(maxage));
}
catch(NumberFormatException nfe) {
nfe.printStackTrace();
request.setAttribute("badnumber", "badnumber");
request.setAttribute("error", "true");
return null;
}
}
String domain = request.getParameter("domain");
if (domain != null && !domain.trim().equals("")) {
cookie.setDomain(domain);
}
String path = request.getParameter("path");
if (path != null && !path.trim().equals("")) {
cookie.setPath(path);
}
String secure = request.getParameter("secure");
if (secure != null && secure.equals("on")) {
cookie.setSecure(true);
} else {
cookie.setSecure(false);
}
return cookie;
}

6. The asterisk in the file's tab at the top of the Source Editor appears whenever there are changes that have not been saved to disk:

Press Ctrl-S (or click save all icon,![]() ) to save the document. The asterisk in the file's tab at the top of the Source Editor disappears.
) to save the document. The asterisk in the file's tab at the top of the Source Editor disappears.
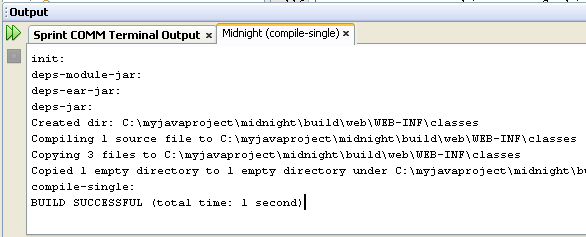
7. Click Build > Compile “FrontController.java” or press F9 to check that there were no errors introduced in the steps you have completed.

The Output window displays messages from the compiler, including any errors. If any, you can double-click the links in the error messages to locate the source of the error. Resolve all errors listed in the Output window before continuing with the tutorial.
Creating the JSP page that receives all the requests
The main.jsp page receives all the requests that the FrontController servlet processes. A dynamic include statement and a LinksHandler are used to create the page.
1. Expand the Midnight project node, the Web Pages node, and the WEB-INF node. Right-click the docs node, choose New > JSP, and name the JavaServer Pages file main. Click Finish. Now main.jsp opens in the Source Editor.


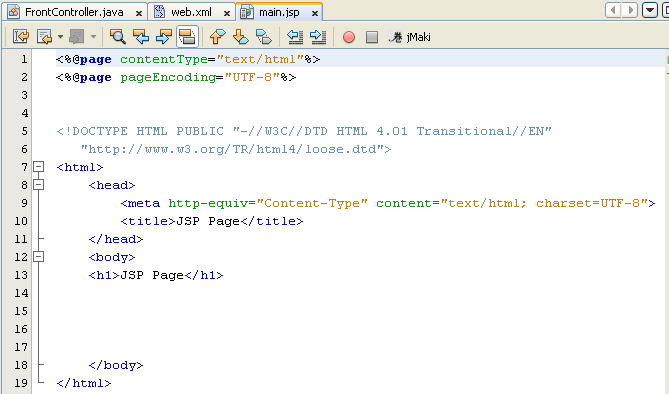
2. In the Source Editor, replace the contents of the main.jsp file with the following code:
<%@page contentType="text/html;charset=UTF-8"%>
<%@page buffer="none"%>
<%-- The <midnight:content/> tag which handles the contents section
is simplistically implemented to use an include. Hence this page cannot be buffered --%>
<%@taglib prefix="midnight" uri="http://www.midnightcookies.com/midnight"%>
<html>
<head><title>The Midnight Cookie Company</title></head>
<body text="#996633" link="#cc6600" vlink="#993300" alink="#000000">
<span font-style="sans-serif">
<TABLE border="0">
<tr>
<table border="0">
<tr><td width="80" height="100"> </td>
<td width="500" height="100"
text="#996633" bgcolor="#ffff99"
valign="center"halign="center">
<jsp:include page="/WEB-INF/docs/header.jsp"
flush="true"/>
</td>
</tr>
<tr><td width="90" height="300"
text="#996633" bgcolor="#ffff99"
valign="top">
<midnight:links separator="<br>"/>
</td>
<td width="500" height="300"
valign="top"cellpadding="15"
cellspacing="15">
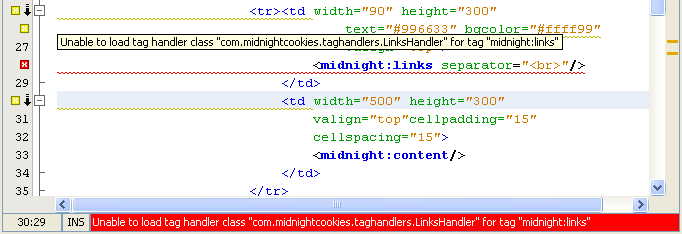
<midnight:content/>
</td>
</tr>
</table>
</tr>
<tr><td width="580" height="50" text="#996633"
bgcolor="#ffff99" valign="top">
<midnight:links separator="|"/>
</td>
</tr>
</TABLE>
</span>
</body>
</html>
Note: After you enter code (either by typing or copying and pasting) into the Source Editor, place the cursor in the Source Editor and press Alt-Shift-F to automatically format the code.
Don’t worry about the error as depicted in the figure; it will disappear when we reload this project and add more files.
3. Press Ctrl-S to save your changes.
Creating the parameter files used to handle user input
The parameter files that you create in this section illustrate the use of tags from tag libraries to handle internationalization. They also show how input is passed through the Request parameters, specifically through the JSP expression language (EL) expression ${param.input}, which is set in the input field of the Input.jsp page.
1. Right-click the docs node and select New > Other from the contextual menu. Under Categories, select Other and under File Types, select Folder. Click Next.
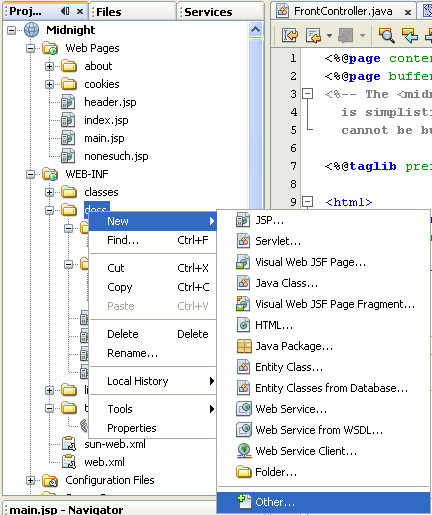

2. In the Name and Location panel, type parameters in the Folder Name text field and click Finish. The new parameters folder appears in the Projects window under the docs node.

3. Right-click the parameters node and choose New > JSP. Type Input in the JSP File Name text field and make sure that WEB-INF/docs/parameters is selected in the Folder text box. Click Finish. Now Input.jsp opens in the Source Editor.


--------------------------------------------------------------------
-------------------------------------------------------------------
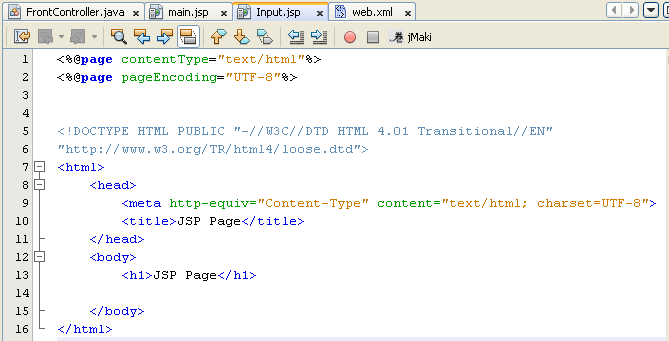
4. In the Source Editor, replace the contents of the Input.jsp file with the following code:
<%@page contentType="text/html;charset=UTF-8"%>
<%@taglib prefix="fmt" uri="http://java.sun.com/jstl/fmt" %>
<%@taglib prefix="c" uri="http://java.sun.com/jstl/core" %>
<%@taglib prefix="midnight" uri="/WEB-INF/tlds/midnight.tld"%>
<fmt:setBundle basename="com.midnightcookies.Midnight" var="bundle" scope="page"/>
<h3><fmt:message key="provide_input" bundle="${bundle}"/></h3>
<form method="POST" action="Output.jsp">
<table>
<tr>
<td><fmt:message key="type_input" bundle="${bundle}"/>:<td>
<%-- The value of the Input field will be placed in a
request parameter named "input" and it will be passed to Output.jsp --%>
<td><input type="text" size="20" name="input" value=""></td>
</tr>
<tr>
<td><fmt:message key="submit" bundle="${bundle}" var="buttonLabel" scope="page"/>
<midnight:button/>
</td>
<td></td>
</tr>
</table>
</form>

5. Don’t worry about the error shown in the figure it will disappear later. Press Ctrl-S to save your changes.
6. Create an Output.jsp file in the Parameters folder using the same method that you used to create the Input.jsp file.


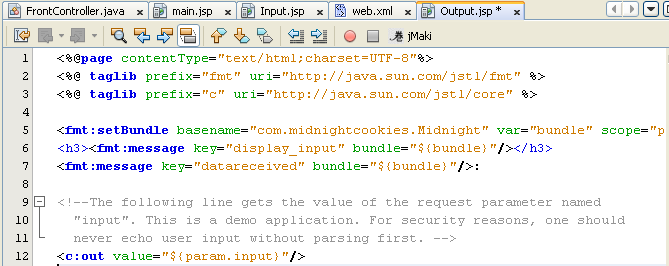
7. In the Source Editor, replace the contents of the Output.jsp file with the following code:
<%@page contentType="text/html;charset=UTF-8"%>
<%@ taglib prefix="fmt" uri="http://java.sun.com/jstl/fmt" %>
<%@ taglib prefix="c" uri="http://java.sun.com/jstl/core" %>
<fmt:setBundle basename="com.midnightcookies.Midnight" var="bundle" scope="page"/>
<h3><fmt:message key="display_input" bundle="${bundle}"/></h3>
<fmt:message key="datareceived" bundle="${bundle}"/>:
<!--The following line gets the value of the request parameter named
"input". This is a demo application. For security reasons, one should
never echo user input without parsing first. -->
<c:out value="${param.input}"/>
8. Press Ctrl-S to save your changes. We continue on next tutorial, part 2.