<Java Web Application 1 |Main |Java Web Application & MySQL 1 >
NetBeans IDE 6.x Tutorial for Java Web Applications Part 2
Using JSTL to handle internationalization
The Tray.jsp page that you create in this section illustrates the use of the JSTL, instead of scripting, to internationalize the page. The CookieCutter.jsp file, CookieMaker.jsp file, and resource bundle property files have been provided with the midnight.zip file. You can take a closer look at those files and the Tray.jsp file for examples of how internationalization is handled in this application.
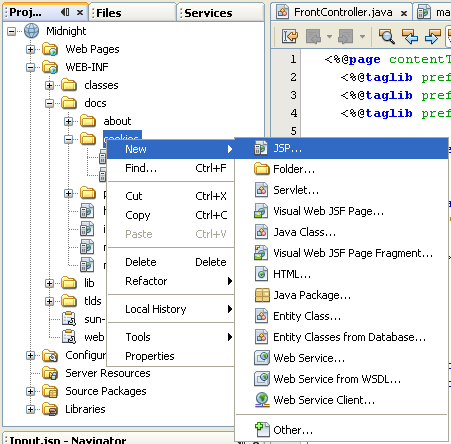
1. Expand the docs node and expand the cookies node.
2. Create a Tray.jsp file in the cookies folder using the same method that you used to create the other JSP files. Make sure that you put it in the cookies folder. |


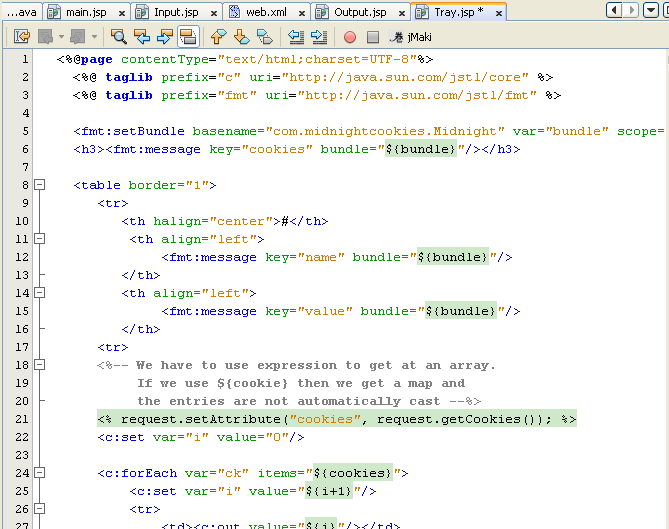
3. In the Source Editor, replace the contents of the Tray.jsp file with the following code:
<%@page contentType="text/html;charset=UTF-8"%>
<%@ taglib prefix="c" uri="http://java.sun.com/jstl/core" %>
<%@ taglib prefix="fmt" uri="http://java.sun.com/jstl/fmt" %>
<fmt:setBundle basename="com.midnightcookies.Midnight" var="bundle" scope="page"/>
<h3><fmt:message key="cookies" bundle="${bundle}"/></h3>
<table border="1">
<tr>
<th halign="center">#</th>
<th align="left">
<fmt:message key="name" bundle="${bundle}"/>
</th>
<th align="left">
<fmt:message key="value" bundle="${bundle}"/>
</th>
<tr>
<%-- We have to use expression to get at an array.
If we use ${cookie} then we get a map and
the entries are not automatically cast --%>
<% request.setAttribute("cookies", request.getCookies()); %>
<c:set var="i" value="0"/>
<c:forEach var="ck" items="${cookies}">
<c:set var="i" value="${i+1}"/>
<tr>
<td><c:out value="${i}"/></td>
<td><c:out value="${ck.name}"/></td>
<td><c:out value="${ck.value}"/></td>
</tr>
</c:forEach>
</table>
4. Press Ctrl-S to save your changes.
Wrapping up
Once you have completed the development stage as described above, the views in the Projects window and Files window should look as follows:


Note: The application illustrated above deploys to the glassfish Web Server. If you have registered and selected a different target server instead, you will not have a META-INF/context.xml file as in Tomcat web server. For example, if your server is the Sun Java System Application Server, you will have a WEB-INF/sun-web.xml file as your deployment descriptor.
Running and Monitoring the Application
Enabling the HTTP Monitor
The HTTP Monitor is enabled by default for the Tomcat Web Server. However, for other servers, you must manually enable the HTTP Monitor. In addition, the HTTP Server must be started for the HTTP Monitor to work for other servers.

Do the following to prepare to use the HTTP Monitor:
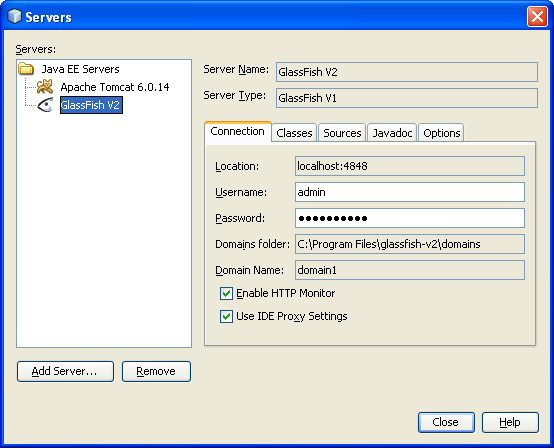
1. Choose Tools > Server from the main window.

2. Select the server.
3. Click Enable HTTP Monitor and then click Close.

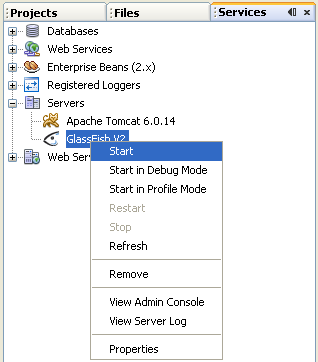
4. In the Services window, right-click the HTTP Server node and choose Start.
Verifying the Context Path
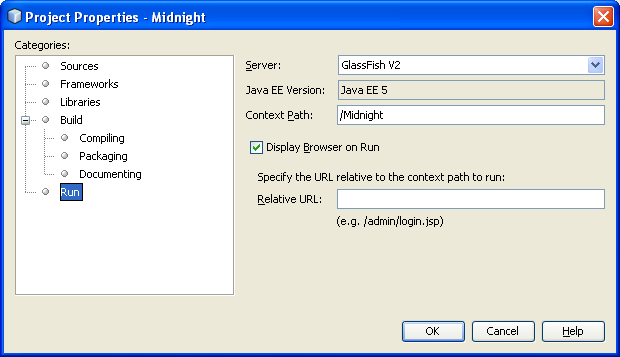
1. Right-click the Midnight project node and choose Properties.
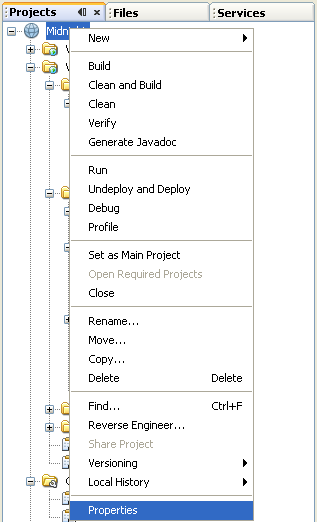
2. In the Project Properties dialog box, click Run.
3. Make sure that the Context Path is set to /Midnight.
Running the application
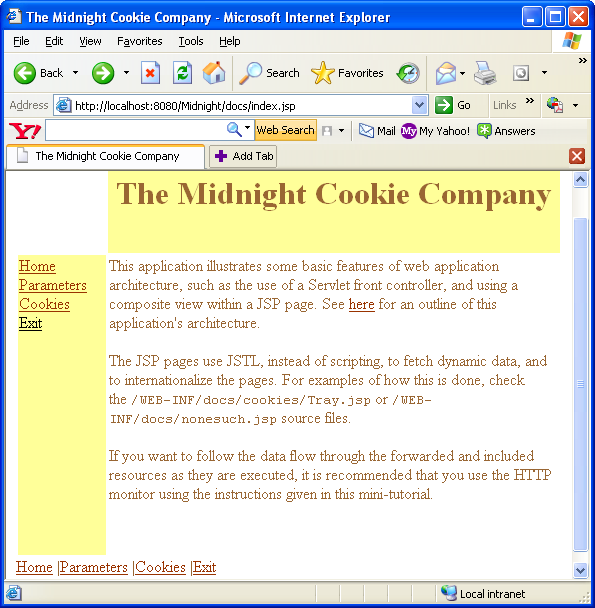
1. In the Projects window, right-click the Midnight project node and choose Run Project from the contextual menu. A progress monitor window appears as the application is prepared and deployed to the web server. The web browser launches with the URL set to http://hostname:port_number/Midnight. The following example shows the web browser running on a Microsoft Windows platform.


2. In the IDE, notice that the HTTP Monitor is displayed. The following sections illustrate how you can use the HTTP Monitor to monitor requests, sessions, and cookies.

Monitoring requests and sessions
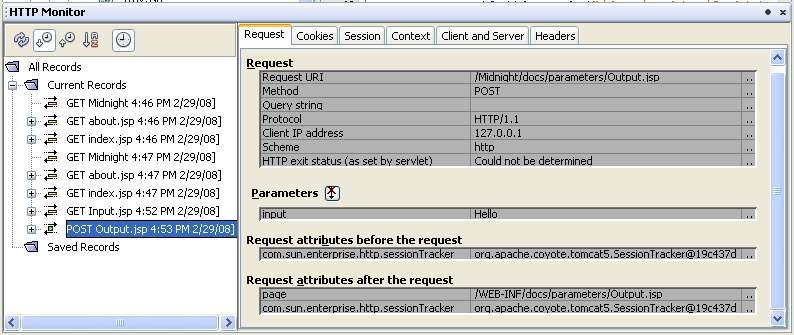
1. In the HTTP Monitor, select the last entry under the Current Records node. The last entry represents the request for the Midnight web application.
2. Select the Request tab and you see information similar to the following snapshot.

3. Select the Session tab and you see information similar to the following snapshot.

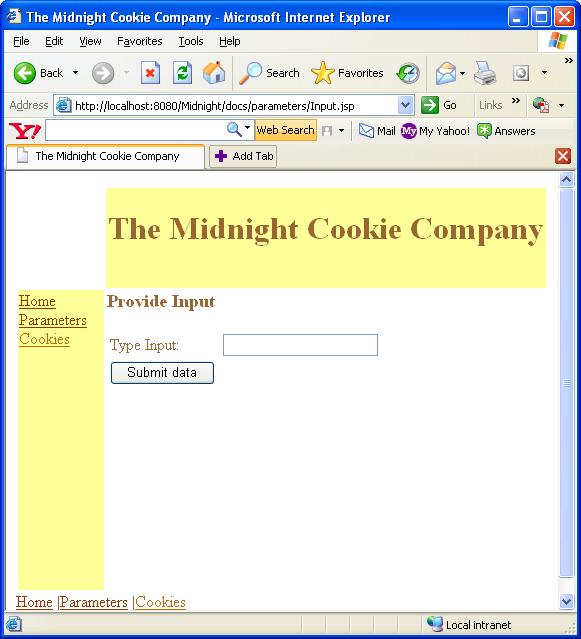
4. In your web browser, click the Parameters link to display the Input.jsp page. Your web browser displays information similar to the following page.
5. In the Type Input text field, type hello and click Submit data. Your web browser displays the contents of the Output.jsp page, similar to the following page.
|

6. In the HTTP Monitor, select the last entry under the Current Records and select the Request tab. The HTTP Monitor displays information similar to the following snapshot.
Monitoring cookies
1. In your web browser, click the Cookies link. Your web browser displays the CookieCutter.jsp page.
2. In the Name text field, type cookie, and in the Value text field, type chocolate.
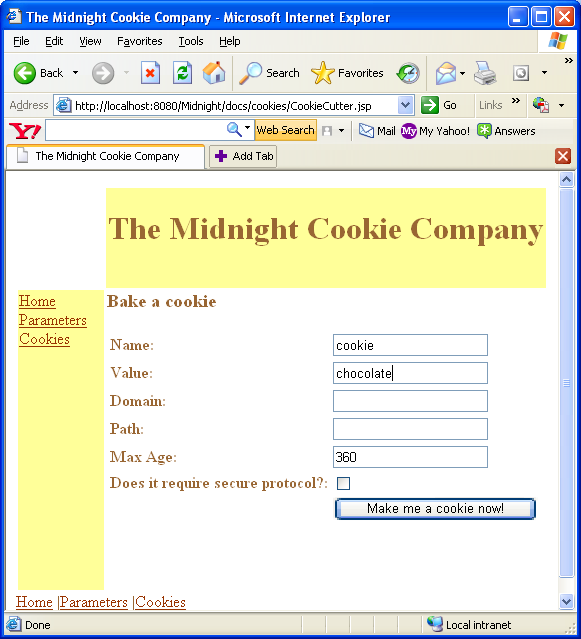
3. Click "Make me a cookie now!". Your web browser displays information similar to the following page.

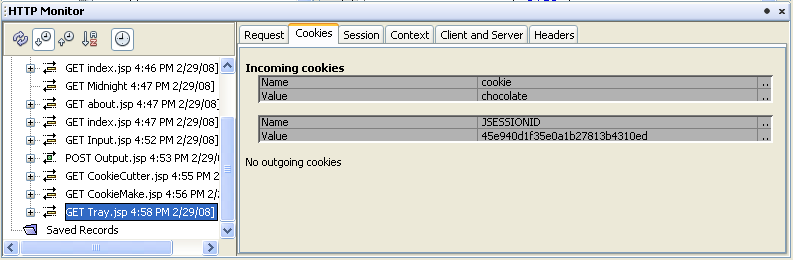
In the HTTP Monitor, select the last entry under the Current Records node. The Cookies tab in the HTTP Monitor displays information similar to the following snapshot.

In your web browser, click Cookie tray, and your web browser displays information similar to the following page.

In the HTTP Monitor, select the last entry under the Current Records node and select the Cookies tab. The HTTP Monitor displays information similar to the following snapshot.
Select the Request tab and the HTTP Monitor displays information similar to the following snapshot.

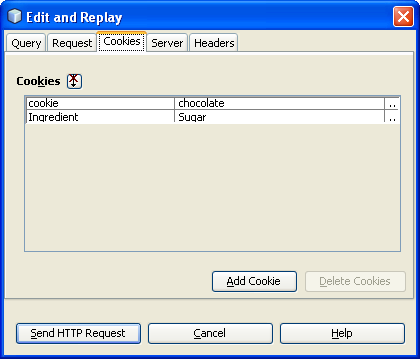
In the HTTP Monitor, right-click the same entry (GET Tray.jsp) under the Current Records node and choose Edit and Replay from the contextual menu. In the Edit and Replay dialog box, click the Cookies tab and click Add Cookie. Set the name to Ingredient and the value to Sugar. Click Send HTTP Request. The browser redisplays the page with the new cookie.


Monitoring requests for non-existent pages
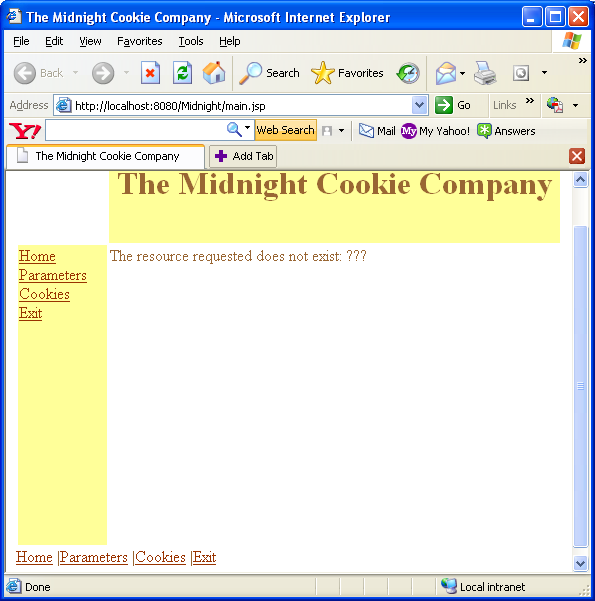
1. In your web browser, type a URL for a page that does not exist to see how the nonesuch.jsp page is used. For example, you might type http://localhost:8084/Midnight/docs/Bake.jspor http://localhost:8080/Midnight/docs/Bake.jsp (port used by glassfish) for the URL and your web browser displays something similar to the following page.

2. In the HTTP Monitor, select the Request tab and you will see information similar to the following snapshot.

Notice that the content of nonesuch.jsp page is displayed in place of the non-existent Bake.jsp page.
Enabling internationalization
Modify the language preference used by your web browser to either French or Swedish in order to see the internationalization feature of this Midnight Cookie Company web application. Note that you might have to add these two languages to the list of languages currently available to your web browser.
Reload or refresh the pages you have viewed in the previous steps. Notice how the links in the left navigation bar, the links on the bottom of the pages, and the contents of some of the application's JSP pages have been translated to the language you have chosen. The web application uses the resource bundle property files to help translate some of the pages used in this web application. So, the translation is only as extensive as the contents of the resource bundle property files.
Applying What You Have Learned
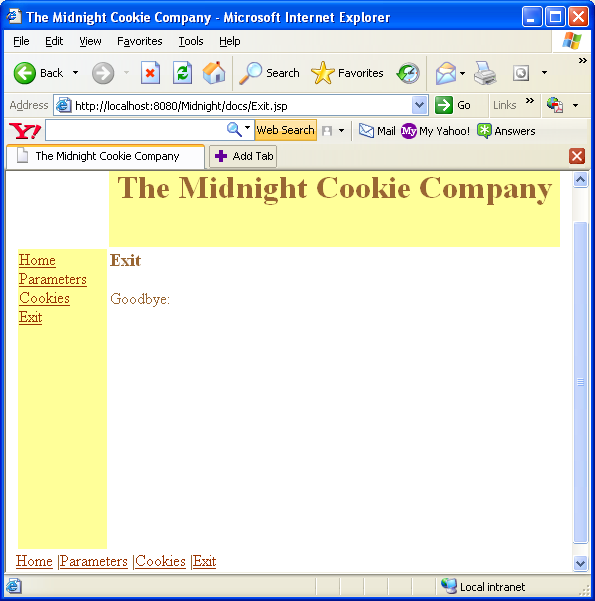
Add an Exit link that takes the user to a page that says "Goodbye" in the appropriate language
Right-click the com/midnightcookies/Midnight.properties file and choose Open from the contextual menu.


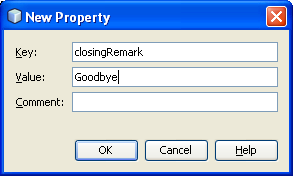
Click the New Property button and add the following keywords and values.
Keyword | Default | French | Swedish |
exit | Exit | Sortie | Utgång |
closingRemark | Goodbye | Au revoir | Hej då |

Edit the French and Swedish manually.
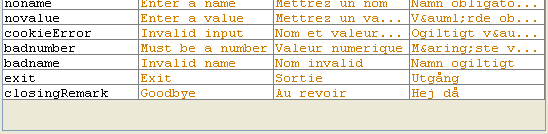
Use åto display the å character.
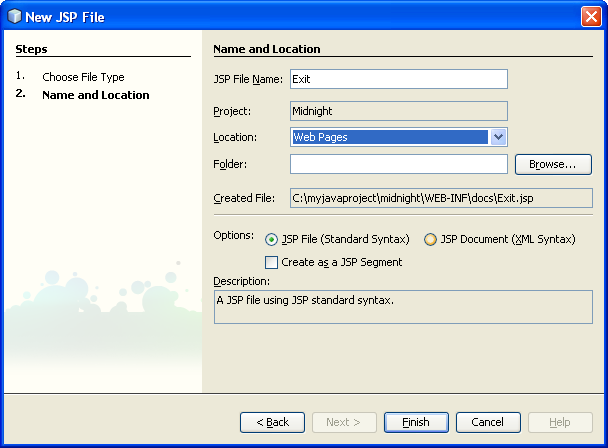
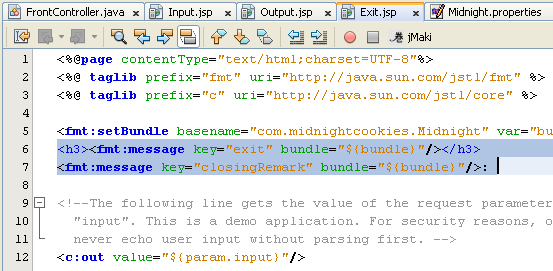
Add an Exit.jsp content file. Use the message tag from the fmt tag library to display the message for the closingRemark keyword (Hint: look at Output.jsp). Don't forget to add a taglib directive for the fmt tag library.

--------------------------------------------------------------------------------------------------------------------------
<%@page contentType="text/html;charset=UTF-8"%>
<%@ taglib prefix="fmt" uri="http://java.sun.com/jstl/fmt" %>
<%@ taglib prefix="c" uri="http://java.sun.com/jstl/core" %>
<fmt:setBundle basename="com.midnightcookies.Midnight" var="bundle" scope="page"/>
<h3><fmt:message key="exit" bundle="${bundle}"/></h3>
<fmt:message key="closingRemark" bundle="${bundle}"/>:
<!--The following line gets the value of the request parameter named
"input". This is a demo application. For security reasons, one should
never echo user input without parsing first. -->
<c:out value="${param.input}"/>
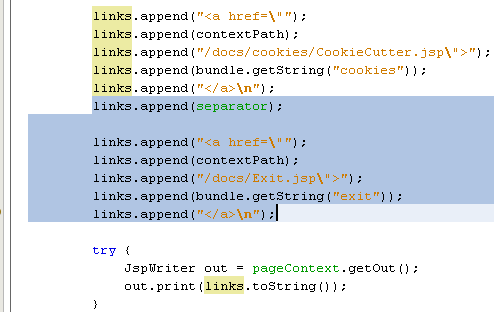
Open the com/midnightcookies/taghandlers/LinksHandler.javafile in the Source Editor and add a link to the Exit.jsp file. Use the exit keyword to get the link text from the properties bundle. Compile the class.

links.append(separator);
links.append("<a href=\"");
links.append(contextPath);
links.append("/docs/Exit.jsp\">");
links.append(bundle.getString("exit"));
links.append("</a>\n");
Run the web application.
Click the Exit link.
Exploring Further
Below are some other web applications features that you might want to explore.
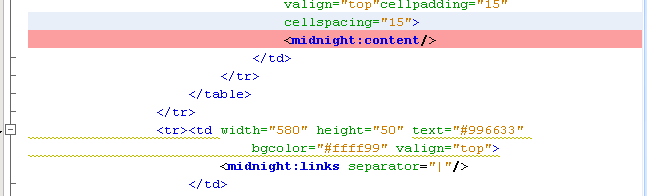
Examining the Midnight tag library
Expand the tlds/Midnight node to see the list of tags in the library. Look at the the Links tag in the Source Editor and at its Attributes to see that it takes a separator attribute.
Debugging web applications
Open the docs/main.jsp file in the Source Editor and set a breakpoint by clicking in the margin at approximately line 32 (the line that invokes midnight:content)
Right-click the project node in the Projects or Files window and choose Debug Project from the contextual menu.

The web application will stop at the breakpoint that you set. Press F7 to step into the code. Whenever a dialog appears because of missing source, press OK to select the default of stopping at the first line with source. Continue pressing F7 until you enter the otherDoStartTagOperations() function in the ContentHandler class. Set a breakpoint at line 50 (request.getRequestDispatcher(page).include(request, response)) and press Ctrl-F5 (continue). Place the cursor over "page", "request", and "response" to see the values. You can also see the values in the Local Variables tab. Note that the Call Stack tab shows the relationship between the JSP code and the generated servlet methods. Try setting other breakpoints. Right-click a variable and choose New Watch from the contextual menu. Click the Watches tab to see the values change as you execute the various pages in the web application. Choose Debug > Finish Session to quit the debugging session.
Testing JSP files
To run a public JSP file (one that is not under the WEB-INF folder), you simply right-click the file's node and choose Run file from the contextual menu.

If a page is loaded, clicking the Browser's reload button will display any modifications that you have made. Private JSP files, like the ones in this tutorial, are a little harder to execute. One way to test a modified private JSP file without having to restart the web application and navigate to that page is to use the HTTP Monitor's replay action.
Modify the docs/cookies/Tray.jsp file by setting the table's border to 10 and save your changes.

In the HTTP Monitor, right-click a GET Tray.jsp record and choose Replay from the contextual menu.
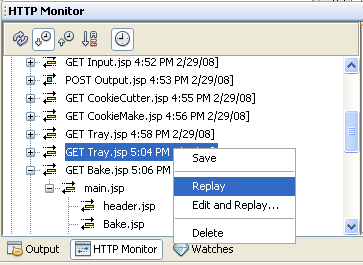
The Tray.jsp page should appear in the browser with a larger table border.

Glossary
Below are explanations of some of the terms used in this tutorial.
Composite View
A design pattern that is used to present information in JSP pages. This design pattern creates an aggregate view from component views. Component views might include dynamic and modular portions of the page. The Composite View design pattern pertains to web application design when you are creating a view from numerous subviews. Complex web pages frequently consist of content derived from various resources. The layout of the page is managed independently of the content of its subviews. For instance, a view might have subviews such as Navigation, Search, Feature Story, and Headline.
When creating a composite view, you can include static content and dynamic content. Static content might consist of an HTML file. Dynamic content is a fragment of a JSP page. The specific content can be determined at either JSP translation time or at runtime.
Front Controller
Front controllers are responsible for routing incoming requests and enforcing navigation in web applications. For more information on the use of the Front Controller design pattern, see theJ2EE Patterns catalog.
JSP page
Pages that are used in web applications to present information to end users and to enable data from end users to flow back to the server. JSP pages must be placed within a web application in order for the JSP pages to be executable within the IDE.
Servlet
Servlets are Java classes that execute within a servlet container, which is typically running within a web server. Servlets are used to do the following:
Generate dynamic content.
Extend the capabilities of web servers and web-enabled application servers.
Interact with web clients (typically a browser application such as Netscape or Internet Explorer) using a request-response paradigm.