<Visual Web JSP & JSF Application 3 |Java & Friends |Java Web Application 1 >
NetBeans and Visual Web JSF Application
Contents:
In this tutorial, you use the NetBeans IDE andJSF 1.2 (Woodstock) components to create and run a simple web application, Hello Web. The example application asks you to input a name and then displays a message that uses that name. At first, you implement this page with an input field. Then you replace the input field with a drop-down list from which the user can choose a name. The drop-down list is populated with names from a database table. This tutorial works with the following technologies and resources
|
The original tutorial can be found atnetbeans.org. All credits must go to the original authors. In this tutorial we try to refine all the steps to more details using screen shots.
The machine specification used in this tutorial are:
-
Intel Pentium Core 2 Duo, 2.2 GHz,
-
Windows XP Pro SP2 + periodical patches + periodical updates
-
2 GB DDR2 RAM
-
160 GB SATA HDD
-
17” SyncMaster 713N monitor.
Creating a Project
From the main menu, choose File > New Project.

In the New Project Wizard, select Web from the Categories list and select Web Application from the Projects list. Click Next.
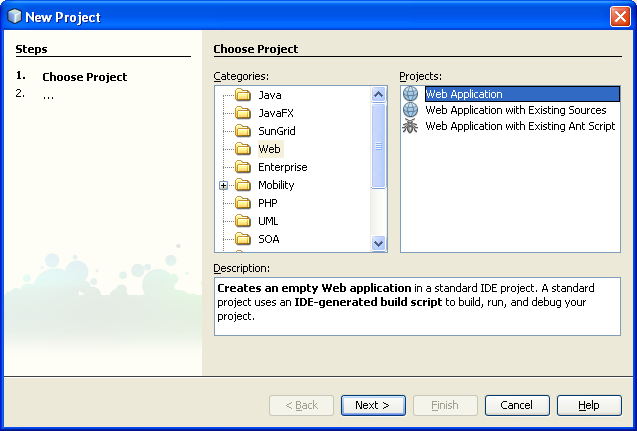
Name the project HelloMyWeb and click Next.

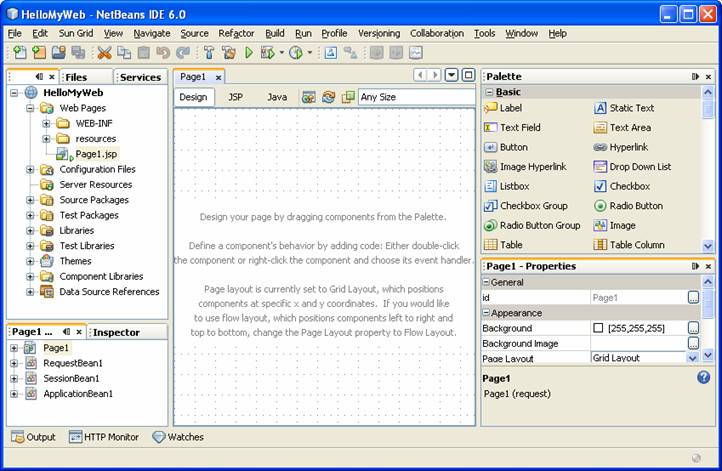
Select the Visual Web JavaServer Faces framework and click Finish. Your project appears with the initial page (Page1) open in the Visual Designer.

Designing the Page
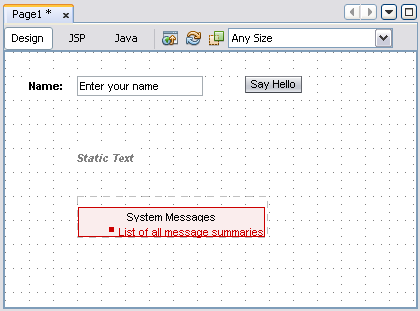
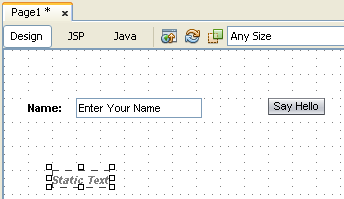
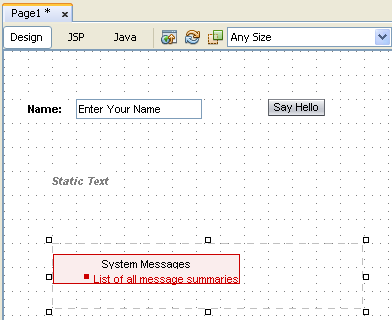
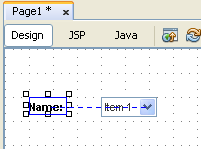
To begin, you design a page like the one shown in the following figure.
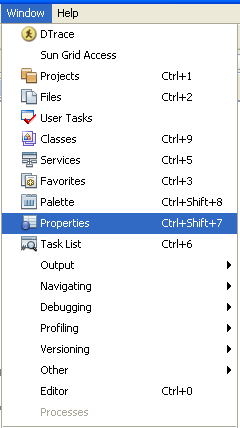
Go to the Properties window of Page1.jsp. If the windows not displayed, invoke it through Window > Properties. You can dock or un-dock this window.

In the Properties window, type Hello My Web in the Title property's text box as shown in the following figure. The Title property's value appears in the browser's title bar when this page (or project) is deployed.
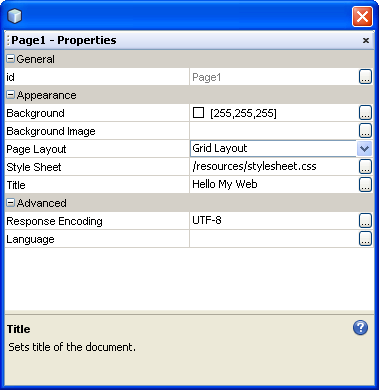
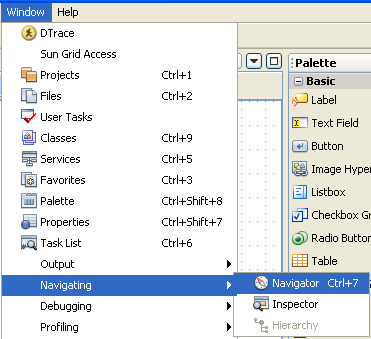
Tip: You can access a component's properties in the Properties windows by selecting the component in either the Visual Designer or the Navigator window. To open the Navigator window, select Window > Navigating > Navigator. You access a page's properties by clicking on a blank spot on the page.

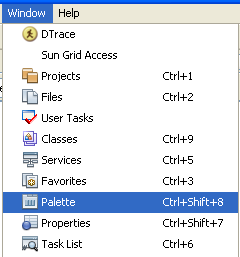
If the Basic node in the Palette window is not expanded, expand it now. All the components that you use in this example are in the Basic section of the Palette. If the Palette is not visible, choose Window > Palette to display it.

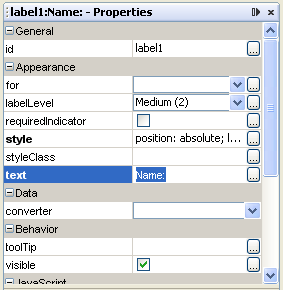
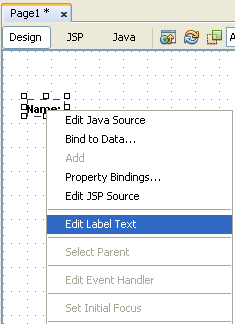
Drag a Label component from the Basic section of the Palette to the left side of the page in the Visual Designer, type Name: and press Enter. Note that the component snaps to the grid on the page. Also note that the value of the text property in the Properties window changes to Name:.

Tip: You can switch the component to edit mode by right-clicking the component and choosing Edit Label Text from the pop-up menu.
Drag a Text Field component from the Basic section of the Palette onto the Visual Designer, type Enter Your Name, and press Enter.
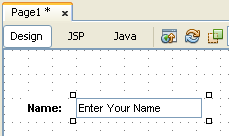
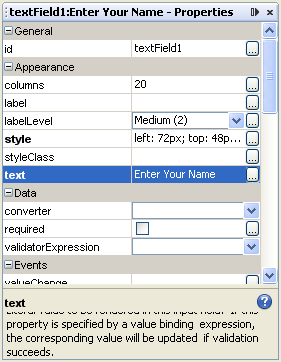
In the Properties window, change the id property of the Text Field from textField1 to nameField.

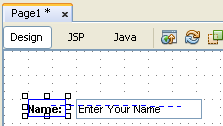
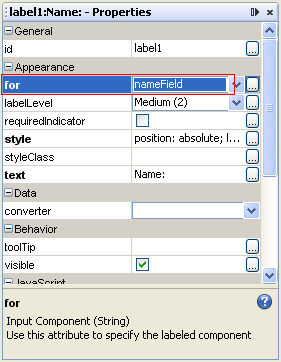
Select the Label component and Ctrl-Shift-Drag from the Label component to the Text Field component. Note that the for property for the Label component is now set to nameField.
Drag a Button component to the right of the Text Field component, type Say Hello, and press Enter.
Important Note: There is a known issue that affects the width of the JSF 1.2 Button component in IE7. The workaround is to place the Button component in a layout component (Grid Panel, Group Panel, or Layout Panel). Resizing the layout component automatically resizes the Button component.


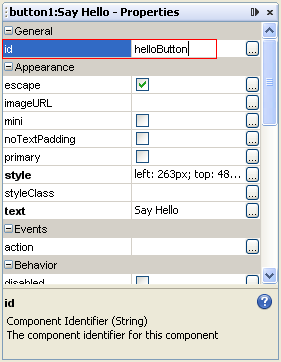
In the Properties window, change the Button component's id property from button1 to helloButton.
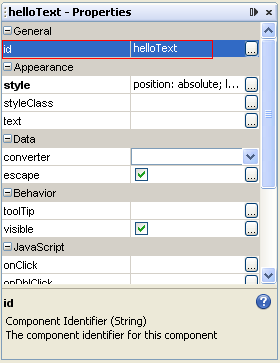
Drag a Static Text component to a spot below the Label component. Change the Static Text component's id property from staticText1 to helloText.
--------------------------------------------------------------------------------------------------------------------------
--------------------------------------------------------------------------------------------------------------------------
Drag a Message Group component onto an out-of-the-way spot on the page, such as under the Static Text component. Adding a Message Group component, which displays runtime errors among other types of messages, is useful for diagnosing programming errors.
In the Editing toolbar, click JSP to switch to the JavaServer Pages (JSP) Source Editor.

Scan through the code and note how the changes that you made in the Properties window are saved. When a page is first displayed in the browser, the page appears exactly as indicated by the tags in the JSP page. If yourpage bean has code that changes the property values, such changes appear only on requests where the page is submitted and subsequently redisplayed.
Run your project by clicking the run button or F6.

Adding Some Behavior
In this section, you add code to make the page redisplay with the message Hello entered-name. You do this by adding an event handler that the application calls whenever the button is clicked. This event handler sets the Static Text component's text property to a "hello" message and then causes the page to be redisplayed so that the text appears.
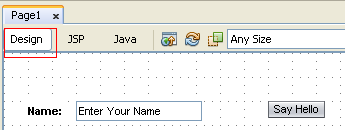
In the Editing toolbar, click Design to switch to the Visual Designer.
Double-click the Button component. The Editing Area switches to the Java Editor and shows the page bean for Page1. The button's event handler,helloButton_action, has been added to the page bean.

Replace the body of the helloButton_action method with the following lines of code (shown in bold). Then press Alt-Shift-F to reformat the code.
Code Example 1: helloButton_action() Code |
public String helloButton_action() { String name = (String)nameField.getText(); helloText.setText("Hello, " + name + "!"); return null; } |

The first line in bold gets the value of the text property for the nameField Text Field component using the getText method. That value is an object of type Object, which needs to be a string, so it is cast to a String object. Then the object is assigned to the name variable.
The second line in bold sets the value of the text property for the helloText Static Text component. This value contains the name that the user entered into the nameField Text Field component. For example, if the user enters Fred, this line of code sets the Static Text component's text property to Hello, Fred!
Running the Application
In the Java Editor, ensure that your Java code does not contain any errors. Errors are indicated by red underlines or red boxes along the left side of the code. Your project will not build if there are errors in the code. Tip: If any, hold the cursor over the red box on the left side of the code to see a description of the error.
Click the Run Main Project button (![]() ). The IDE saves your files and builds your project. The Build Output window appears at the bottom of the screen and displays relevant status messages.
). The IDE saves your files and builds your project. The Build Output window appears at the bottom of the screen and displays relevant status messages.
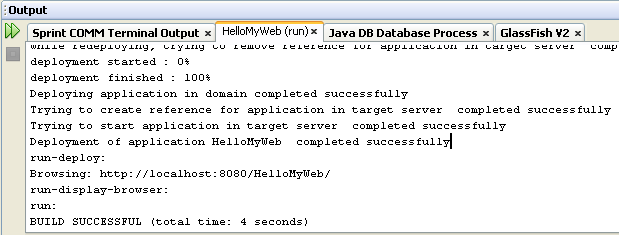
Once your application is built and deployed, the IDE launches your default web browser (if it is not already running), and your web application appears.
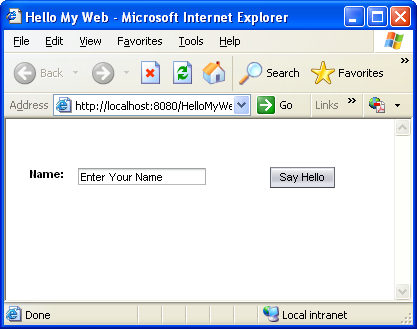
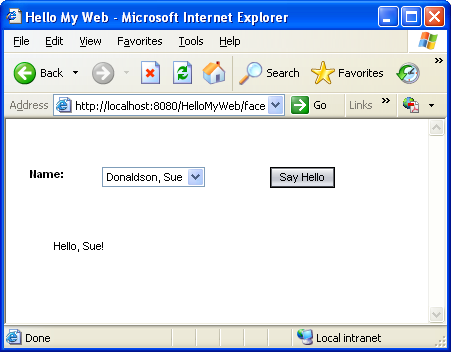
Enter your name in the text field and click Say Hello. "Hello your name" is then displayed below the components in the first line. The browser submits the form to the web server, which calls your web application. The application executes the button action method, updates the page elements, re-renders the same page with the changed data, and sends the page back to the web browser. The following figure is the result if the name submitted is Mikerisan Smith.

Replacing the Text Field With a Drop Down List
The remainder of this tutorial shows how to use a Drop Down List component instead of a Text Field to get user input, as shown in the following figure. This Drop Down List component gets its list of choices from the bundled PERSON database table.

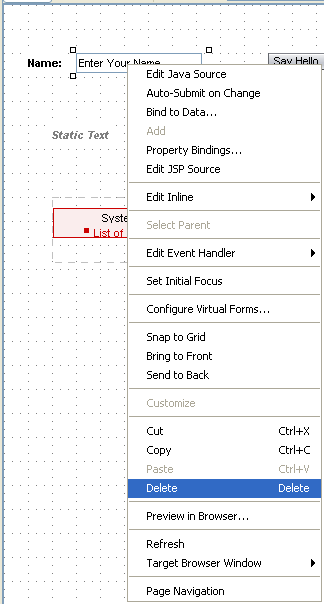
In the Editing toolbar, click Design to switch to the Visual Designer. In the Visual Designer, right-click the nameField Text Field component and choose Delete from the pop-up menu.
Drag a Drop Down List component from the Basic section of the Palette onto your page in the Visual Designer. Move the component into the area where the Text Field component was.
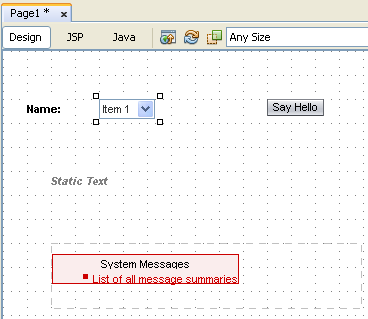
Notice, as shown in the following figure, that the Navigator window shows a dropDown1 component and a dropDown1DefaultOptions object. The Drop Down List component's items property identifies the object that contains the choices in the list. When you add a Drop Down List component to the page, the IDE creates a Default Options object (dropDown1DefaultOptions) and sets this object as the value of the Drop Down List component's items property. Only the Drop Down List component is visible in the Visual Designer. The Default Options object merely supplies the choices that appear in the list. Later in this tutorial, you modify the Drop Down List component to obtain its choices from a different source.

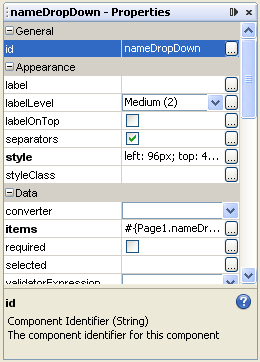
In the Properties window, change the component's id to nameDropDown.
Select the Label component and Ctrl-Shift-Drag from the Label component to the Drop Down List component. Note that the for property for the Label component is now nameDropDown.

Binding the Drop Down List to the Database Table
The Services window, which appears on the left side of the IDE workspace, includes a Databases node. The Databases node shows all the database drivers and connections that have been added to the IDE. The NetBeans IDE comes with a sample Travel database. The Travel database appears under the Databases node.

In this section of the tutorial, you use the PERSON table from the Travel database to supply the choices for the Drop Down List component. In the Services window, expand the Databases node and check if the Travel database is connected. If the jdbc node for the TRAVEL database's badge is broken and you cannot expand the node, the IDE is not connected to the database. To connect to the TRAVEL database, right-click the jdbc node for TRAVEL and choose Connect from the pop-up menu.

Enter travel for the Password, select Remember Password During This Session, and click OK. If you do not see a jdbc node for the TRAVEL database, see the NetBeans Installation Instructions for information about making the database available to the IDE.
Expand the TRAVEL database's Tables node. Under Tables, you see nodes for each table in the database, such as CARRENTAL and FLIGHT. The following figure shows the Runtime window with the Tables node expanded.

Drag PERSON from the Services window and drop it on the Drop Down List.

The display on the list changes from item 1 to abc, indicating that the list is displaying bound data and that the data being displayed is of the type String. The IDE adds a non-visual personDataProvider component for the database table. The personDataProvider component appears in the Navigator window. The IDE also adds a personRowSet property to SessionBean1.

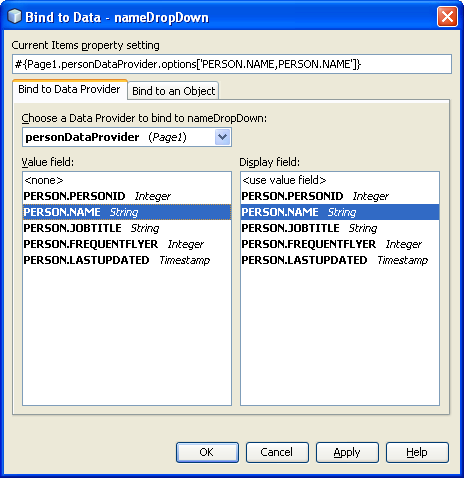
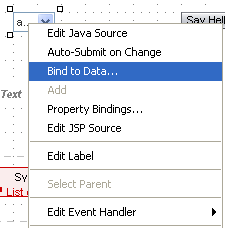
Right-click the Drop Down List and choose Bind to Data from the pop-up menu. The Bind to Data dialog box appears, as shown in the following figure.


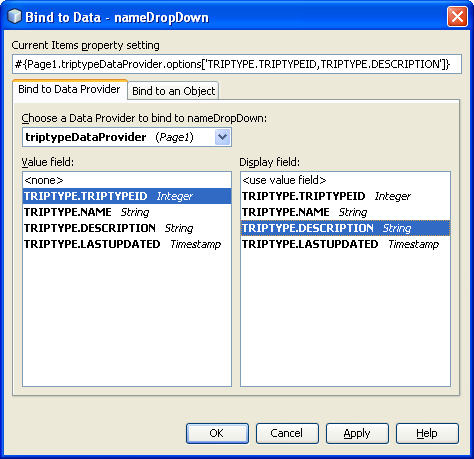
When you bind data to a Drop Down List component, you must specify what to display in the list (the Display Field) and you must specify what values to use in the underlying program (the Value Field). Typically, you want to display some meaningful value from the database table, such as a person's name, but you want to use a unique identifier in the underlying program, such as the person's ID. With this application, however, you want to bind both the Value field and the Display field to the same database column, the PERSON.NAME column, as described in the next two steps. Set the Value field in the dialog box to PERSON.NAME, leave the Display field set to PERSON.NAME, and click OK.
Adding Some Behavior
In the Visual Designer, double-click the Button component. The Editing Area switches to the Java Editor and moves to the helloButton_action method.
Replace the body of the helloButton_action method (previous code) with the following code (shown in bold).

Code Example 2: helloButton_action Replacement Code |
public String helloButton_action() { String name = (String)nameDropDown.getSelected(); String splitnames[] = name.split(","); helloText.setText("Hello, " + splitnames[1] + "!"); return null; } |
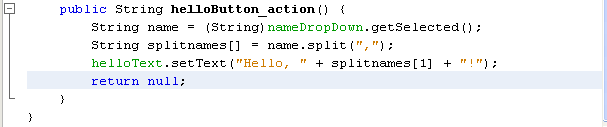
The first line uses the getSelected method to get the current value of the Drop Down List, which is the currently selected name in the list. Because data is stored in the database as lastname, firstname, the string must be modified before it is displayed. Otherwise, the application will print "Hello, lastname, firstname!" The second line uses the split method to split the string into an array, using the comma as a delimiter. The first item in the array (at position 0) contains the last name, and position 1 contains the first name. In the third line, the text property for the Static Text component is set to a value that includes the first name.
Note: This method assumes that all values in this table are in the format lastname, firstname. It does not robustly handle strings that do not follow this format.
Add the following code to the pre-render method. This code sets the first item in the list as the default selection.

Code Sample 3: prerender Method Code |
public void prerender() { // If no selection, set default selection if (nameDropDown.getSelected() == null) { personDataProvider.cursorFirst(); nameDropDown.setSelected ((String)personDataProvider.getValue("person.name")); } } |

Running the Application
Click the Run Main Project button. The IDE builds and deploys the application and displays the page in the web browser.
|
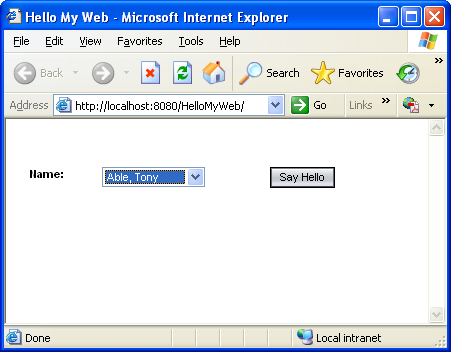
Select a name from the list and click Say Hello. The browser sends the Drop Down List component's selected value to the server, and the server executes the button's helloButton_action method.
Doing More
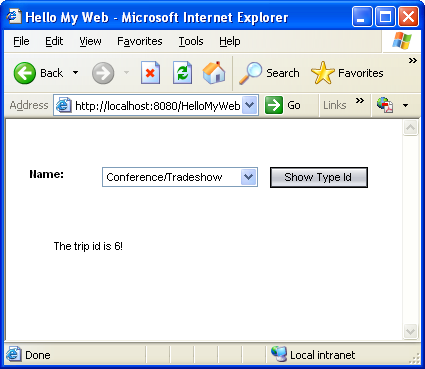
1. Try It. Using steps that are similar to the ones that you have learned in this tutorial, try building a web application that has a Drop Down List component that shows all the DESCRIPTION values in the TRIPTYPE table. When a user clicks a Show Type Id button, have the page display the trip type's TRIPTYPEID. To do this, you must bind the Drop Down List component's Display field to TRIPTYPE.DESCRIPTION and the component's Value field to TRIPTYPE.TRIPTYPEID.
Drag the TRIPTYPE table onto the Drop Down List. Verify it through the Navigator window.

Bind the Drop Down List to the TRIPTYPE data.
Change the button’s text to Show Type Id.

Double-click the button to change the code. Replace the body of the helloButton_action method (previous code) with the following code (shown in bold).
public String helloButton_action() {
Integer triptypeid = (Integer)nameDropDown.getSelected();
helloText.setText("The trip id is " + triptypeid + "!");
return null;
}
Run your project.

Select on of the trip description and click the Show Type Id button.
2. Try It. A Listbox component is similar to a Drop Down List component. Try replacing the Drop Down List component with a Listbox component. In this application, the Listbox component's multiple property must not be checked, because only one item can be selected at a time. Remember to bind the Listbox to the database table and to change the helloButton_action method to get the Listbox's selected value.
Delete the Drop Down List and replace it with Listbox component.
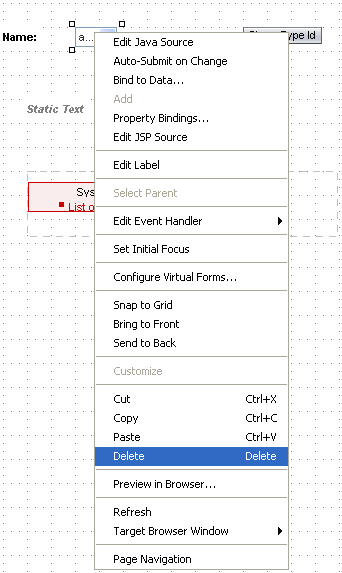
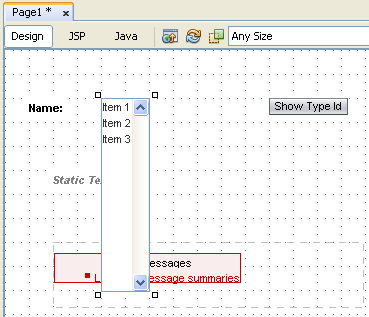
Change the id to the namelistbox.

Re-arrange the Static text and System messages as shown below in order to give a space to our list box.

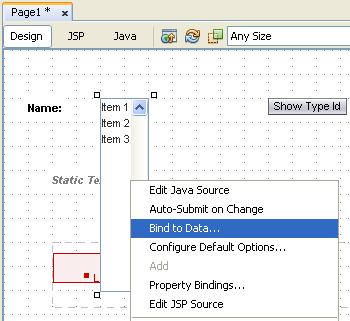
Bind to the data table similar to the previous example using the triptype data provider.

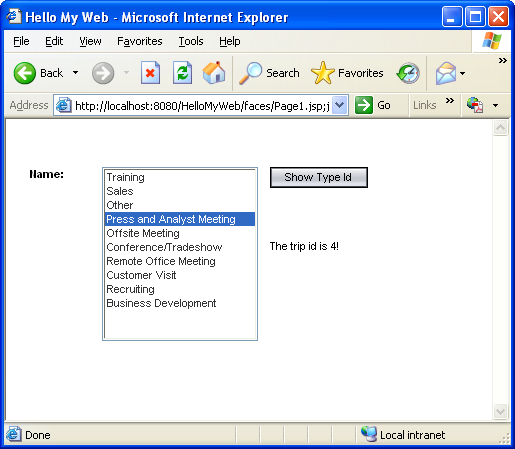
Double click the button and replace the body of the helloButton_action method (previous code) with the following code (shown in bold).
public String helloButton_action() {
Integer triptypeid = (Integer)namelistbox.getSelected();
helloText.setText("The trip id is " + triptypeid + "!");
return null;
}

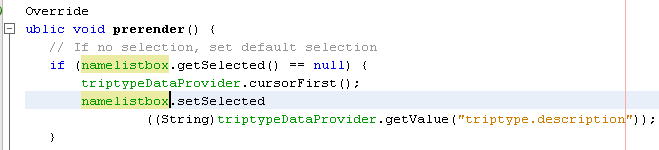
Also change the prerender code using the namelistbox.
@Override
public void prerender() {
// If no selection, set default selection
if (namelistbox.getSelected() == null) {
triptypeDataProvider.cursorFirst();
namelistbox.setSelected((String)triptypeDataProvider.getValue("triptype.description"));
}
}
Run your project.
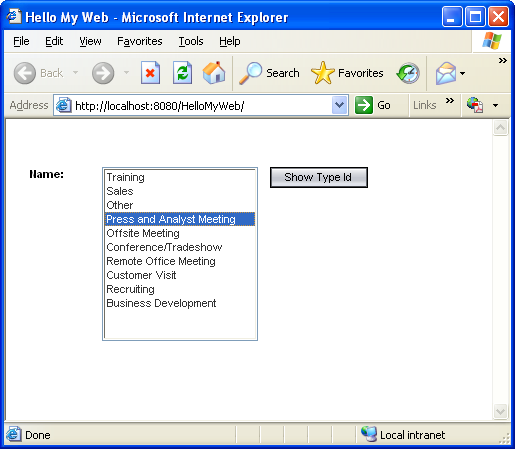
Select one trip type description and click the Show Type Id button.
Summary
The typical workflow for designing a web page from the IDE consists of the following steps:
Create the page.
Place components, such as the Text Field component and the Button component, onto the page.
Edit the components' properties to change their appearance and behavior.
Bind the components to their data connection, when appropriate.
Edit the Java source to control server-side behavior, such as event handling.
Build and test your application.