< Testing Snort on Windows XP Pro SP2 | Java & Friends | Testing the New Snort Configuration >
Snort and MySQL Database
What do we have in this session?
-
Snort and MySQL Database
-
Creating Snort Databases
-
Creating Snort’s User Accounts
-
Creating Table for Snort in mysnort and archive Databases
-
Snort and MySQL Logging
Snort and MySQL Database
Install MySQL on Windows XP Pro using the steps shown at: MySQL and Windows XP Pro SP2. Launch MySQL Command Line Client (console).

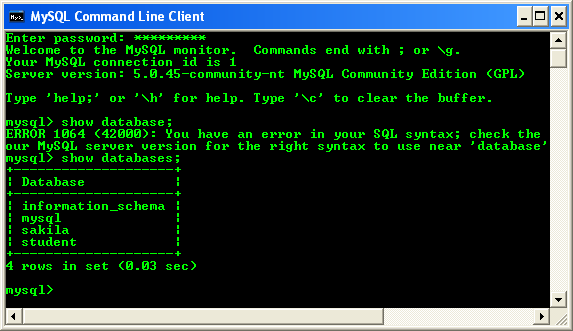
Key-in the root password and show any databases available by issuing the following command:
mysql>show databases;
If you are planning to setup Snort and MySQL database for the production environment, make sure all the security aspects are tightened. The following basic steps show how to clean-up the database for security aspects. At the prompt, type the following and then press the Enter key:
mysql>use mysql;
This command puts you in the database called mysql. Then, get rid of any host entries, like this:
mysql>delete from user where host = "%";
Next, delete other user accounts, like this:
mysql>delete from user where user = "";
Then, make sure the root account is the only user account here, like this:
mysql>select * from user;
This command displays user information. You should only see root as a user. Delete the test database (if any) by typing the following:
mysql>drop database test;
Ensure that only the mysql database exists by typing the following command:
mysql>show databases;
The following should appear:
+----------+
| Database |
+----------+
| mysql |
+----------+
1 row in set (0.00 sec)
Well, you’re ready to create your Snort databases.
Creating Snort Databases
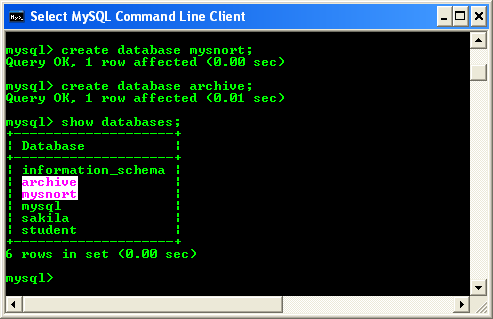
At the mysql> prompt, type the following commands and press the Enter key after each one. In this case we create two databases: mysnort and archive.
mysql>create database mysnort;
mysql>create database archive;
When you execute a show databases; command, now you should see something like in the following screenshot.
mysql>show databases;
Creating Snort’s User Accounts
With the Snort databases in place, set up the user accounts that Snort will use when it logs in to add data to its databases. As an example, the following steps are walking through on how to setup the setangedik user account. Create a user account with password by issuing the following SQL statement:
mysql>CREATE USER 'setangedik'@'localhost' IDENTIFIED BY '134@Atu4aR';

Remember that MySQL users consist of a user name and a hostname. From each host that a connection to the database will be made, there must be a corresponding user/hostname entry.
Next, at the mysql> prompt, type the following and press Enter after each line. This command will give the setangedik user privileges and rights on mysnort database:
mysql>GRANT INSERT,SELECT,UPDATE on mysnort.* to setangedik@localhost IDENTIFIED by "134@Atu4aR";

Then issue the following command for archive database.
mysql>GRANT INSERT,SELECT,UPDATE on archive.* to setangedik@localhost IDENTIFIED by "134@Atu4aR";

Verify the setangedik user’s permissions by issuing the following command:
mysql>SHOW GRANTS for setangedik@localhost;
---------------------------------------------------------
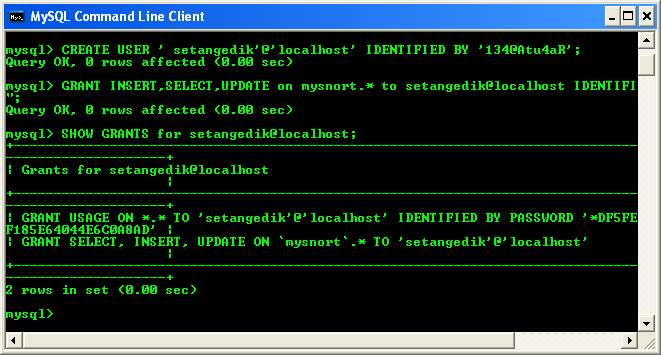
MySQL displays the setangedik user’s permissions, which should match those you gave the setangedik user account when you created it. If you made a mistake, go back and repeat the steps on the snort user account’s permission. The snort user account must be allowed to do its task, otherwise nothing will work.
Creating Table for Snort in mysnort and archive Databases
Together with snort installation, we have been provided with MySQL scripts to create tables. The SQL scripts are in %Snort%\schemas subfolder.

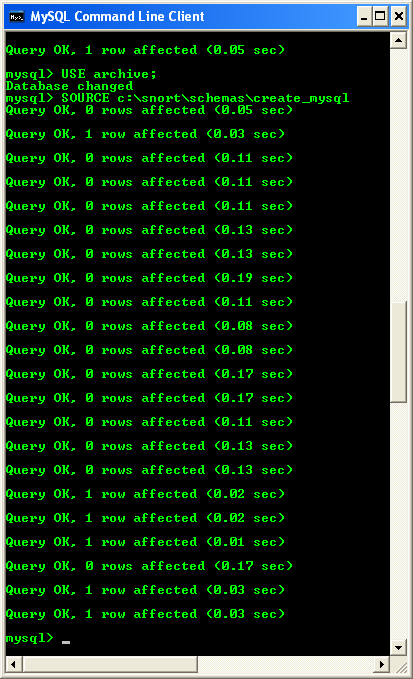
Next, let create those tables. Issue the following command at mysql prompt. Change the path accordingly if yours are different.
mysql> USE mysnort;
mysql> SOURCE c:\snort\schemas\create_mysql
There are many tables created from the create_mysql SQL script as shown in the following screenshot.

If you have installed MySQL Workbench, you can view those tables visually.


However you can also view those tables by issuing the following command at mysql command prompt.
mysql>use mysnort;
mysql>show tables;

Next, create the same tables for archive database using the same SQL script. Change the path accordingly if yours are different.
mysql> USE archive;
mysql> SOURCE c:\snort\schemas\create_mysql
Snort and MySQL Logging
Now we are going to edit snort.conf file so that Snort can connect and store data in MySQL. Open snort.conf and change the following settings:
# database
# output database: alert, <db_type>, user=<username> password=<password> test dbname=<name> host=<hostname>
# output database: log, <db_type>, user=<username> password=<password> test dbname=<name> host=<hostname>
To
# database
# output database: alert, <db_type>, user=<username> password=<password> test dbname=<name> host=<hostname>
# output database: log, <db_type>, user=<username> password=<password> test dbname=<name> host=<hostname>
output database: alert, mysql, user=setangedik password=134@Atu4aR dbname=mysnort host=localhost
output database: log, mysql, user=setangedik password=134@Atu4aR dbname=mysnort host=localhost
We set for logging and alert. Actually, both log and alert should provide same information with log provides the details and alert provides summary. Save and close snort.conf file.