<Insert, Update, Delete & JPA (Derby) |Java & Friends |Insert, Update, Delete & JPA (MySQL) >
Java Web Application:
Using JPA within a Visual Web JSF Application Part 1
(MySQL database)
Contents:
-
Creating a Database Using MySQL Command Line Client Tool
-
Making a Connection to the Database Using NetBeans
-
Creating a Table and Populating a Sample Data
-
Linking a Visual Web Project to a Java Standard Edition Project
-
Creating the Projects
-
Linking the Projects Together
-
Binding to a Database Table
-
Connecting to the Database
-
Creating a Java Persistence Entity Class Representing the Users Database Table
-
Creating a Persistence Unit
-
Setting Key Attributes With Java Persistence Annotations
-
Creating the Classes
-
Creating the Entity Controller Class
-
Binding the Entity Bean to the Table Component
-
Creating a Property in the Session Bean
-
Creating the Initialization Method
-
Binding the Property to the Table Component
-
Deploy and Running the Program
-
Doing Some Customization
This tutorial provides the Java web application using JPA in JSF application that connected to MySQL database. It is a modified version of the same tutorial usingJava Derby database.
Creating a Database Using MySQL Command Line Client Tool
First of all let create a database named student using MySQL Command Line Client. Execute the following SQL statement.
CREATE DATABASE student;

Then, verify the database creation by issuing show database; statement. Please exit MySQL Command Line Client and launch NetBeans.

Making a Connection to the Database Using NetBeans
The Users table should have five columns, as follows (you can remove the photo Column, because this column will not be used in this tutorial):
studentId - Primary key; Type: INTEGER, NOT NULL
name - Type: String, Size: 50
email – Type: String, Size: 30
contactNo - Type: INTEGER, Size:20
photo – Type: BLOB
Create a new database connection. Services window > expand Database node > expand the Driver node > select MySQL (Connector/J driver) > right click mouse > select Connect Using context menu.

Fill in the Database URL:, database User Name: and its Password:. Select Remember password tick box and click OK. In this case the database’s user is root.
The following Figure shows that the connection to student database was established. Click OK.
|


Expand the student database connection node. Well, this re-confirm the database connection.

Creating a Table and Populating a Sample Data
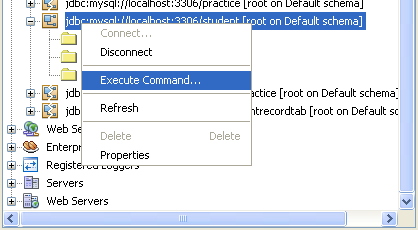
Next, we would like to create a table and populate the table with some sample data. Select the connection node > right click mouse > select Execute Command. This will launch SQL query editor.
Copy, paste and execute the following SQL script to create a Users table. You can remove the photo column/field because we will not use this column for this tutorial.
-- create a table named Users
CREATE TABLE Users(
studentId INTEGER(10) NOT NULL AUTO_INCREMENT,
name VARCHAR(50),
email VARCHAR(30),
contactNo VARCHAR(30),
photo BLOB,
PRIMARY KEY (studentId)
)type=innodb;
Note: We include the BLOB data type just for a demonstration. This BLOB data type can be used to store binary such as images, files etc. in the table.

Optionally, if you want to start the index from 8700 for example, execute the following script.
ALTER TABLE Users AUTO_INCREMENT = 8700;

Verify our previous task by expanding the Tables node.
Next, insert some sample data by executing the following SQL script. You need to have some images that stored in the C:\butterfly folder for this script to be executed properly if you include the photo column/field in the previous step. Change the path and the image files name accordingly. These images will be used in another tutorial.
-- insert sample data
INSERT INTO Users(name, email,contactNo,photo)
VALUES ('Stephanie Lame', 'stephanie@aol.com', '808-2341567', LOAD_FILE('C:\\butterfly\\butterfly1.jpg'));
INSERT INTO Users(name, email,contactNo,photo)
VALUES ('Meg Ryan', 'ryan@gmail.com', '808-7681569', LOAD_FILE('C:\\butterfly\\butterfly2.jpg'));
INSERT INTO Users(name, email,contactNo,photo)
VALUES ('Jodie Foster', 'foster@yahoo.com', '808-2348710', LOAD_FILE('C:\\butterfly\\butterfly3.jpg'));
INSERT INTO Users(name, email,contactNo,photo)
VALUES ('Amar Maarof', 'amar@gmail.com', '604-7364518', LOAD_FILE('C:\\butterfly\\butterfly4.jpg'));
INSERT INTO Users(name, email,contactNo,photo)
VALUES ('Alif Nijar', 'nijar@aol.com', '705-4452345', LOAD_FILE('C:\\butterfly\\butterfly5.jpg'));

Verify our data insertion by using View Data context menu. Select Users table node > right click mouse > select View Data context menu.

Well, all looks fine until now.

The following shows the example of an index that start from 8700.

Linking a Visual Web Project to a Java Standard Edition Project
To use the Java Persistence API from a Visual Web application, you actually create two projects. One project is your Visual Web project. The other is aJava Standard Edition (SE) application project that includes several classes whose code the web application will call. From within this Java SE application project, you generate a persistence unit to get a handle to the Java Persistence API. Your web application then uses the classes created in the Java SE application project to establish the database binding, and later to do the database update, delete, and add operations.
Creating the Projects
-
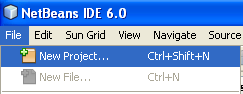
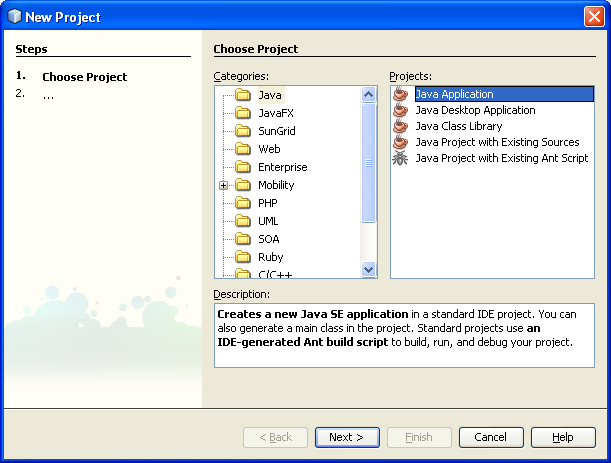
Create the Java SE application project. Begin by creating the Java SE application project, which is a general Java project. Click the New Project icon in the toolbar (Ctrl+Shift+N), then select Java in the Categories column and Java Application in the Projects column. Then click Next.
-
In the New Java Application screen, set the project name to MyTestModelApp. You also need to set the package to com.samples.model. You can do this by changing the default Create Main Class entry from mytestmodelapp.Main to com.student.model.Main. Click Finish.


-
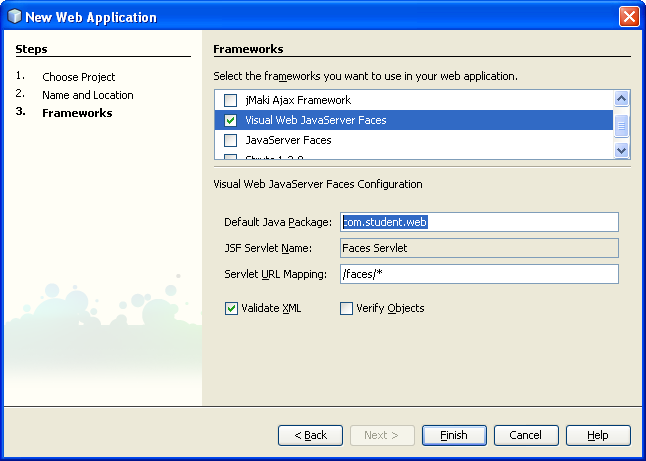
Create the Visual Web project. From the New Project dialog, select Web as the category and Web Application as the project, then click Next.


-
In the New Web Application dialog, set the project name to MyTestWebApp. The project location should default to the same location as the MyTestModelApp project else you need to browse the MyTestModelApp project. Click Next to go to the screen where you select the framework.

-
Select Visual Web JavaServer Faces for the framework. When you make this selection, the screen displays configuration settings. Change the Default Java Package setting from mytestwebapp to com.student.web. After completing this step, MyTestModelApp and MyTestWebApp appear as nodes in the Project window. Click Finish.

Linking the Projects Together
Now you want to link the two projects together. Specifically, you want the MyTestModelApp project to be a dependency of the MyTestWebApp project. To make MyTestModelApp a dependent project of MyTestWebApp, you need to add the MyTestModelApp.jar file to the MyTestWebApp project. Here's how to do this:
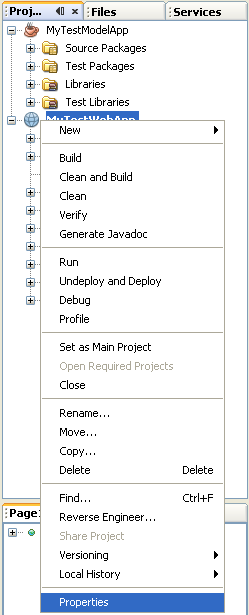
1. In the Projects window, right Click the MyTestWebApp project node and select Properties from its context menu.
2. In the Project Properties dialog, click the Libraries node in the Categories section on the left. Then, click Add Project.
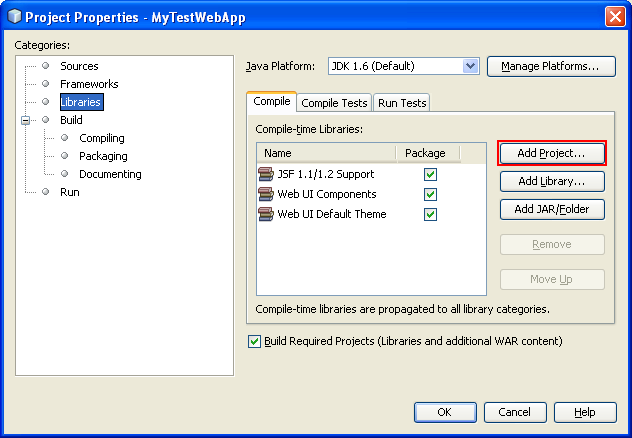
3. In the Add Project window, browse to the location with the MyTestModelApp project and select it. Then click Add Project JAR Files. This step adds the MyTestModelApp jar file to the compile-time libraries for the MyTestWebApp project, and MyTestModelApp appears in the Project Properties screen. Click OK in the Project Properties screen to complete the process.


Binding to a Database Table
You use the Java Persistence API to convey information back and forth from a database table to the table visual component that's used in the Visual Web JSF application. After you do this binding, you use the API to retrieve rows from the database table, but you display the data using the Visual Web Table component's built-in display features.
Connecting to the Database
To begin, you connect to the database with the Users table from within the MyTestWebApp project. If you have not yet connected to it, open the Services window, expand the Databases node, open the context menu for thejdbc:mysql://localhost:3306/student[root on Default Schema] node and choose Connect. If you are using a different DBMS, then, if needed, set up a driver for that database and create a new connection, providing the necessary connection parameters. We already completed this task.
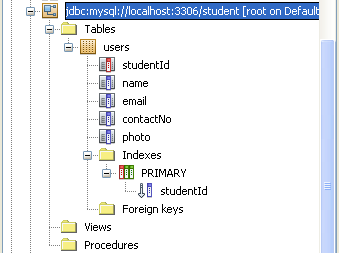
From the Services window, verify that the connection to the database is established. Open the Databases > student database Tables node and verify that the users table is correct.
|

Creating a Java Persistence Entity Class Representing the Users Database Table
Create an entity class representing the Users table. As noted previously, the entity class is the Java Persistence representation of the database table definition. JPA uses Java language annotation feature to mark Plain Old Java Objects (POJOs) as JPA entities with information on object-relation mapping. Create the entity class from within the TestModelApp project using the Entity Classes from Database function.
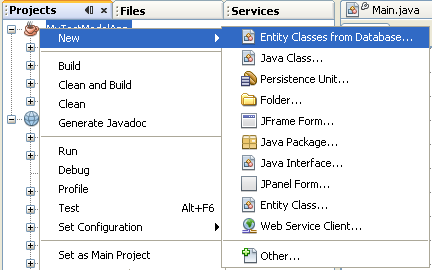
1. In the Projects (or Files) window, right click the MyTestModelApp project. From the context menu, select New > Entity Classes from Database.
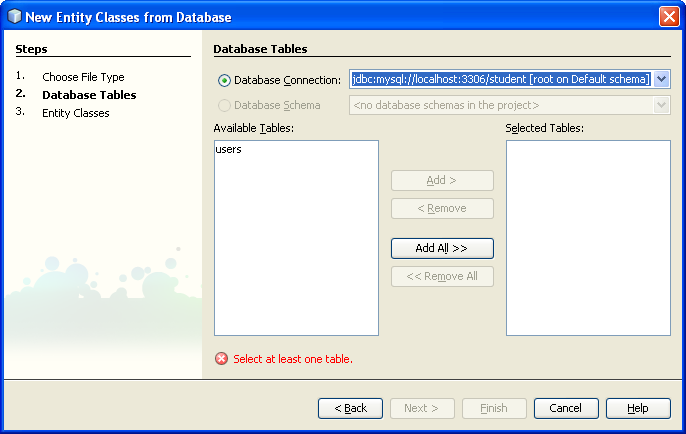
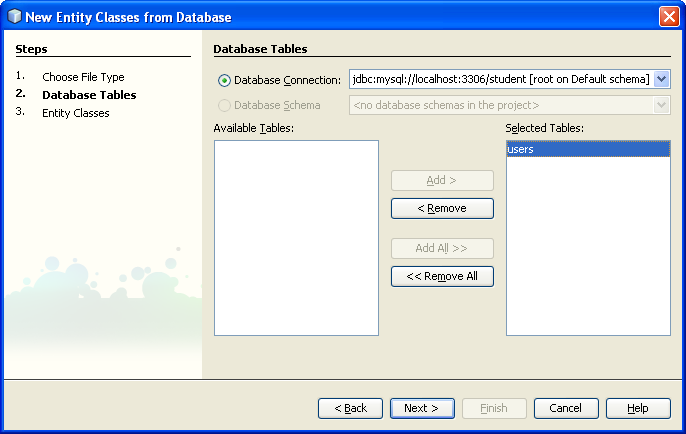
2. The New Entity Classes from Database Database Tables dialog displays. If the Database Connection field is blank, then select the student database from the pull-down list. The Available Tables column displays all the tables in the sample database, including the users table. Select the users table and click Add to move users to the Selected Tables column. Click Next after moving the users table.
3. The Entity Classes dialog displays. The IDE displays the database table name users, and suggests a class name of Users. (Double click this class name to change it, if you want.) The dialog also indicates that the package is com.student.model. Click Create Persistence Unit.
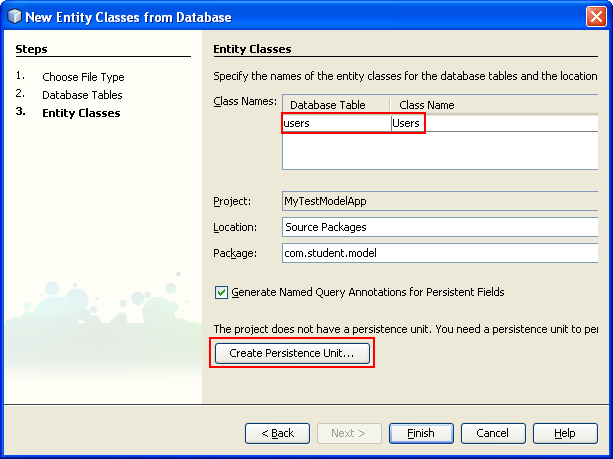
Creating a Persistence Unit
1. In the Create Persistence Unit dialog, set the Persistence Unit Name to studentPU. Leave the other fields with the default values. Click Create, then click Finish in the Entity Classes screen to complete the operation and create the studentPU persistence unit.

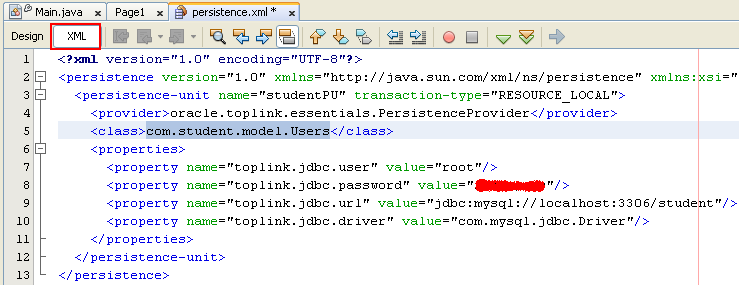
2. It is a good idea to verify that the persistence unit is created correctly. To do so, expand the MyTestModelApp Source Packages > META-INF node and double click the persistence.xml file. The Design window displays information about the persistence unit, while the Navigator window shows the XML properties.

3. Click the XML tab to see the complete XML listing. The properties in the file should correctly reflect the database name, its url, driver, and password, along with the package and class name (com.student.model.Users). The transaction type is RESOURCE_LOCAL and the provider is oracle.toplink.essentials.PersistenceProvider. Important: Be sure that the password field is filled in correctly.
Setting Key Attributes With Java Persistence Annotations
If you are working with the Derby database, you need to make some modifications to the generated Users.java code to handle auto generation of the primary key value. However, other database systems may handle primary key value generation differently, and any modifications you make to the generated Users.java class must match the underlying database's primary key generation policies. In this case we are using MySQL so we will skip this step. If we fail later, we will come back to this step.
Creating the Classes
Creating the Entity Controller Class
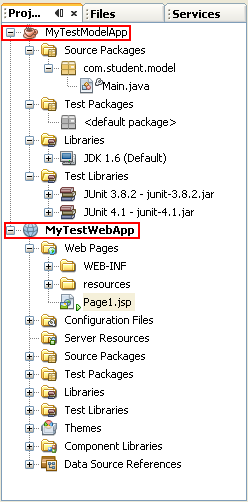
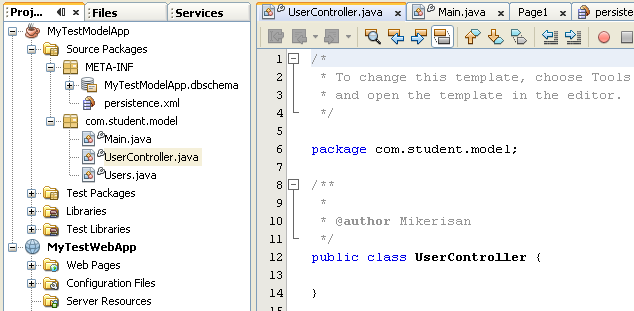
You continue to work in the MyTestModelApp project, creating a new class called UserController in the com.student.model package. (We provide the code for this class below, and you can paste it into your class.) Expand the MyTestModelApp > Source Packages > com.student.model.

Notice that there are already two classes in the package: Main.java and Users.java. Right click the com.student.model node and select New > Java Class.

In the New Java Class dialog, set the class name to UserController (leave the location as Source Packages and the package name as com.student.model). Click Finish.

You should see the skeleton source code for this new class in the Edit window.
Add the following code to the class:
private EntityManagerFactory emf;
private EntityManager getEntityManager() {
if (emf == null) {
emf = Persistence.createEntityManagerFactory("studentPU");
}
return emf.createEntityManager();
}
public Users[] getUsers() {
EntityManager em = getEntityManager();
try {
javax.persistence.Query q = em.createQuery("select c from Users as c");
return (Users[]) q.getResultList().toArray(new Users[0]);
} finally {
em.close();
}
}
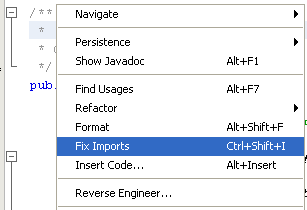
Use the Fix Imports function to import the required classes. (Right click in the source editor window and select Fix Imports from the pop-up menu.)
Doing so adds the following three import statements to the class:
import javax.persistence.EntityManager;
import javax.persistence.EntityManagerFactory;
import javax.persistence.Persistence;
You can use the Format function, available from the same pop-up menu, to format the code alignment.

Notice that the UserController class includes the method getUsers, which invokes the createQuery method on the javax.persistence.EntityManager interface to create a query that returns the rows of data from the Users table. The results of the query are returned as an array.
Binding the Entity Bean to the Table Component
You are ready to bind the entity component for accessing the Users database table to a Table component in the MyTestWebApp project. (Recall that you created the entity bean in the TestModelApp.) You do this binding from within the MyTestWebApp project. Here are the binding steps:
Create a property in SessionBean1 that returns an array of Users objects.
Create a method to initialize the array.
Then, bind the array of Users objects to the Table component.
Use the Java Persistence API Entity Manager to invoke the Users array initialization method.
Let's examine these steps in more detail.
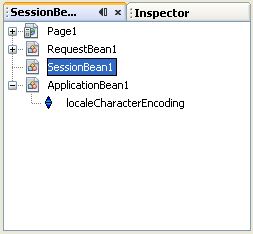
Creating a Property in the Session Bean
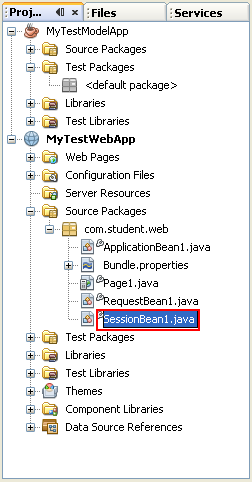
In the NetBeans IDE, you can find managed beans in several locations: in the Navigator window, in the source packages node in the Projects window, and in the src > java > project-name node in the Files window.
1. First, create a property in SessionBean1 that returns an array of users objects. In the Navigator window, double click SessionBean1 to open it in the Java Source Editor. Or, double click SessionBean1 from within the Projects window MyTestWebApp > Source Packages > com.student.web node. If you do not see the Navigator window, try displaying a page from TestWebApp, such as Page1, in the Design window. The Navigator window should display beneath the Projects window. If you still do not see the Navigator window, click the Design tab in the Design window.
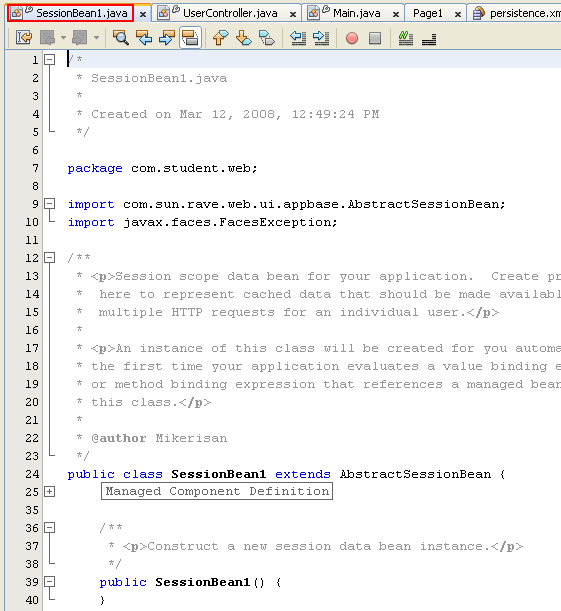
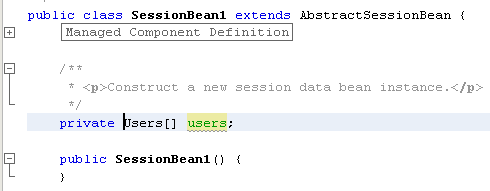
2. Add a property called users to SessionBean1. Type in the following line of code: private Users[] users;

3. Fix imports. Most likely, the line you just entered will be marked as an error. If so, use the source editor's context menu Fix Imports function to fix this error. (Be sure to correct this error before continuing to the next step.) To fix the error, the IDE adds the following import statement: import com.samples.Users;


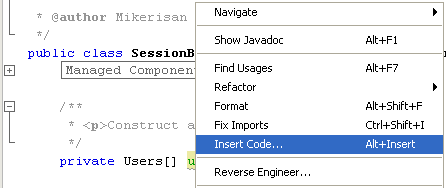
4. Generate get and set methods for the users property. Right click the line of code you typed in and select the action Insert Code. Choose Getter and Setter from the popup menu. Then, select users: Users[ ].
-----------------------------------------------------------------------------------------------------------------------------
-----------------------------------------------------------------------------------------------------------------------------

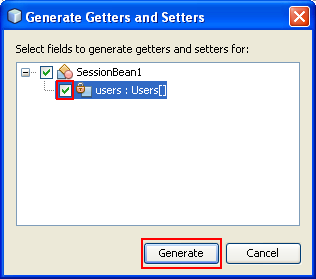
The Insert Code action adds public get and set methods. When finished, SessionBean1 should include the following code.

Creating the Initialization Method
1. Add a method called updateUsers to SessionBean1. This method will be used to initialize the users property. Here's the code for the method:
public void updateUsers(){
UserController usersController = new UserController();
users = usersController.getUsers();
}

2. Use the Fix Imports function to fix the import needed for updateUsers. If there are errors in the code, do a Save All files to clear them.

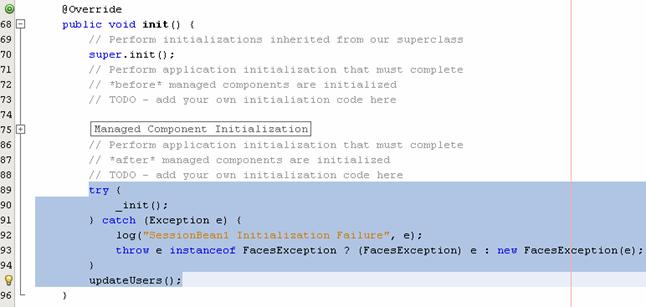
3. Add a call to the updateUsers method in the SessionBean1 init method: updateUsers();. The SessionBean1 init method should look as follows (comment lines not shown):
public void init(){
super.init();
try {
_init();
} catch (Exception e) {
log("SessionBean1 Initialization Failure", e);
throw e instanceof FacesException ? (FacesException) e: new FacesException(e);
}
updateUsers();
}
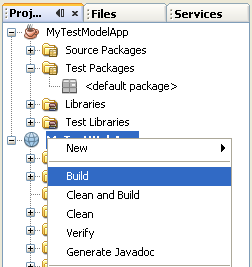
4. Save all the files.

5. Build both the TestModelApp and TestWebApp projects.


Binding the Property to the Table Component
Now you are ready to bind the users property you just added to a Table component.
1. From MyTestWebApp > Web Pages, double click Page1.jsp to open the page in the Design window.

2. Drag a Table component from the Palette and drop it on the page in the Design window. It should as follows:

3. Right click the Table component on the page and click Bind to Data from its context menu.

4. In the Get Data From drop down list, select users (from SessionBean1) as the binding array. (Note that if you do not see the users property displayed in the drop down list, right click in the Design window and click the Refresh option in the context menu. Or simply click the Refresh button in the toolbar. If you still do not see the users property displayed in the drop down list, then close and reopen the TestWebApp project.) Click OK.

5. The Table component display in the Design window should change to the following. If needed, adjust the columns to be displayed.

Deploy and Running the Program
1. Deploy and run the TestWebApp project.

Notice the progress in the Output window.
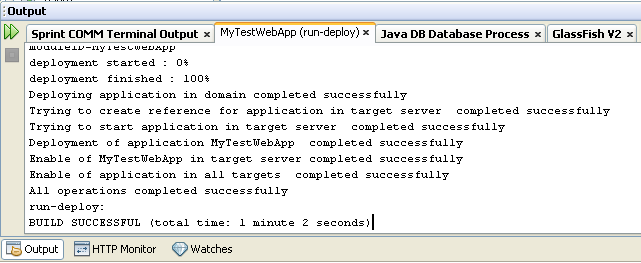
Next, run the web application. Notice the progress in the Output window for the GlassFish web server.

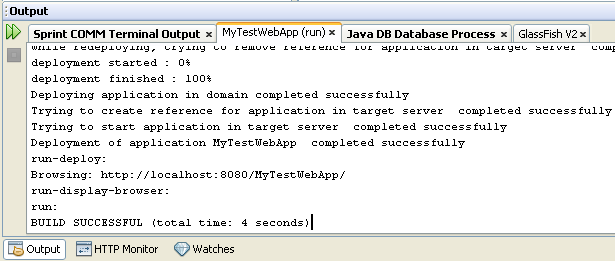
The Table component displays, and, if you created sample data for the database table, that data should be displayed as shown in the following Figure using Internet Explorer.

Doing Some Customization
Next, let do some customization to our table. Select the Table Layout from the context menu.
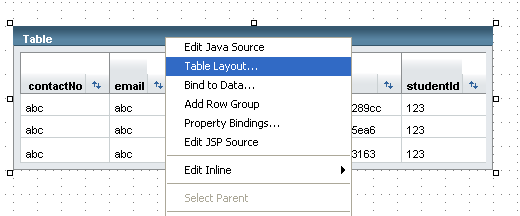
Unselect the photo if you included this column/field in your table during the table creation steps.

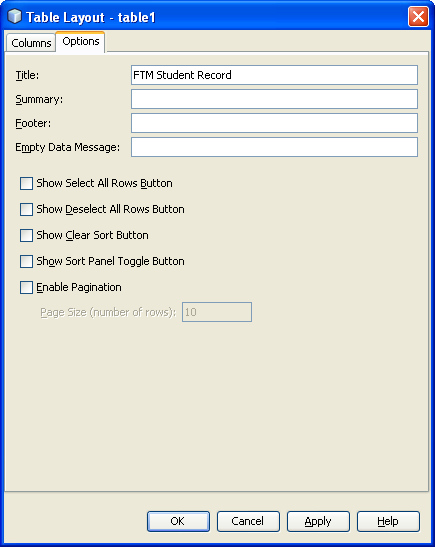
Change the Header Text for all the column as listed in the following table.
From | To |
contactNo | Contact No |
name | Name |
studentId | Student Id |

Click the Options tab and change the table’s title to FTM Student Record. Click OK.
Resize the table if needed by selecting and dragging the column’s border. Re-run the project to see the effect.

We will continue to add more features for this application in the next tutorial.