Using Hibernate
in a Java Swing Application 2
|
|
Creating the Java Swing Application Project
In this exercise you create a simple Java Swing application project called MyDVDStoreAdmin.
Choose File > select New Project (Ctrl-Shift-N).
Select Java Application from the Java category and click Next.
|


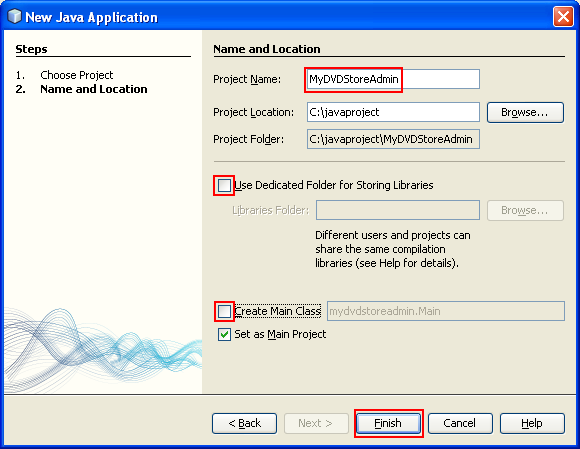
Type MyDVDStoreAdmin for the project name and set the project location if needed.
De-select the Use Dedicated Folder option, if selected. For this tutorial there is little reason to copy project libraries to a dedicated folder because you will not need to share libraries with other users.
De-select Create Main Class. Click Finish.
When you click Finish, the IDE creates the Java application project. The project does not have a main class. You will create a form and then set the form as the main class.
Adding Hibernate Support to the Project
To add support for Hibernate to a J2SE project you need to add the Hibernate library to the project. The Hibernate library is included with the IDE and can be added to any project by right-clicking the 'Libraries' node in the Projects window, selecting 'Add Library' and then selecting the Hibernate library in the Add Library dialog box.
The IDE includes wizards to help you create the Hibernate files you may need in your project. You can use the wizards in the IDE to create a Hibernate configuration file and a utility helper class. If you create the Hibernate configuration file using a wizard the IDE automatically adds the Hibernate libraries to the project.
Creating the Hibernate Configuration File
The Hibernate configuration file (hibernate.cfg.xml) contains information about the database connection, resource mappings, and other connection properties. When you create a Hibernate configuration file using a wizard you specify the database connection by choosing from a list of database connection registered with the IDE. When generating the configuration file the IDE automatically adds the connection details and dialect information based on the selected database connection. The IDE also automatically adds the Hibernate library to the project classpath. After you create the configuration file you can edit the file using the multi-view editor, or edit the XML directly in the XML editor.
Select and right-click the Source Packages node in the Projects window and choose New > Other to open the New File wizard.

Select Hibernate Configuration Wizard from the Hibernate category. Click Next.

Keep the default settings in the Name and Location pane (you want to create the file in the src directory). Click Next.
-----------------------------------------------------------------

Select the sakila connection in the Database Connection drop down list. Click Finish.

When you click Finish the IDE opens hibernate.cfg.xml in the source editor. The IDE creates the configuration file at the root of the context classpath of the application (in this case, in the Files window, ../classes).
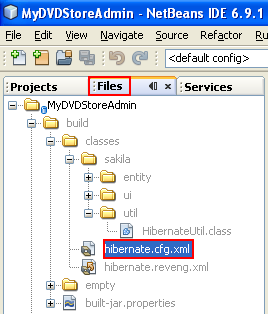
In the Projects window the file is located in the <default package> of the Source Packages. The configuration file contains information about a single database. If you plan to connect to multiple databases, you can create multiple configuration files in the project, one for each database servers, but by default the helper utility class will use the hibernate.cfg.xml file located in the root location.

If you expand the Libraries node in the Projects window you can see that the IDE added the required Hibernate JAR files and the MySQL connector JAR.

< Java Swing and Hibernate 1 | Java and NetBeans Tutorial | Java Swing and Hibernate 3 >