Using Hibernate in a Web Application 7
(With NetBeans & MySQL)
Creating browse.xhtml
You will now create the browse.xhtml page for displaying details of the selected film. You can use the Facelets Template Client wizard to create the page based on the JSF Facelets template template.xhtml that you created.
-
Right-click DVDStore in the Projects window and choose New > Other.

-
Select Facelets Template Client in the JavaServer Faces category. Click Next.

-
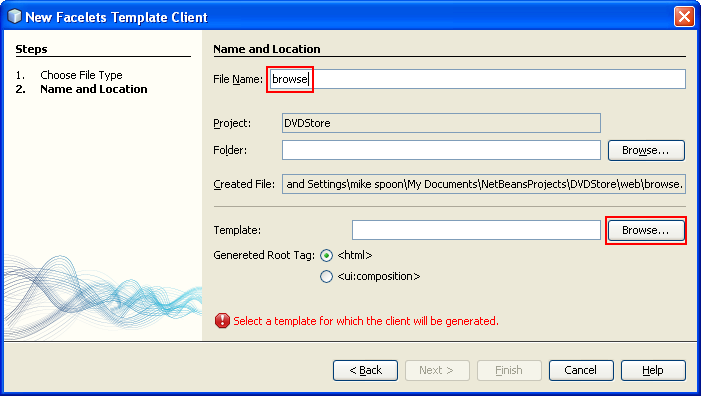
Type browse for the File Name.
-
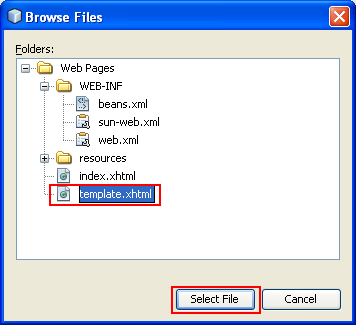
Locate the Template for the page by clicking Browse to open the Browse Files dialog box.
-
Expand the Web Pages folder and select template.xhtml. Click Select File.
-
Select <ui:composition> for the Generated Root Tag. Click Finish.

When you click Finish, the file browse.xhtml opens in the editor with the following code.
<ui:composition xmlns:ui="http://java.sun.com/jsf/facelets"
template="./template.xhtml">
<ui:define name="top">
top
</ui:define>
<ui:define name="body">
body
</ui:define>
</ui:composition>
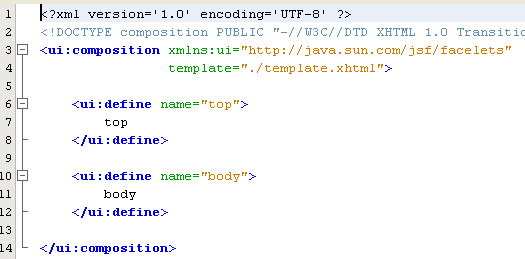
You can see that the new file specifies the template.xhtml file and that the <ui:define> tag has the property name="body"
-
Add the following code (in bold) between the <ui:define> tags to create the form and call the methods in the managed bean FilmController to retrieve the data and populate the form.
<ui:composition xmlns:ui="http://java.sun.com/jsf/facelets"
template="./template.xhtml">
xmlns:h="http://java.sun.com/jsf/html"
xmlns:f="http://java.sun.com/jsf/core">
<ui:define name="top">
top
</ui:define>
<ui:define name="body">
<h:form>
<h:panelGrid columns="2">
<h:outputText value="Title:"/>
<h:outputText value="#{filmController.selected.title}" title="Title"/>
<h:outputText value="Description"/>
<h:outputText value="#{filmController.selected.description}" title="Description"/>
<h:outputText value="Genre"/>
<h:outputText value="#{filmController.category}"/>
<h:outputText value="Cast"/>
<h:outputText value="#{filmController.actors}"/>
<h:outputText value="Film Length"/>
<h:outputText value="#{filmController.selected.length} min" title="Film Length"/>
<h:outputText value="Language"/>
<h:outputText value="#{filmController.language}" title="Film Length"/>
<h:outputText value="Release Year"/>
<h:outputText value="#{filmController.selected.releaseYear}" title="Release Year">
<f:convertDateTime pattern="MM/dd/yyyy" />
</h:outputText>
<h:outputText value="Rental Duration"/>
<h:outputText value="#{filmController.selected.rentalDuration}" title="Rental Duration"/>
<h:outputText value="Rental Rate"/>
<h:outputText value="#{filmController.selected.rentalRate}" title="Rental Rate"/>
<h:outputText value="Replacement Cost"/>
<h:outputText value="#{filmController.selected.replacementCost}" title="Replacement Cost"/>
<h:outputText value="Rating"/>
<h:outputText value="#{filmController.selected.rating}" title="Rating"/>
<h:outputText value="Special Features"/>
<h:outputText value="#{filmController.selected.specialFeatures}" title="Special Features"/>
<h:outputText value="Last Update"/>
<h:outputText value="#{filmController.selected.lastUpdate}" title="Last Update">
<f:convertDateTime pattern="MM/dd/yyyy HH:mm:ss" />
</h:outputText>
</h:panelGrid>
<br/>
<br/>
<h:commandLink action="#{filmController.prepareList}" value="View All List"/>
<br/>
</h:form>
</ui:define>
</ui:composition>
</html>
--------------------------------------------------------------

You can see that browse.xhtml and index.xhtml will use the same page template.
-
Save your changes.
Running the Project
The basics of the application are now complete. You can now run the application to check if everything is working correctly.
-
Click Run Main Project in the main toolbar or right-click the DVDStore application node in the Projects window and choose Run.
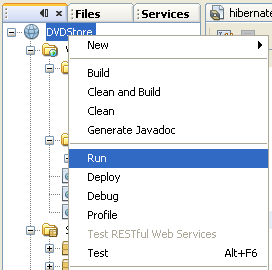
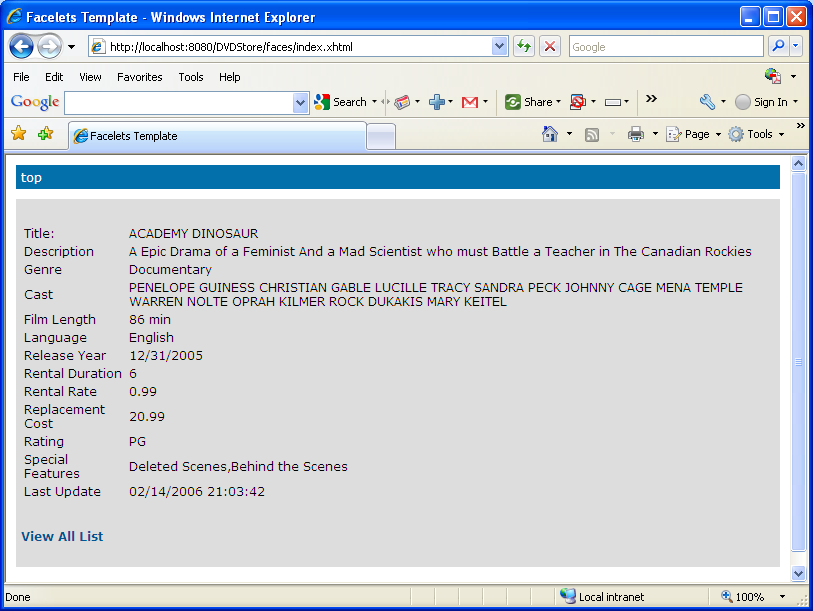
The IDE saves all changed files, builds the application, and deploys the application to the server. The IDE opens a browser window to the URL http://localhost:8080/DVDStore/ that displays the list of films.

-
In your browser, click "View" to load browse.xhtml to view the film details. Notice also the "Next 10" link.
Downloading a Complete Project
You can download the solution to this tutorial as a project at: a zip archive of the finished project or a local copy at: Hibernate with web application zip file.
Java, ORM & Hibernate 6 | Back to Main