Using Hibernate in a Web Application 6
(With NetBeans & MySQL)
Creating the Web Pages
In this exercise you will create two web pages for displaying the data. You will modify the index.xhtml generated by the IDE to add a table that displays the films in the database. You will then create browse.xhtml to display a film's details when you click the "View" link in the table. You will also create a JSF template page that is used by index.xhtml and browse.xhtml.
You will first create the JSF Facelets template template.xhtml that is used in the composition of the index.xhtml and browse.xhtml pages.
-
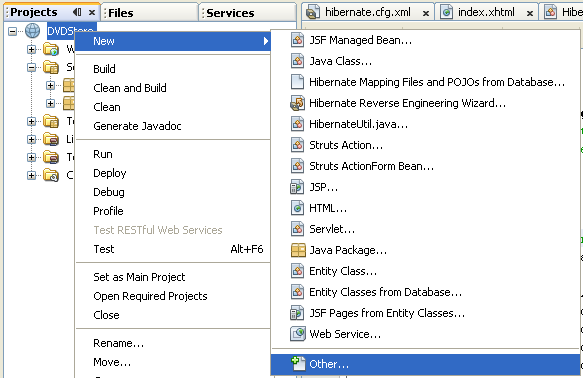
Right-click DVDStore in the Projects window and choose New > Other.
-
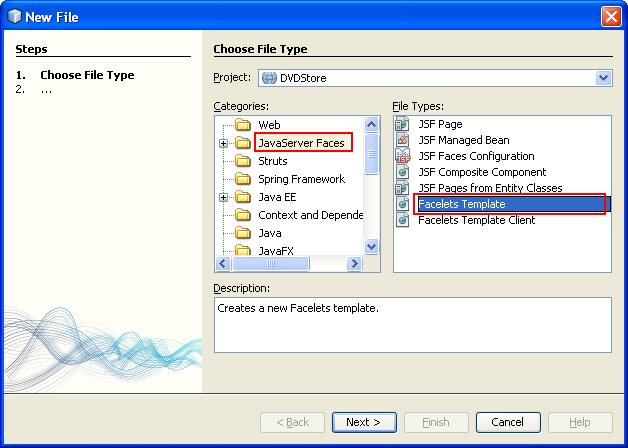
Select Facelets Template in the JavaServer Faces category. Click Next.
-
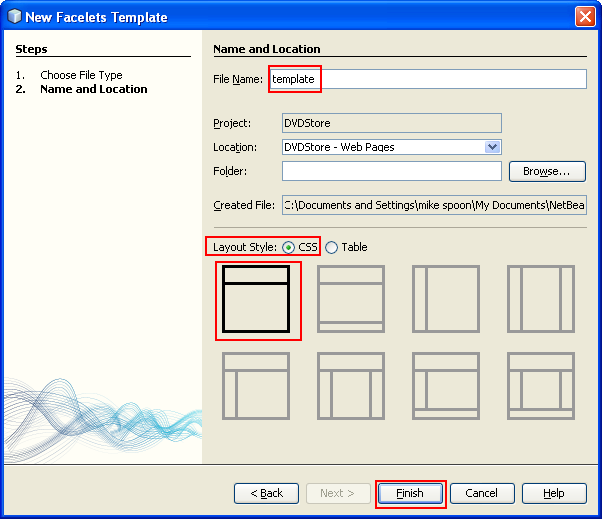
Type template for the File Name and choose the first CSS layout style.
-
Click Finish. When you click Finish, the file template.xhtml opens in the editor. The template contains the following default code.
<h:body>
<div id="top" class="top">
<ui:insert name="top">Top</ui:insert>
</div>
<div id="content" class="center_content">
<ui:insert name="content">Content</ui:insert>
</div>
</h:body>

-
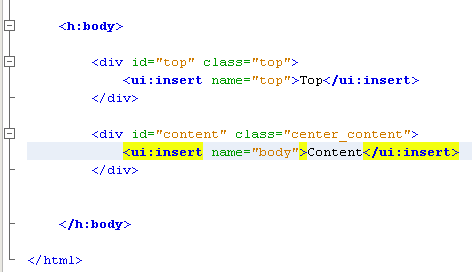
Modify the <ui:insert> element to change the default generated name to "body".
<div id="content" class="center_content">
<ui:insert name="body">Content</ui:insert>
</div>
-
Save your changes.
The content enclosed within the <ui:define name="body"> element in index.xhtml and browse.xhtml will be inserted into the location identified with <ui:insert name="body">Content</ui:insert> in the template.
Modifying index.xhtml
When you created the web application, the IDE automatically generated the page index.xhtml. In this exercise you modify the page to display a list of film titles. The JSF page calls the methods in the JSF Managed Bean FilmController to retrieve the list of films and then displays a table with the film titles and descriptions.
-
Expand the Web Pages folder in the Projects window and open index.xhtml in the editor. The New Project wizard generated the following default index.xhtml page.
<html xmlns="http://www.w3.org/1999/xhtml"
xmlns:h="http://java.sun.com/jsf/html">
<h:head>
<title>Facelet Title</title>
</h:head>
<h:body>
Hello from Facelets
</h:body>
</html>

-
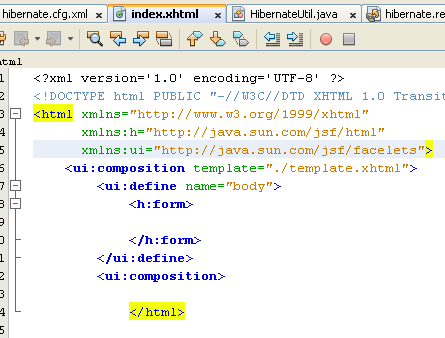
Modify the page to use the JSF <ui:composition> and <ui:define> elements and add a <h:form> element.
<html xmlns="http://www.w3.org/1999/xhtml"
xmlns:h="http://java.sun.com/jsf/html"
xmlns:ui="http://java.sun.com/jsf/facelets">
<ui:composition template="./template.xhtml">
<ui:define name="body">
<h:form>
</h:form>
</ui:define>
<ui:composition>
</html>
------------------------------------------------------------
When you start typing the tags, the IDE adds xmlns:ui="http://java.sun.com/jsf/facelets" tag library declaration.
The <ui:composition> and <ui:define> elements are used in combination with the page template that you will create. The <ui:composition> element references the location of the template that will be used by this page. The <ui:define> element references the position in the template that the enclosed code will occupy. In order to invoke tag library declaration automatic insertion, you need to type part of the element manually instead of copy and paste it.
-
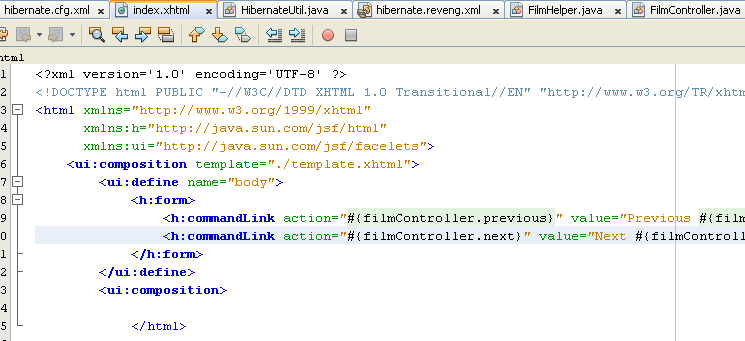
Add the following navigation links that call the previous and next methods in the JSF managed bean.
<ui:define name="body">
<h:form>
<h:commandLink action="#{filmController.previous}" value="Previous #{filmController.pageSize}" rendered="#{filmController.hasPreviousPage}"/>
<h:commandLink action="#{filmController.next}" value="Next #{filmController.pageSize}" rendered="#{filmController.hasNextPage}"/>
</h:form>
</ui:define>
-
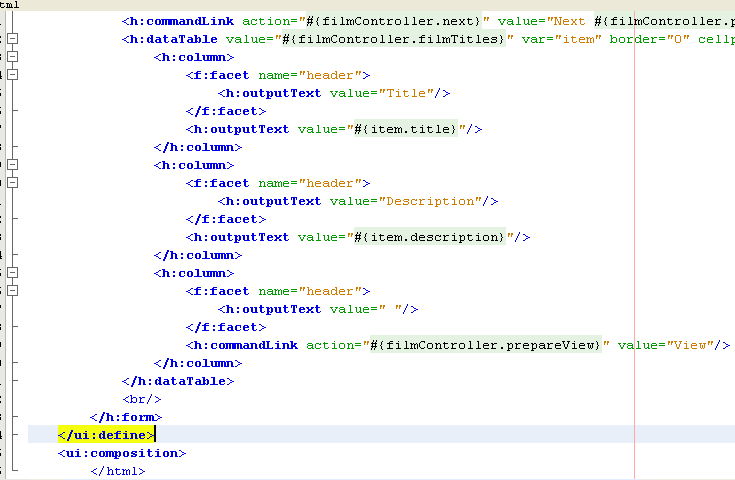
Add the following dataTable element (in bold) to generate the table to display the retrieved items. You may need to type manually, the <f:facet> tag, so that the IDE will add xmlns:f="http://java.sun.com/jsf/core tag library declaration.
<h:form styleClass="jsfcrud_list_form">
<h:commandLink action="#{filmController.previous}" value="Previous #{filmController.pageSize}" rendered="#{filmController.hasPreviousPage}"/>
<h:commandLink action="#{filmController.next}" value="Next #{filmController.pageSize}" rendered="#{filmController.hasNextPage}"/>
<h:dataTable value="#{filmController.filmTitles}" var="item" border="0" cellpadding="2" cellspacing="0" rowClasses="jsfcrud_odd_row,jsfcrud_even_row" rules="all" style="border:solid 1px">
<h:column>
<f:facet name="header">
<h:outputText value="Title"/>
</f:facet>
<h:outputText value="#{item.title}"/>
</h:column>
<h:column>
<f:facet name="header">
<h:outputText value="Description"/>
</f:facet>
<h:outputText value="#{item.description}"/>
</h:column>
<h:column>
<f:facet name="header">
<h:outputText value=" "/>
</f:facet>
<h:commandLink action="#{filmController.prepareView}" value="View"/>
</h:column>
</h:dataTable>
<br/>
</h:form>
-
Save your changes.
The index page will now display a list of film titles in the database. Each row in the table includes a "View" link that invokes the prepareView method in the managed bean. The prepareView method returns "browse" and will open browse.xhtml.
Java, ORM & Hibernate 5 | Back to Main | Java, ORM & Hibernate 7