Introduction to the Struts Web Framework 3
Creating a Success Page
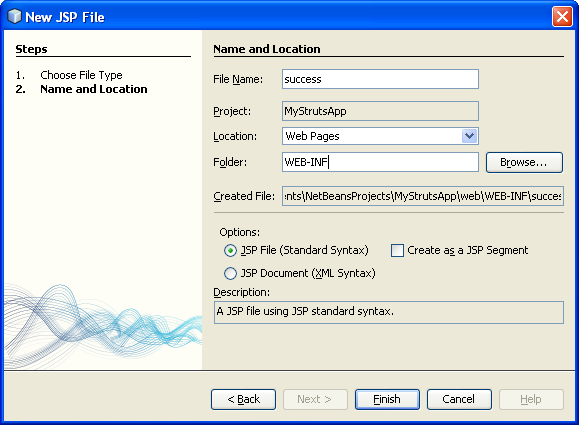
1. Right-click the MyStrutsApp project node, choose New > JSP, and name the new file success.

In the Folder field, click the adjacent Browse button and select WEB-INF from the dialog that displays. Click Select Folder to enter WEB-INF in the Folder field. Any files contained in the WEB-INF folder are not directly accessible to client requests. In order for success.jsp to be properly displayed, it must contain processed data. Click Finish.


In the Source Editor, change the content of the newly created page to the following:
<head>
<meta http-equiv="Content-Type" content="text/html; charset=UTF-8">
<title>Login Success</title>
</head>
<body>
<h1>Congratulations!</h1>
<p>You have successfully logged in.</p>
<p>Your name is: .</p>
<p>Your email address is: .</p>
</body>

2. Add a bean taglib directive to the top of the file:
<%@ taglib uri="http://struts.apache.org/tags-bean" prefix="bean" %>

3. Add the following <bean:write> tags (changes in bold):
<p>Your name is: <bean:write name="LoginForm" property="name" />.</p>
<p>Your email address is: <bean:write name="LoginForm" property="email" />.</p>
---------------------------------------------------
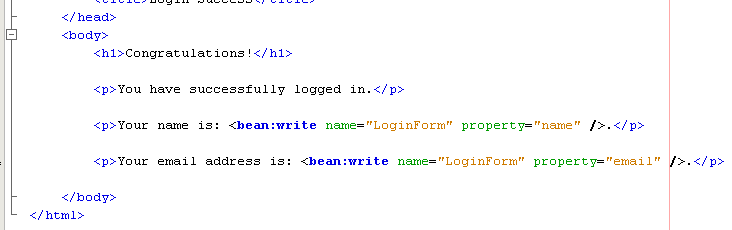
By employing the <bean:write> tags, you make use of the bean taglib to locate the ActionForm bean you are about to create, and display the user data saved for name and email.
Creating an ActionForm Bean
A Struts ActionForm bean is used to persist data between requests. For example, if a user submits a form, the data is temporarily stored in the form bean so that it can either be redisplayed in the form page (if the data is in an invalid format or if login fails) or displayed in a login success page (if data passes validation).
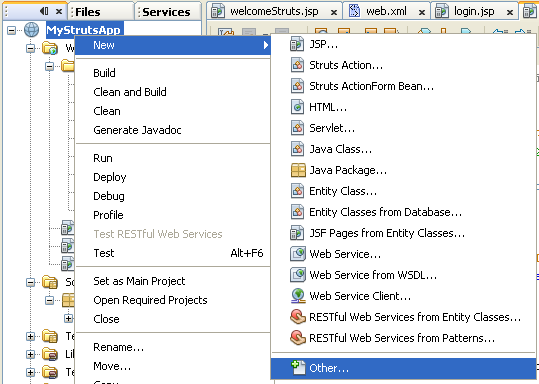
1. Right-click the MyStrutsApp project node and choose New > Other. Under Categories choose Struts, and then under File Types choose Struts ActionForm Bean. Click Next.

2. Type in LoginForm for the Class Name. Then select com.myapp.struts in the Package drop-down list and click Finish.

The IDE creates the ActionForm bean and opens it in the Source Editor. By default, the IDE provides it with a String called name and an int called number. Both fields have accessor methods defined for them. Also, the IDE adds a bean declaration to the struts-config.xml file. If you open the struts-config.xml file in the Source Editor, you can see the following declaration, which was added by the wizard:
<form-beans>
<form-bean name="LoginForm" type="com.myapp.struts.LoginForm" />
</form-beans>

The IDE provides navigation support in the struts-config.xml file. Hold down the Ctrl key and hover your mouse over the ActionForm bean's fully qualified class name. The name becomes a link, enabling you to navigate directly to the class in the Source Editor:

3.
In the
ActionForm
bean in the Source Editor, create fields and accompanying accessor methods that correspond to the
name
and
email
text input fields that you created in
login.jsp.
Because
name
has already been created in the
ActionForm
skeleton, you only need to implement
email.
Add the following declaration beneath
name
(changes in bold) for LoginForm.java:
private String name;
private String email;
To create accessor methods, place your cursor on
email
and press Alt-Insert (or right-click mouse on the email variable > select Insert Code).

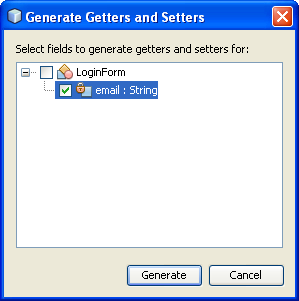
Select Getter and Setter, then in the dialog that displays, select email : String and click Generate. Accessor methods are generated for the email field.

Note: You can delete the declaration and accessor methods for number, as it is not used in this tutorial.
Strut & Web 2 | Back to Main | Strut & Web 4