< Perl and Windows Script Host (WSH) | Java & Friends | This tutorial in single pdf file (~12MB)>
Install, Configure and Running Oinkmaster
What do we have in this session?
-
Installing and Configuring Oinkmaster
-
Running the Oinkmaster GUI
-
Updating Tk Package
-
Configuring Oinkmaster from Oinkmaster GUI
-
Getting the Oinkmaster Code
-
Example for snort 2.8.6.0:
-
Example for Snort 2.8.5.3:
-
Example for Snort 2.8 (This will be deprecated on June 2010):
-
Continue on Configuring Oinkmaster
-
Updating Snort Rules using Oinkmaster
-
Further Reading and Fun Activities
Installing and Configuring Oinkmaster
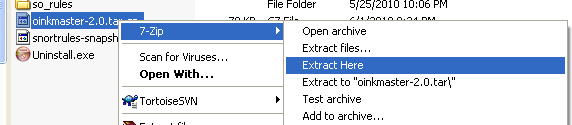
Now, we are ready to install and configure Oinkmaster. Firstly download the latest version at Oinkmaster.

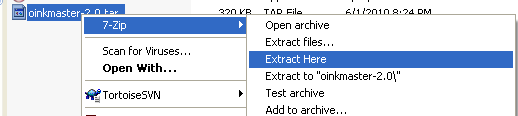
Extract the compressed file. In this case we downloaded and uncompress the file in Snort root folder.
Running the Oinkmaster GUI
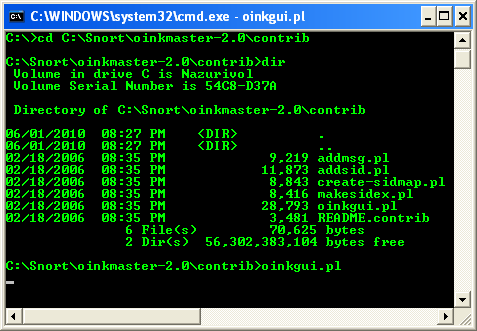
Next, run the Oinkmaster GUI program (oinkgui.pl) from Windows command prompt or double click the file from Windows Explorer. The file should be under contrib sub folder.
C:\>Snort\oinkmaster-2.0\contrib>oinkgui.pl
Can't locate Tk.pm in @INC (@INC contains: C:/Perl/site/lib C:/Perl/lib .) at C:\Snort\oinkmaster-2.0\contrib\oinkgui.pl line 45.
BEGIN failed--compilation aborted at C:\Snort\oinkmaster-2.0\contrib\oinkgui.pl line 45.
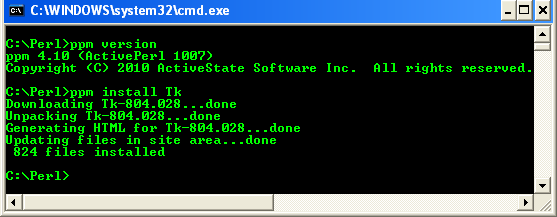
Updating Tk Package
We got some error here. Let update Tk package by issuing the following command at Windows command prompt (also can be done using PPM GUI).
C:\>Perl>ppm install Tk
Configuring Oinkmaster from Oinkmaster GUI
Next, re-run the oinkgui.pl from Windows command prompt or double click the file from Windows Explorer.
C:\>Snort\oinkmaster-2.0\contrib>oinkgui.pl
The following screenshot shows Oinkmaster GUI. Now we are ready to do basic configuration.
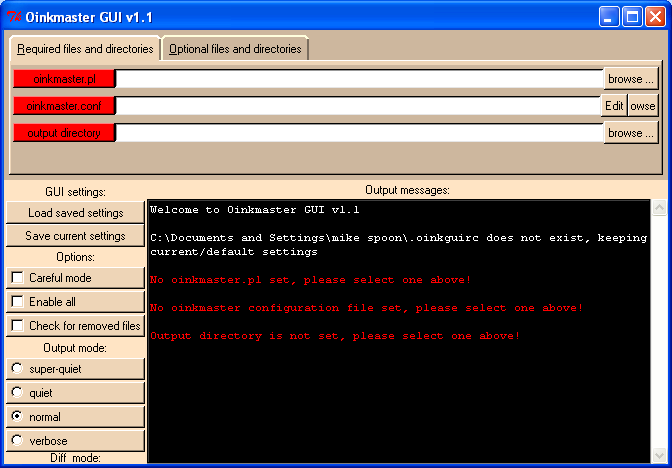
Left-click the 'Required files and directories' tab. There are three dialog boxes that must be configured.
In the 'oinkmaster.pl' dialog box type 'C:/Snort/oinkmaster/oinkmaster.pl' (less the quotes), and the button should turn from 'Red' to 'Green', indicating the path has been set correctly.
In the 'oinkmaster.conf' dialog box type 'C:/Snort/oinkmaster/oinkmaster.conf' (less the quotes), and the button should turn from 'Red' to 'Green', indicating the path has been set correctly.
In the 'output directory' dialog box type 'C:/Snort/rules/' (less the quotes), and the button should turn from 'Red' to 'Green', indicating the path has been set correctly.
You can use the Browse button to browse and select those files.

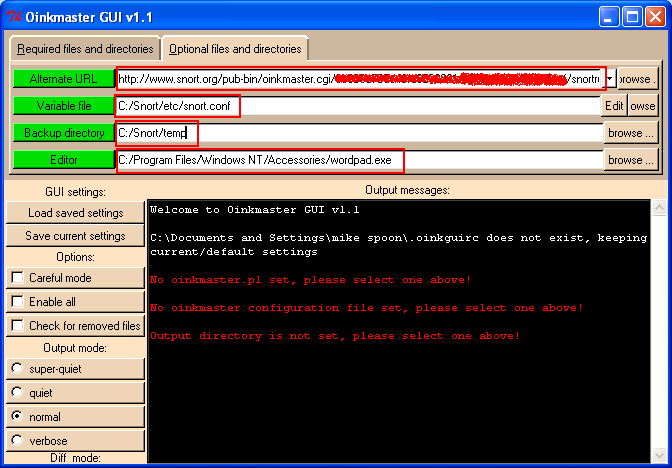
Next, left-click on the 'Optional files and directories' tab. There are four dialog boxes that should be configured. To the right in the 'Alternate URL' dialog box left-click the down radio button, select the 'https://www.snort.org/pub-bin/oinkmaster.cgi/<OINK_CODE>/ snortrules-snapshot-2860.tar.gz
' (less the quotes), and the button should turn from 'Red' to 'Green', indicating the path has been set correctly.
You must insert your specific generated 'OINK_CODE' in the above configuration that was generated from the Snort.org site, and is located at the bottom of your 'Account Settings' page.
Getting the Oinkmaster Code
Register at Snort.org (if you are not registered user yet) and login. Click the Subscriptions and Oinkcodes tab. Click Oinkcodes link, generate and get the code. The following screenshots demonstrates the page on how to get the Oinkmaster code.

Take note that, the CURRENT and 2.8 naming conventions will be deprecated on June 2010 for oinkmaster downloads. So, you will be responsible for updating your oinkmaster.conf file (done through oinkmaster GUI) to reflect your installed version of Snort.
Example for Snort 2.8.6.0:
url = https://www.snort.org/pub-bin/oinkmaster.cgi/<oinkmaster_code_here>/snortrules-snapshot-2860.tar.gz
Example for Snort 2.8.5.3:
url = https://www.snort.org/pub-bin/oinkmaster.cgi/<oinkmaster_code_here>/snortrules-snapshot-2853.tar.gz
Example for Snort 2.8 (This will be deprecated on June 2010):
url = https://www.snort.org/pub-bin/oinkmaster.cgi/<oinkmaster_code_here>/snortrules-snapshot-2.8.tar.gz
Continue on Configuring Oinkmaster
Next, let continue configuring Oinkmaster. In the 'Alternate URL' dialog box scroll to the right and replace the 'OINK_CODE' (less the quotes) with your unique generated oinkcode.
In the 'Variable File' dialog box type 'C:/Snort/etc/snort.conf' (less the quotes), and the button should turn from 'Red' to 'Green', indicating the path has been set correctly.
To the left of the 'Browse' button there is a 'Edit' button that will allow the 'snort.conf' file to be loaded and edited by clicking on the 'Edit' button.
Open a command window, at the command prompt type 'mkdir C:\Snort\temp\' (less the quotes), and tap the 'Enter' key.
At the command prompt type 'exit' (less the quotes), and tap the 'Enter' key to exit the command window.
--------------------------------------------------------

In the 'Backup directory' dialog box type 'C:/Snort/temp/' (less the quotes), and the button should turn from 'Red' to 'Green', indicating the path has been set correctly.
In the 'Editor' dialog box type 'C:\Program Files\Windows NT\Accessories\wordpad.exe' (less the quotes), and the button should turn from 'Red' to 'Green', indicating the path has been set correctly. The path to WordPad may be different, so make SURE to include the correct path. Left-click the 'Save current settings' button, and there should be a 'Successfully saved...' message in the 'Output messages:' screen.

Updating Snort Rules using Oinkmaster
Depending on your installation paths for Snort and Oinkmaster, you should change those paths accordingly. Now it's time to update the Snort rules. Close Oinkmaster GUI and re-open it. Click Update rules! button on the left. Notice the messages on the right pane.
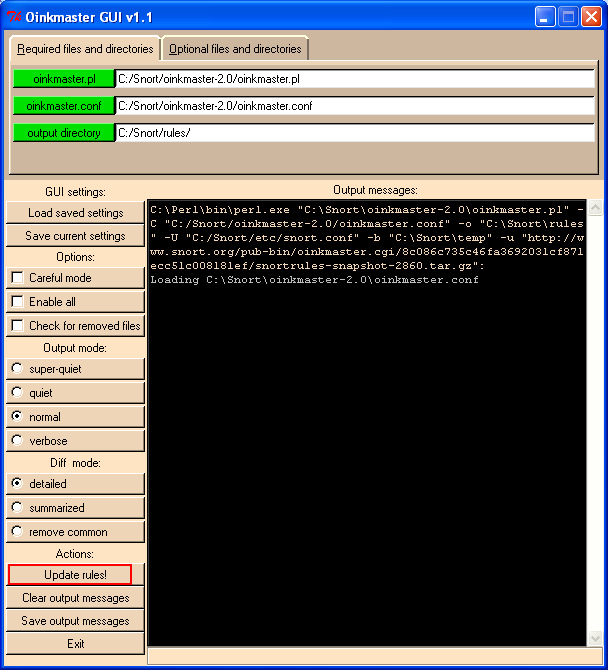

The first time Oinkmaster updates the rules there will be a lot of text displayed to the screen as it's collecting all the data for the next update. If the Snort is running, you may want to stop it and re-run again. If there was a problem with one or more rules Snort will refuse to start. Check the Windows 'Event Viewer' and select 'Application' to see any error that Snort generated on startup. All errors must be resolved in order for Snort to run. After each rule update Snort must be restarted in order for the new rule changes to be in effect.
Further Reading and Fun Activities
Well, to further your investigation and fun, you may want to simulate attacks, viewing and recognizing the patterns and many more fun and funny things, you should try list some of the dataset that can be used to simulate attacks as in the real attacks and Snort can be used to explore and study many things regarding the network security up to the packet level. Another one is for DDoS simulation.
------------------ End --------------------