<Insert, Update, Delete & JPA ver 2 (MySQL) |Main |DBDesigner: Install, Test & Use >
Steps to Move (or Copy) and Re-'setup' NetBeans Java Web App with MySQL Database Project to Another Machine (Localhost) Exercise
Contents:
-
Introduction
-
Pre-requirement on the new PC (notebook in this case)
-
Changing the MySQL root/user to the Original MySQL Database root/user password
-
Setting up the Original MySQL Database
-
Creating Tables and Populating Them with Sample Data
-
Building and Running the Java Web Application with MySQL Database Project
-
Un-deploying the Unnecessary Projects
-
Opening, Building and Running the Java Web Application
-
Clean Building and Re-running the Java Web Application
Introduction
You have successfully build and run the Java Web Application with MySQL database on your local machine. However, later, you need to move or copy, re-build and re-run your same project on another machine. Many of our students complained that they stuck at many stages when trying to complete this task, welcoming with many errors that cannot be resolved automatically by NetBeans. This is not a project deployment, so we would like to show how to complete this task smoothly. The following Figure shows the example of moving (or copying) the NetBeans project from PC on the left to a notebook on the right which we will explore in this Module.
Pre-requirement on the new PC (notebook in this case) for this exercise:
|

The following steps done on the new machine with no domain/non-network (localhost).
Changing the MySQL root/user to the Original MySQL Database root/user password
First of all you need to change or reset your current MySQL password to the password used in the original database machine though it is localhost. Use the MySQL Command Line Client, login using your current password for root. If the original database used other user name (in this case, other than root), you need to create the same user name with same password used in the original MySQL. Keep in mind that the MySQL root password for the new machine will be changed when the following steps completed.

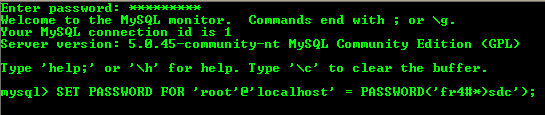
The following is MySQL statement to change the root password to the new one. In this case, the original project is using root user, if the original project using other user, change accordingly.
SET PASSWORD FOR 'user'@'localhost' = PASSWORD('newpwd');
In this case use the following fictitious original MySQL database root password so that 'the project' will not complain that the password is invalid.
SET PASSWORD FOR 'root'@'localhost' = PASSWORD('fr4#*)sdc');
You can change the password back to the original using the same MySQL statement later if you want.
Setting up the Original MySQL Database
If you already have database with the same name, you may need to drop it first using the DROP DATABASE database_name;
DROP DATABASE student;
Next, setup your MySQL database for this project using the following MySQL script. Firstly create a database named student. This is the original database name.
CREATE DATABASE student;

Creating Tables and Populating Them with Sample Data
Next, create a table named Users by executing the following MySQL script. This can also be done in NetBeans.
CREATE TABLE Users(
studentId INTEGER(10) NOT NULL AUTO_INCREMENT,
name VARCHAR(50),
email VARCHAR(30),
contactNo VARCHAR(30),
PRIMARY KEY (studentId)
)type=innodb;
Next, execute the following ALTER command to change the start of the auto increment for the studentId (primary key). In this case we start the studentId from 4000 and then database system will increment by 1 for every new record.
ALTER TABLE Users AUTO_INCREMENT = 4000;
Next, insert some sample data. You may want to change the data while retaining the MySQL script syntax.
INSERT INTO Users(name, email,contactNo,photo)
VALUES ('Stephanie Lame', 'stephanie@aol.com', '808-2341567');
INSERT INTO Users(name, email,contactNo,photo)
VALUES ('Meg Ryan', 'ryan@gmail.com', '808-7681569');
INSERT INTO Users(name, email,contactNo,photo)
VALUES ('Jodie Foster', 'foster@yahoo.com', '808-2348710');
INSERT INTO Users(name, email,contactNo,photo)
VALUES ('Amar Maarof', 'amar@gmail.com', '604-7364518');
INSERT INTO Users(name, email,contactNo,photo)
VALUES ('Alif Nijar', 'nijar@aol.com', '705-4452345');
As usual, the database objects can be edited later by using MySQL Administrator Tools or MySQL Command Line Client. Now, if there is no error during the previous steps, you are ready to open the project, try building and running it using the Netbeans.
Building and Running the Java Web Application with MySQL Database Project
Undeploying the Unnecessary Projects
First of all, it is a good idea and practice to clean up your unused web server applications (Glassfish or Tomcat) from the previously deployed projects (if any). To complete this task, do the following steps.
Make sure the web server already started and the sign is shown by the grey Start Server sub menu under the Tools menu.

Open the Services window. For the glassfish web server, expand the Server nodes > Glassfish V2 > Applications > Web Applications. Any deployed application will be listed here. For example, TheWebApp has been deployed in the Glassfish web server shown in the following Figure.

To undeploy this application, Services window > expand Servers node > select your web server (in this case we use GlassFish) > select the Applications node > right-click mouse > select Undeploy context menu.
|

The application will be removed from the GlassFish Web server node. It is a good practice to undeploy other unused web applications if any by repeating the same steps to undeploy other un-used web applications.
Opening, Building and Running the Java Web Application
Next, you are ready to open the project. There are two project folder in this exercise. Firstly open the model, TheModelApp and then the web application, TheWebApp. Make sure there are no errors. Normally there are unresolved errors that can be resolved by following the instruction of the NetBeans IDE or you need to wait for a while.
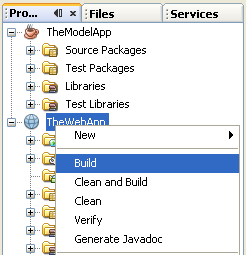
After the project opened successfully, you can start the building process. Build the TheModelApp first and then TheWebApp.

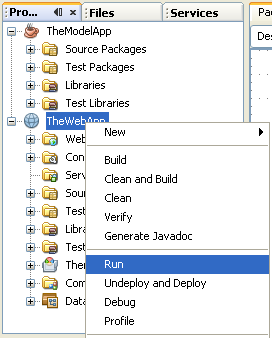
If there are no error(s), then run both projects.
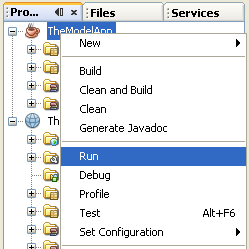
Make sure there are no error(s) that can be seen in the Output window for both the application and the web server.

--------------------------------------------------------------
--------------------------------------------------------------

Clean Building and Re-running the Java Web Application
If the browser displayed error for the first run, you may need to clean and rebuild the project. To complete this task, do the following steps.


Then, re-run the TheWebApp only.

Hopefully, this small tutorial will provide a solution on how to move NetBeans project with a database from one pc to another, smoothly that is very useful when you have downloaded and trying to re-build and re-run Java application with database project using NetBeans.