<PHP Eclipse PDT and Wordpress |Main |Install MySQL on Windows 2003 Server >
Install, Test and Use MySQL 5.0.45 on Windows Xp Pro SP2
Contents:
-
Install MySQL 5.0.45
-
Verify MySQL Installation
-
Testing MySQL
-
Executing MySQL Statements
The machine specifications used in this task are:
-
Intel Pentium Core 2 Duo, 2.2 GHz.
-
Windows XP Pro SP2 + periodical patches + periodical updates.
-
2 GB DDR2 RAM.
-
160 GB SATA HDD.
-
17” SyncMaster 713N monitor.
-
MySQL 5.0.45
Install MySQL 5.0.45
1. First of all download MySQL for Windows at MySQL.com. Double click the Windows installer msi file.
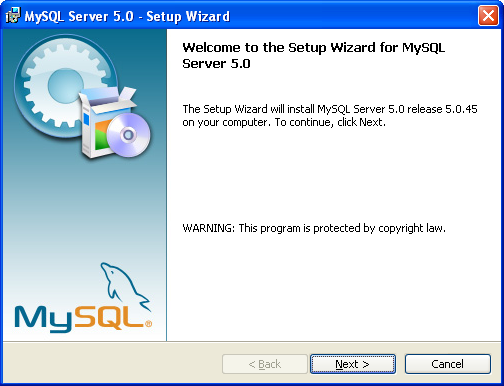
2. The setup wizard welcome page launched. Click Next.
|


3. Select Complete and click Next.

4. The setup wizard is ready to install MySQL. Click Install.

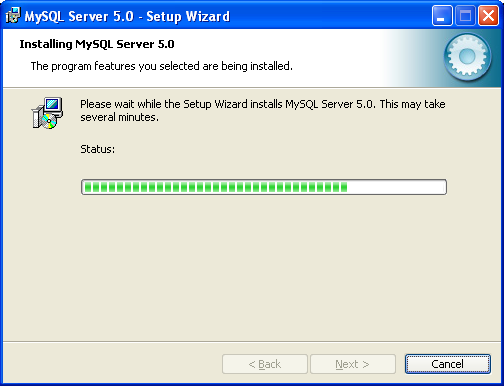
5. Wait and relax.
6. Some advertisements. Click Next.
7. Click Next.

8. The setup wizard completed. Select the Configure the MySQL Server now and click Finish. We will do some basic configuration.

9. Click Next.

10.In this case we will do the standard configuration. Click Next. Please refer to MySQL Detailed Configuration steps for detailed configuration if you need it.

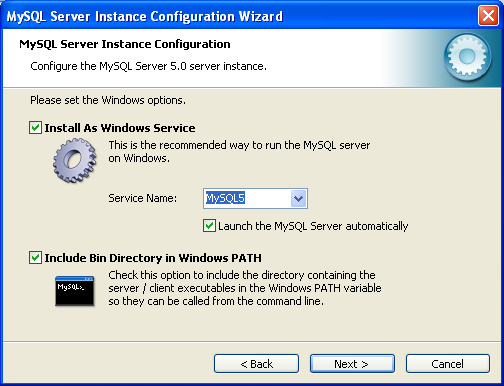
11.So, we will install MySQL as a service with MySQL5 as a service name and include the Bin directory in the Windows path (environment variables) then we can run MySQL command from any relative path later. Select as shown below and click Next.
12.Fill in the password for MySQL root user. This is a super user for MySQL and there are many more users with different privileges that you can create later. The password can be changed later. Click Next.

13.The MySQL instance configuration wizard will start its work. You can change any settings done previously by hitting the Back button, else just click Execute.

14.The configuration process being executed. Any error will be prompted during this stage and for error(s) you will see a red cross instead of blue tick shown below. The service seems started successfully means that we can start using MySQL database. Click Finish.

Verify MySQL Installation
1. So, what have been done by the MySQL setup wizard? In the Start > All Programs you can see the following MySQL menu.

2. In the Windows Services snap-in, you can see MYSQL5 service is running.

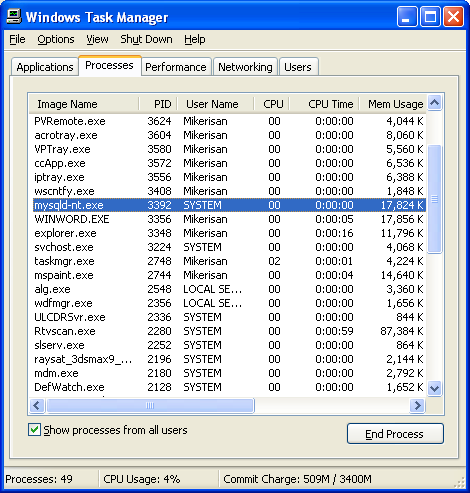
3. In Windows Task Manager you can see MySQL5 process is running.
4. In Windows’s System Variable path setting you can see MySQL Bin path has been set.

5. Next we are going to test and play around with MySQL to see its functionalities. Before continuing further, it is important to understand the components found in MySQL's root directory:
§ The bin subdirectory contains the scripts for executing utilities and setting up the environment.
§ The data subdirectory contains all database instances, including their data.
§ The Docs subdirectory contains the MySQL Reference Manual.
§ The share subdirectory contains localization files, including character sets and language packages.
§ The my.ini file is the configuration file that was generated by the Configuration wizard, and contains information such as the port being listened on, path to installation directory, path to database root, and default character set.

6. The database created will be stored in the data folder. In the following Figure we can see default databases that have been created: mysql and test.

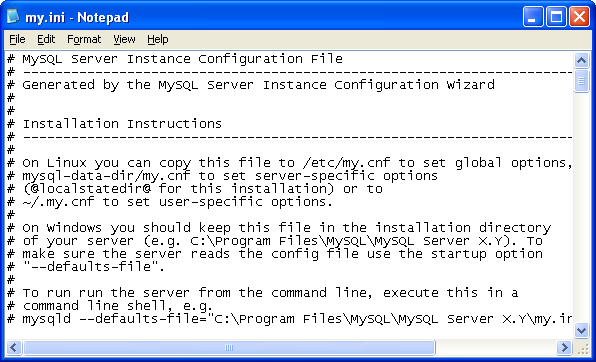
7. MySQL server instance configuration file is my.ini under MySQL root directory.

8. The following is the ini file opened using Wordpad text editor.
|
Testing MySQL
1. Let run the MySQL Command Line Client tool.

2. Key-in the root password that has been set during the setup process done previously.

3. Now we are ready to execute MySQL commands and statements. Firstly, go to help.

4. Next, try the status command, displaying MySQL current status.

Executing MySQL Statements
1. Let play around with MySQL database. The following are Tables with some sample data that we will create and manipulate. These tables created in the myhotel database. (PK is a Primary Key)
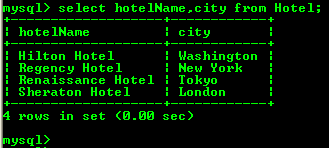
Table name: Hotel | ||
hotelNo (Primary key) | hotelName | city |
H111 | Hilton Hotel | Washington |
S111 | Sheraton Hotel | London |
R123 | Regency Hotel | New York |
R456 | Renaissance Hotel | Tokyo |
Table name: Room | |||
roomNo (PK) | hotelNo (PK) | roomType | price (USD) |
1 | H111 | S | 72.00 |
2 | S111 | D | 99.99 |
3 | R123 | P | 80.50 |
4 | R456 | S | 72.00 |
Table name: Guest | ||
guestNo (PK) | guestName | guestAddress |
G111 | Jodie Foster | Washington |
G112 | Meg Ryan | New York |
G321 | Michael J. Fox | Chicago |
G900 | Katmasu | Chiba |
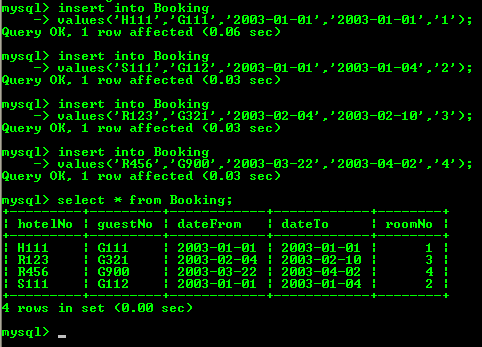
Table name: Booking | ||||
hotelNo (PK) | guestNo (PK) | dateFrom (PK) | dateTo | roomNo |
H111 | G111 | 2003-01-01 | 2003-01-02 | 1 |
S111 | G112 | 2003-01-01 | 2003-01-04 | 2 |
R123 | G321 | 2003-02-04 | 2003-02-10 | 3 |
R456 | G900 | 2003-03-22 | 2003-04-02 | 4 |
2. First of all create a database named myhotel. MySQL is not case sensitive, so the uppercase and lowercase is similar. Try executes the following SQL statements.
mysql> show databases;

mysql> create database myhotel;
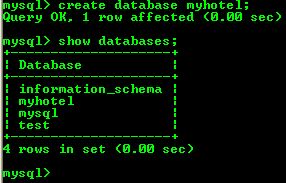
3. In order to use myhotel database, we need to change to that database using the use command.
mysql> use myhotel;
![]()
4. Next, while in myhotel database, create a table named Hotel.
mysql> create table Hotel(
-> hotelNo char(7),
-> hotelName varchar(20),
-> city char(20) not null,
-> primary key (hotelNo)
-> )
-> type=innodb;
mysql>
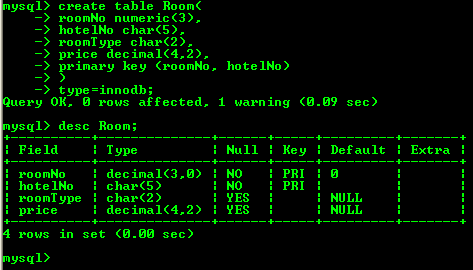
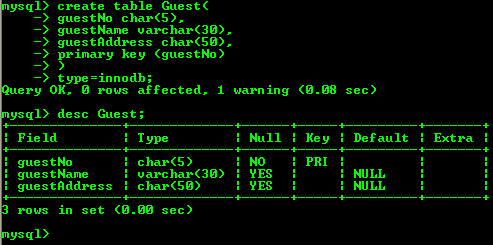
5. Use desc (describe) command to check the table property.
mysql> desc Hotel;

6. Use the up and/or down arrow of your keyboard to repeat the previously used commands or MySQL statements. Create another table named Room, Guest and Booking.
mysql> create table Room(
-> roomNo numeric(3),
-> hotelNo char(5),
-> roomType char(2),
-> price decimal(4,2),
-> primary key (roomNo, hotelNo)
-> )
-> type=innodb;
mysql> create table Guest(
-> guestNo char(5),
-> guestName varchar(30),
-> guestAddress char(50),
-> primary key (guestNo)
-> )
-> type=innodb;
------------------------------------------------------------------------------------------------------------------
mysql> create table Booking(hotelNo char(5), guestNo char(5), dateFrom date,
-> dateTo date, roomNo decimal, primary key(hotelNo,guestNo,dateFrom))
-> type=innodb;

mysql> show tables;

7. Next, let insert some data into our tables.
mysql> insert into Hotel
-> values('H111','Hilton Hotel','Washington');
mysql> insert into Hotel
-> values('S111','Sheraton Hotel','London');
mysql> insert into Hotel
-> values('R123','Regency Hotel','New York');
mysql> insert into Hotel
-> values('R456','Renaissance Hotel','Tokyo');
8. Verify our data insertion using the Select command.
mysql> select * from Hotel;

mysql> insert into Room values('1','H111','S','72.00');
mysql> insert into Room values('2','S111','D','99.99');
mysql> insert into Room values('3','R123','P','80.50');
mysql> insert into Room values('4','R456','S','72.00');
mysql> select * from Room;

mysql> insert into Guest values('G111','Jodie Foster','Washington');
mysql> insert into Guest values('G112','Meg Ryan','New York');
mysql> insert into Guest values('G321','Michael J. Fox','Chicago');
mysql> insert into Guest values('G900','Katmasu','Chiba');
mysql> select * from Guest;

mysql> insert into Booking
-> values('H111','G111','2003-01-01','2003-01-01','1');
mysql> insert into Booking
-> values('S111','G112','2003-01-01','2003-01-04','2');
mysql> insert into Booking
-> values('R123','G321','2003-02-04','2003-02-10','3');
mysql> insert into Booking
-> values('R456','G900','2003-03-22','2003-04-02','4');
mysql> select * from Booking;
9. Create another table in the same database.
mysql> CREATE TABLE tab1 (cola INTEGER,colb CHAR(10));

mysql> insert into tab1 values('1000','mike');
mysql> insert into tab1 values('900','John');
mysql> insert into tab1 values('435','Sarah');
mysql> select * from tab1;

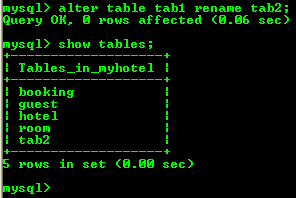
10.Renaming a table using Alter command.
mysql> alter table tab1 rename tab2;
mysql> show tables;
11.Update table’s data using Update command.
mysql> UPDATE tab2 SET cola=cola+(0.05*cola);
mysql> select * from tab2;

12.Playing with Select command, querying data.
mysql> select hotelName,city from Hotel;
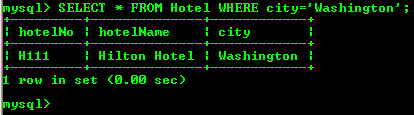
mysql> SELECT * FROM Hotel WHERE city='Washington';
mysql> SELECT guestName,guestAddress FROM Guest WHERE guestAddress='Washington' ORDER BY guestName;

13.Deleting a record (row).
mysql> DELETE FROM tab2 WHERE cola=200;
mysql> DELETE FROM tab2 WHERE cola=945;
mysql> select * from tab2;

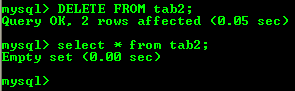
14.Deleting all data from tab2 table.
mysql> DELETE FROM tab2;
mysql> select * from tab2;
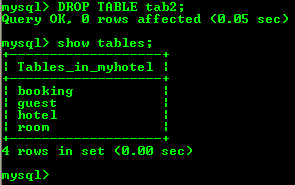
15.Deleting a table named tab2.
mysql> DROP TABLE tab2;
mysql> show tables;
16.Creating a new database named mynexthotel using Create command.
mysql> CREATE DATABASE mynexthotel;
mysql> show databases;
17.Deleting the database using a Drop command.
mysql> DROP DATABASE mynexthotel;
mysql> show databases;

Well, that all for this moment. At this stage you should be quite familiar to the basic on creating and manipulating database and other related objects using MySQL. We create a database, in a database there will be table(s), in table(s) there will be data. Tables consist of columns (fields or attributes) and rows (records or tuples). The intersection of column and row called a cell, a smallest ‘unit’ to store data in a database. More MySQL statements and database manipulation practice can be found in:MySQL database manipulation exercise 1 andMySQL database manipulation exercise 2.