Using Hibernate
in a Java Swing Application 9
|
|
Creating POJOs and Mapping Files Individually
Note: This exercise is optional and describes how to create the POJO and mapping file that you created with the Hibernate Mapping Files and POJOs from Database wizard. Because a POJO is a simple Java class you can use the New Java Class wizard to create the class and then edit the class in the source editor to add the necessary fields and getters and setters. After you create the POJO you then use a wizard to create a Hibernate mapping file to map the class to the table and add mapping information to hibernate.cfg.xml. When you create a mapping file from scratch you need to map the fields to the columns in the XML editor.
Right-click the Source Packages node in the Projects window > right-click mouse > choose New > Java Class to open the New Java Class wizard.
|

In the wizard, type MyActor for the class name and type sakila.entity for the package. Click Finish.

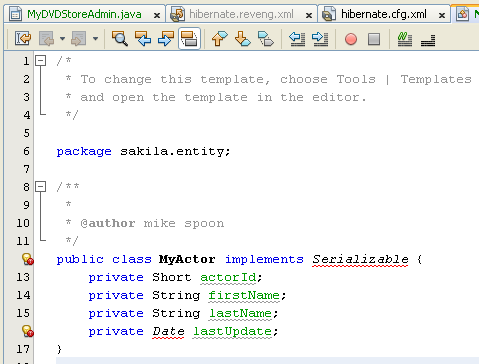
Make the following changes to the class to implement the Serializable interface and add fields for the table columns.
public class MyActor implements Serializable {
private Short actorId;
private String firstName;
private String lastName;
private Date lastUpdate;
}
The following is the screenshot for the code.
Generate the getters and setters for the fields by placing the insertion cursor in the source editor, pressing Alt-Insert (or right-click mouse > choose Insert Code context menu) > select Getter and Setter.


In the Generate Getters and Setters dialog box, select all the fields and click Generate.

In the Generate Getters and Setters dialog box, you can use the Up arrow on the keyboard to move the selected item to the MyActor node and then press the Space bar to select all fields in MyActor.
Fix your imports and save your changes. Right click mouse anywhere in the editor > select Fix Imports context menu.


After you create the POJO for the table you will want to create the Hibernate Mapping File for MyActor.java.
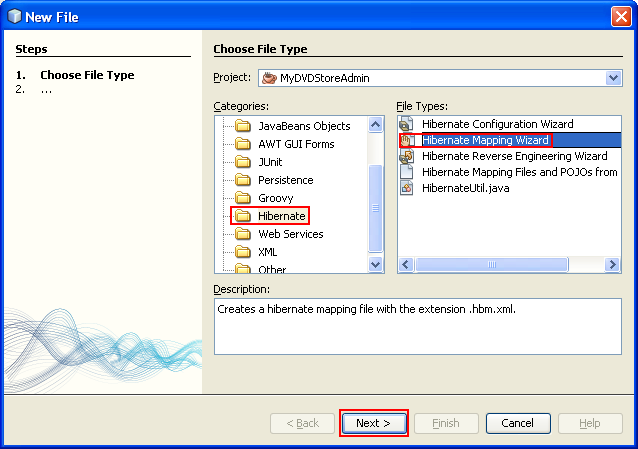
Right-click the Source Packages node in the Projects window and choose New > Other to open the New File wizard.

Select Hibernate Mapping Wizard in the Hibernate category. Click Next.
---------------------------------------------------------
Type MyActor.hbm for the File Name and check that the Folder is src/sakila/entity. Click Next.

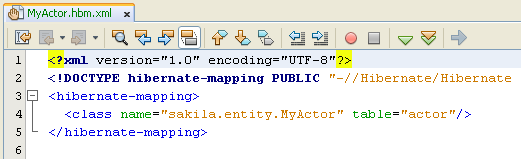
Type sakila.entity.MyActor for the Class to Map and select 'actor' from the Database Table drop down list. Click Finish.

When you click Finish the MyActor.hbm.xml Hibernate mapping file opens in the source editor.
The IDE also automatically adds an entry for the mapping resource to hibernate.cfg.xml. You can view the entry details by expanding the Mappings node in the Design view of hibernate.cfg.xml file.

or in the XML view. The mapping entry in the XML view will look like the following:
...
...
<mapping resource="sakila/entity/MyActor.hbm.xml"/>
</session-factory>
</hibernate-configuration>
The following screenshot shows the complete XML file content.

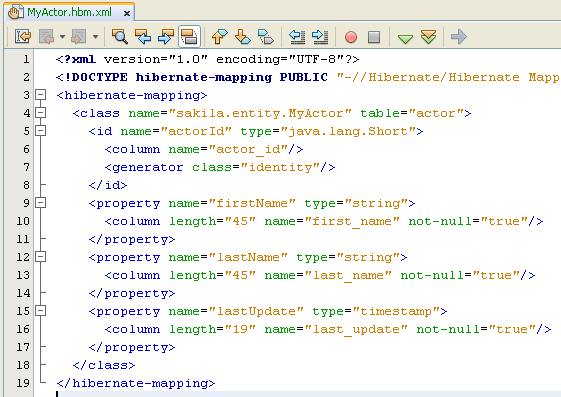
Map the fields in MyActor.java to the columns in the Actor table by making the following changes to MyActor.hbm.xml.
<hibernate-mapping>
<class name="sakila.entity.MyActor" table="actor">
<id name="actorId" type="java.lang.Short">
<column name="actor_id"/>
<generator class="identity"/>
</id>
<property name="firstName" type="string">
<column length="45" name="first_name" not-null="true"/>
</property>
<property name="lastName" type="string">
<column length="45" name="last_name" not-null="true"/>
</property>
<property name="lastUpdate" type="timestamp">
<column length="19" name="last_update" not-null="true"/>
</property>
</class>
</hibernate-mapping>
The following screenshot shows MyActor.hbm.xml file content.
You can use code completion in the editor to complete the values when modifying the mapping file.
Note: By default, the generated class element has a closing tag. Because you need to add property elements between the opening and closing class element tags, you need to make the following changes. After making the changes you can then use code completion between the class tags.
<hibernate-mapping>
<class name="sakila.entity.MyActor" table="actor">
</class>
</hibernate-mapping>
The following screenshot shows the code completion in action.

Click the Validate XML button in the toolbar and save your changes.

The following screenshot shows the XML validation sample output.

Creating individual POJOs and Hibernate mapping files might be a convenient way to further customizing your application.
< Java Swing and Hibernate 8 | Java and NetBeans Tutorial | Java Swing and Hibernate 1 >