Using Hibernate
in a Java Swing Application 4
|
|
Generating Hibernate Mapping Files and Java Classes
In this tutorial you use a plain old Java object (POJO), Actor.java, to represent the data in the table ACTOR in the database. The class specifies the fields for the columns in the tables and uses simple setters and getters to retrieve and write the data. To map Actor.java to the ACTOR table you can use a Hibernate mapping file or use annotations in the class. You can use the Reverse Engineering wizard and the Hibernate Mapping Files and POJOs from a Database wizard to create multiple POJOs and mapping files based on database tables that you select. Alternatively, you can use wizards in the IDE to help you create individual POJOs and mapping files from scratch. If you are using NetBeans IDE 6.5, you do not need to create the hibernate.reveng file with the Reverse Engineering wizard. You create the reverse engineering file and specify the database tables in the Hibernate Mapping Files and POJOs from a Database wizard. When you want to create files for multiple tables you will most likely want to use the wizards. In this tutorial you only need to create one POJO and one mapping file so it is fairly easy to create the files individually. You can see the steps for creating the POJOs and mapping files individually at the end of this tutorial.
Creating the Reverse Engineering File
The reverse engineering file (hibernate.reveng.xml) is an XML file that can be used to modify the default settings used when generating Hibernate files from the metadata of the database specified in hibernate.cfg.xml. The wizard generates the file with basic default settings. You can modify the file to explicitly specify the database schema that is used, to filter out tables that should not be used and to specify how JDBC types are mapped to Hibernate types.
Select and right-click the Source Packages node > select New > select Other to open the New File wizard. |
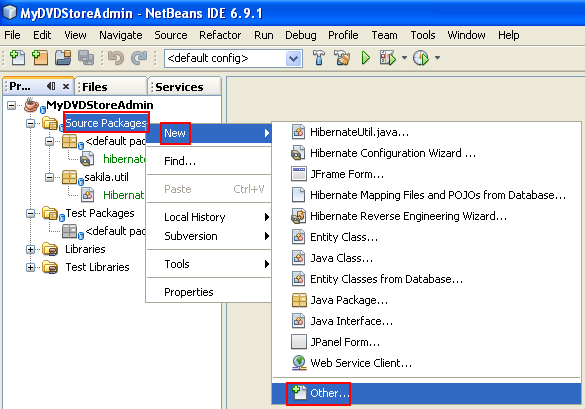
Select Hibernate from the Categories list and Hibernate Reverse Engineering Wizard from the File Types list. Click Next.

Type hibernate.reveng for the file name.
Keep the default src as the Location. Click Next.

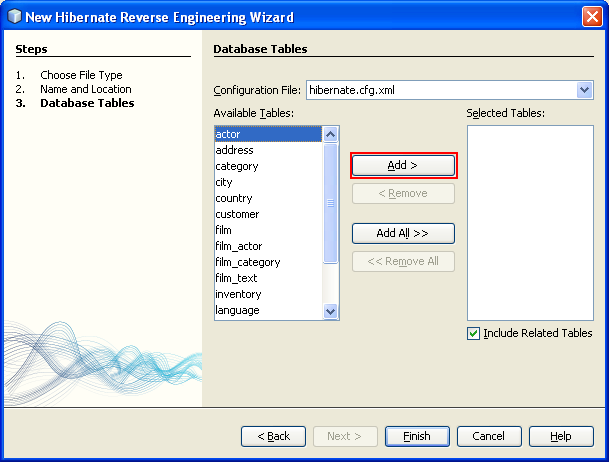
Select actor in the Available Tables pane and click Add button. Click Finish.

The wizard generates a hibernate.reveng.xml reverse engineering file. You can close the reverse engineering file because you will not need to edit the file.
Creating Hibernate Mapping Files and POJOs From a Database
The Hibernate Mapping Files and POJOs from a Database wizard generates files based on tables in a database. When you use the wizard, the IDE generates POJOs and mapping files for you based on the database tables specified in hibernate.reveng.xml and then adds the mapping entries to hibernate.cfg.xml. When you use the wizard you can choose the files that you want the IDE to generate (only the POJOs, for example) and select code generation options (generate code that uses EJB 3 annotations, for example).
Select and right-click the Source Packages node in the Projects window and choose New > Other to open the New File wizard.
-------------------------------------------------------
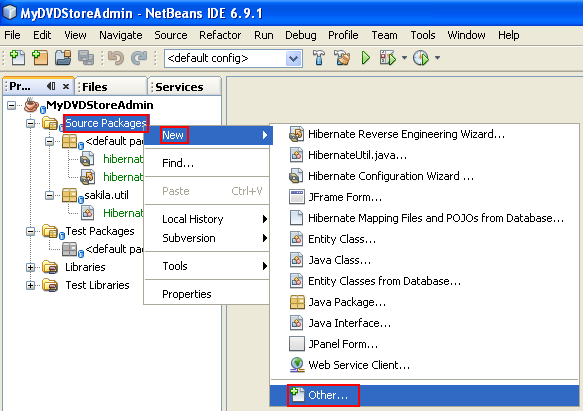
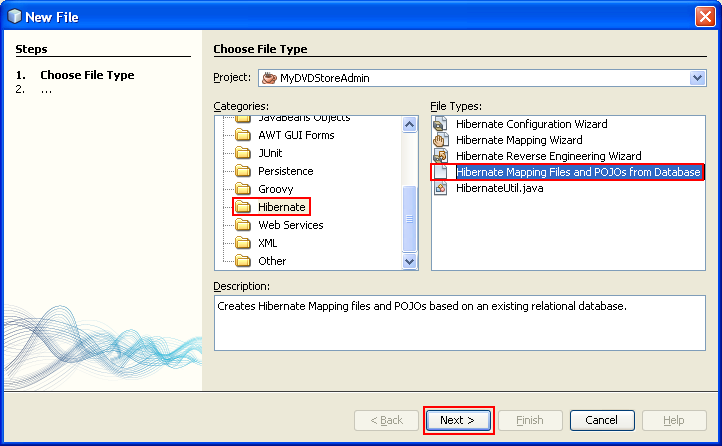
Select Hibernate Mapping Files and POJOs from a Database in the Hibernate category. Click Next.
Select hibernate.cfg.xml from the Hibernate Configuration File dropdown list, if not selected.
Select hibernate.reveng.xml from the Hibernate Reverse Engineering File dropdown list, if not selected.
Ensure that the Domain Code and Hibernate XML Mappings options are selected.
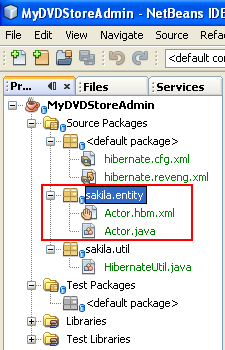
Type sakila.entity for the Package name. Click Finish.

When you click Finish, the IDE generates the POJO Actor.java with all the required fields and generates a Hibernate mapping file (Actor.hbm.xml) and adds the mapping entry to hibernate.cfg.xml.
Now that you have the POJO and necessary Hibernate-related files that make you ready to create a simple Java GUI front end for the application. You will also create and then add an HQL query that queries the database to retrieve the data. In this process we also use the HQL editor to build and test the query.
< Java Swing and Hibernate 3 | Java and NetBeans Tutorial | Java Swing and Hibernate 5 >