Hands-on Tutorial: Hello World with Ant 1
(On Windows system)
|
Note: The original source can be found at: Hello World With Ant tutorial. This is a refined version with detail steps.
This document provides a step by step tutorial for starting java programming with Ant. It does not contain deeper knowledge about Java or Ant. This tutorial has the goal to let you see, how to do the easiest steps in Ant.
What do we have in this session?
Preparing the project
We want to separate the source from the generated files, so our java source files will be in src folder. All generated files should be under build, and then splitted into several subdirectories for the individual steps: classes for our compiled files and jar for our own JAR-file. Make sure that ant and other java related command lines such as javac are working on your Windows machine. Firstly, create a project folder for example:
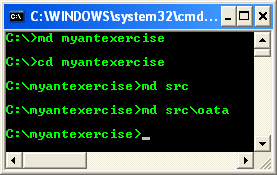
We have to create only the src directory. (Because I am working on Windows, here is the win-syntax - translate to your shell):
|


The following simple Java class just prints a fixed message out to STDOUT (standard output), so just write this code into src\oata\HelloWorld.java. Create HelloWorld.java file and write the following code and save the file. The java source file can be opened in any text editor.

package oata;
public class HelloWorld {
public static void main(String[ ] args) {
System.out.println("Hello World");
}
}
Now just try to compile and run that. Firstly create classes sub directory under build directory to store the generated .class file.
C:\>myantexercise>md build\classes

C:\>myantexercise>javac -sourcepath src -d build\classes src\oata\HelloWorld.java

C:\>myantexercise>java -cp build\classes oata.HelloWorld
----------------------------------------------------------
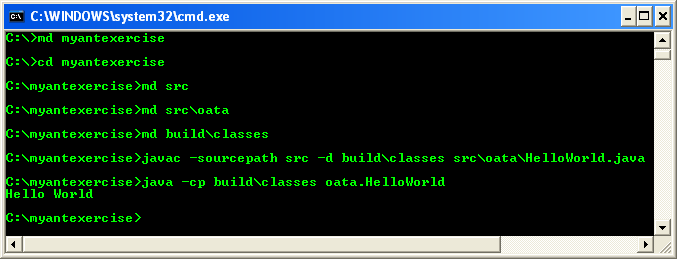
Which will result in:
Hello World
Creating a jar-file is not very difficult. But creating a startable or runnable jar-file needs more steps:
Create a manifest-file containing the start class, creating the target directory and archiving the files.
C:\>myantexercise>echo Main-Class: oata.HelloWorld>myManifest

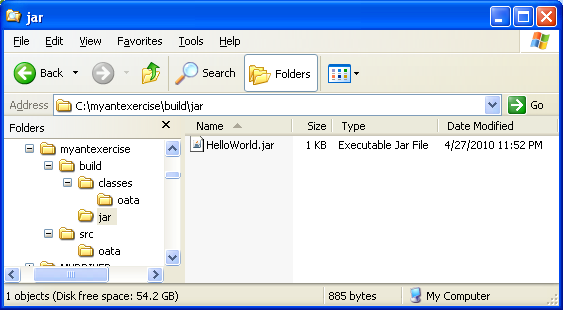
C:\>myantexercise>md build\jar

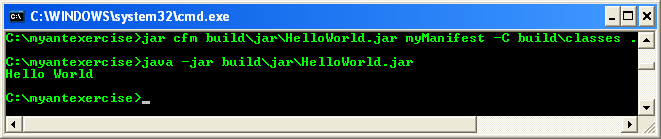
C:\>myantexercise>jar cfm build\jar\HelloWorld.jar myManifest -C build\classes .

C:\>myantexercise>java -jar build\jar\HelloWorld.jar
Note: Do not have blanks around the >-sign in the echo Main-Class instruction because it would falsify it!